Saturday, November 18, 2006

Apologies for Newsletter Images

I'm sorry that the newsletter images did not show for most of you, I'm going to have to find a different image host. I would like to share the images from yesterday's newsletter for those who did not see them. November 17, 2006 Newsletter

Martha Treadway: Creative Team Member
Go to the newsletter to read her profile

Martha's Tutorials


Friday, November 17, 2006

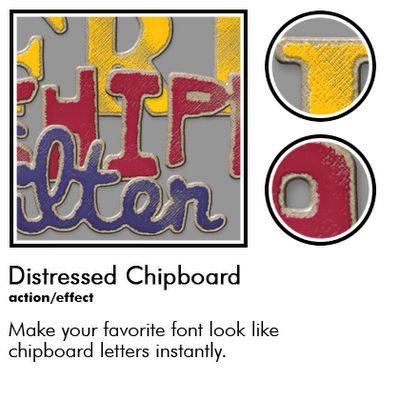
Make Your Own Chipboard Words with this Free PS/ PSE Action

update at bottom of post
Digital Scrapbooking Tutorial for Creating Your Own Elements
by Julie Ann Shahin,
founder/editor
In order to complete this tutorial, you'll need this free download courtesy of Atomic Cupcake. This link takes you to their site so you'll need to click on the return arrow on your browser to come back to the blog. Atomic Cupcake Chipboard Action
This works for both Photoshop and Photoshop Elements.
1. Download the chipboard action. Scan it with your Norton Antivirus software as you should with all downloads. Right-click on it the zipped folder and select "Extract All..." Install the action according to the directions accompanying it.

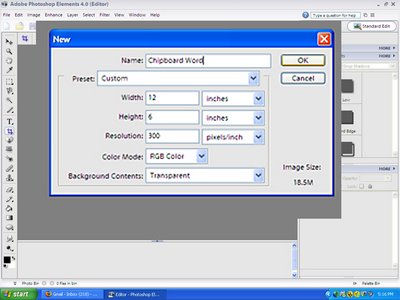
2. In Photoshop Elements, create a New Document. I want my letters to be fairly large, and this action works better with larger letters. My document for my chipboard word will be 12" x 6" 300 dpi, transparent background.


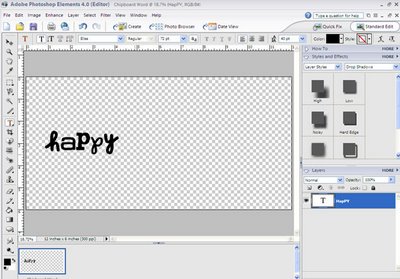
3. I type my word (happy) with the font "elise" at size 72.


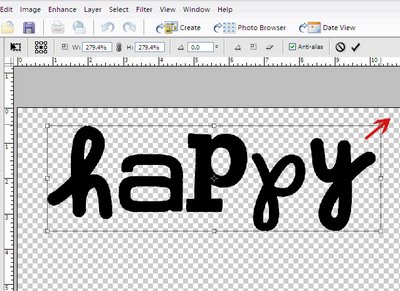
4. Next I use the move tool. Holding down the shift key, drag the corner of the text box to size that is your personal preference.


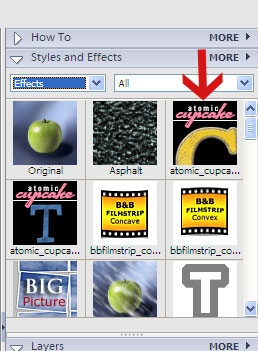
5. In your Styles and Effects palette, Select Effects, All to see the Atomic Cupcake action icon. With your text layer selected, double-click on the icon. Allow the program to run the action automatically, it might take several minutes depending on the length of your word.


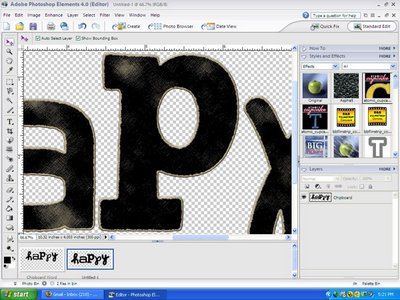
6. The action will create a new document which has your new chipboard word in it. There will be a "dancing ants" type line around your letters. Click ctrl-d to deselect the word.


7. You may zoom in up close to see the distressed chipboard up close.


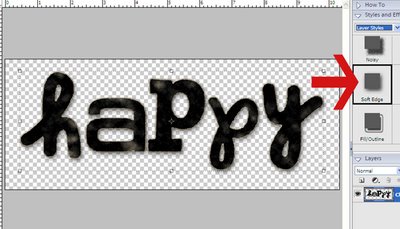
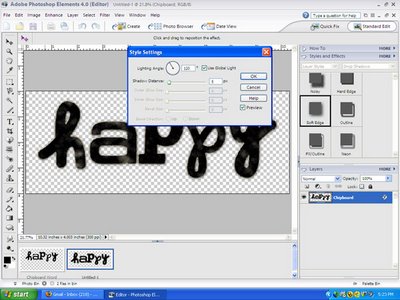
8. You may add a drop shadow if you wish. I use a soft edge shadow this time.


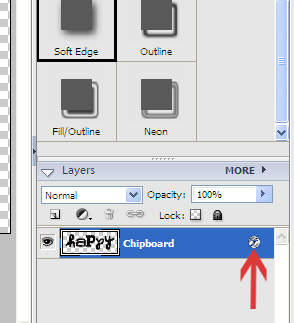
7. To adjust the shadow, double-click on the f icon in the layer.


8. I adjust my shadow distance between 1 - 5 for it to be realistic.


9. Congrats! You've created your chipboard word.


Additional Resources:


Create Digital Die Cuts for Scrapbooking at Simple Scrapbooks

Create a Tag - 2peas Tutorial

Scalloped Edges - 2peas Tutorial

Curved Corners and Other Shapes - MS DIP/DIS - 2peas Tutorial


Create Your Own Transparency Elements - 2peas Tutorial

Element Creation Tutorials at Digital Scrapbook Place

Make a Flower in Photoshop Elements - Digital Scrapbook Place


If you liked this post, sign up for our newsletter.


Keywords: Adobe Photoshop, Beginner, Create Your Own Elements, Creative Team Member, Custom, Photoshop Elements PSE, PS7, Resources


Update: Check out Katie Pertiet's Digital Video Tutorial on how to add sewing to your layouts without using a sewing machine!

Thursday, November 16, 2006

EDS Comments Policy

If you are a fan of this blog, please consider leaving us a comment when you see something you like. We get hundreds of visitors, yet my team only knows if we are giving you what you want and like if you tell us. We'd like to give you more of what you really like about this blog.

I would like to set up a policy for leaving comments.

1. We Love It When You Share Your Thoughts
Your comments are just as important as our tutorials. If you've tried a technique and it works or didn't work for you, it adds to everyone's knowledge. Everyone is welcome to leave a comment here whether you are a paper scrapper, or any level of digital scrapper, or thinking of getting into scrapping!

2. Spam Is Not Allowed and Will Be Deleted

3. Relevant Links in Comments is Encouraged
If you have a related link that adds to one of the posts on this blog, feel free to share. This adds to the group knowledge and is welcome.


If you like our blog, please subscribe to the newsletter.

Easy Epoxy Stickers You'll Want to Create Over and Over Again: Digital Tutorial

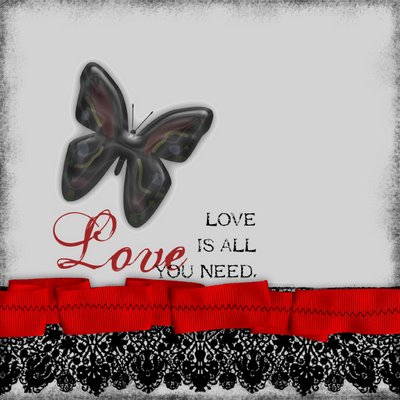
Custom Epoxy Stickers: Digital Scrapbooking Element Tutorial
by Julie Ann Shahin,
Founder and Editor
Click on image to enlarge

Supplies used:
Photoshop Elements 5.0
Rhonna Farrer Designing with Digital Cabaret kit word art
Jan Crowley Little Black Dress kit Inked edge
Amy Martin Stitched Folded Ribbon
Dawn Stocsill aka hunibuni Angelic Funk kit black lace

Photoshop Elements 5.0 tutorial:

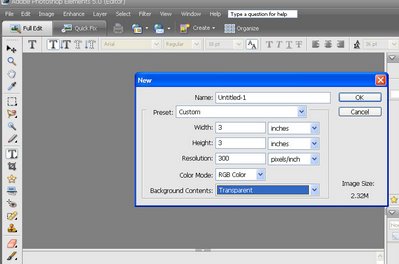
1. Start a new document. I want my sticker to be no bigger than 3"x3" so I will make my document this size.


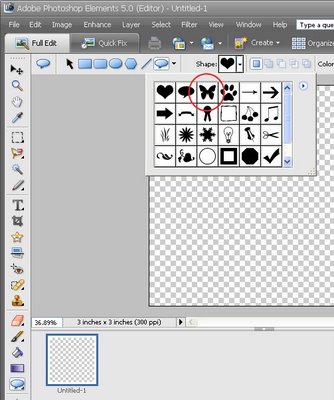
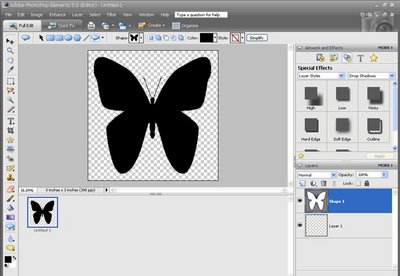
2. Selecting the shapes tool, I click on the drop-down menu, and select the butterfly shape.


3. With the shape selected, I click in the upper right corner of the document, hold the mouse key down, and drag the shape across and down, eyeballing the size that I want.


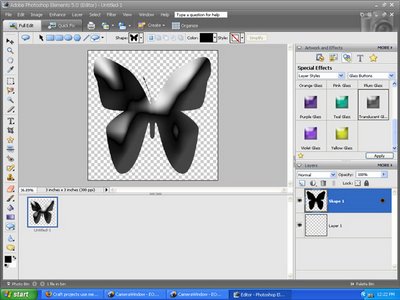
4. I want to make a copy of this layer so I make sure the layer is selected and then click ctrl-j. Now I want to work with this new layer so I make sure the new layer is selected. Next I go to the palette on the right side, and choose the Special Effects menu. I select "Layer Styles" and "Glass buttons" from the drop-down menus. I double-click on the translucent glass effect.


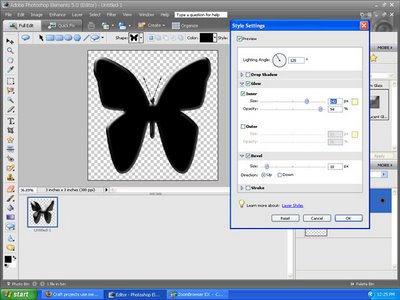
5. I want to adjust the effect. If you go to that layer in the layer palette, you will see an icon on the right side. If you hover over the icon, it says "Indicates layer styles" - double-click that icon to get a dialogue box. I adjust according to taste. Next I create a copy of the layer by clicking ctrl-j.


(Click on the image to see it larger).

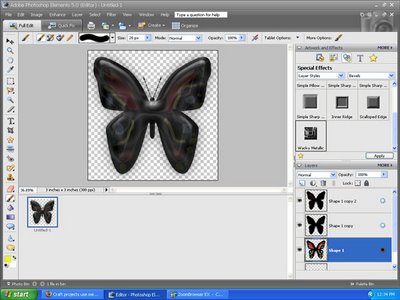
6. On the new layer, I want to add a bevel, so I go to "layer styles" and select "bevels". This time I double-click on Wacky Metallic. Now I adjust the opacity of the different layers according to taste.


7. My next step is to add my personal artistic touch. Using the brush tool, I add strokes of color to the original layer (shape 1)


8. When I am finished, I flatten the image by going to the layer menu --> Flatten image. This makes the whole area around the butterfly gray. I used the magic eraser tool to take away that background leaving a transparent background (the checks mean the background is transparent.) Now you are ready to use your epoxy sticker! See my finished product above in the top photo!


Sign up for our weekly newsletter at the bottom of the blog!

Wednesday, November 15, 2006

Talent Search! Ends November 28th

TALENT SEARCH
EveryDay Digital's Talent Search! Please help us with our search for new members.

The Everyday Digital Scrapbooking Idea Blog's mission is to bring new ideas for scrapbooking with your computer via tutorials every weekday. This mission is accomplished through step-by-step instructions, visual examples of layouts, and links for related information for all ages. This blog is a multi-designer blog devoted to digital technology for use in scrapbooking. Its purpose is to inspire creativity by sharing links and resources.

We are looking to add several team members. If you are a Digital artist or infuse your projects with a digital touch, please consider applying or pass the word to those you know have such talent.

Team member Requirements:
-create two-three projects per month as assigned with full credit and world-wide exposure of your talent
(our blog gets visitors from a dozen countries with over 11,000 hits to our site)

Your benefit:
-Add credit to your resume
-Team Experience


If you are interested, send a link to your best gallery, and a statement of your commitment to thedigitalproject@gmail.com
Deadline: November 28, 2006
Announcement of team: December 5, 2006

Now You Can Create Your Own Striped Ribbons with This Easy Digital Scrapbooking Tutorial

Digital scrapbook element creation tutorial
for Photoshop Elements 5.0
by Julie Ann Shahin, founder and editor
Custom ribbon
Click on image to enlarge

How do you create realistic looking embellishments for scrapbooking?

Digital guru Renee Pearson states in her book "Digital Designs for Scrapbooking" that the good news is that you don't have to decide between paper or digital scrapbooking. "How you use the tools at your disposal is up to you."

So here is a way to create ribbon{digitally} that looks like it has real texture.

Supplies used for the card shown above:
Photoshop Elements 5.0
Fun stamp, safety pin and torn cardboard by Tiff Brady
Inked edge, stitches, and flower by Jan Crowley, Little Black Dress kit
Tiny tag by Misty Cato, Eternal Romance kit
Free to be stamped words and Blossom by Jen Wilson
Ribbon by me, Julie Ann Shahin
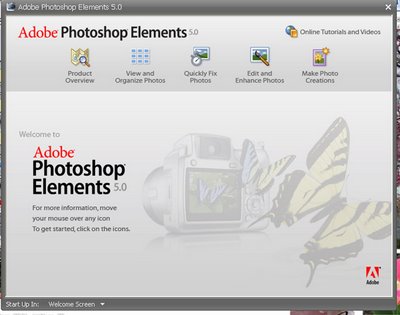


1. Open PSE 5.0 and click on "edit and enhance photos"
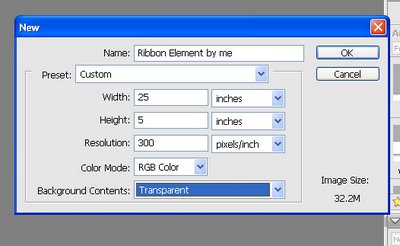

2. Click ctrl-N to create a new document. I wanted to make my document 25 inches by 5 inches because I often like to have my ribbon span over a two-page layout. In the example above, hoewever, I only end up using a seven-inch segment of my ribbon for the 5"x7" card.
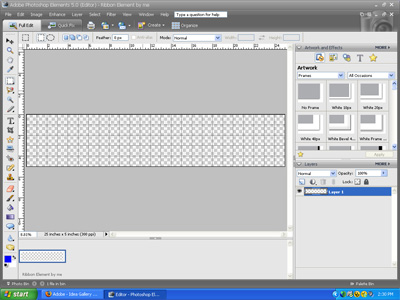


3. Go to View and turn on the Rulers and the Grid. I select the color that I want the background of my ribbon to be by double-clicking on the foreground color in the tool box. I take the rectagular marquee tool and use it to create a rectangle that is 2.5" x 25". This is going to be my ribbon.


4. I use the paint bucket tool to fill my selection area. Press ctrl-d to deselect the area. Double-click on your foreground color in the toolbox again to choose a second color to be in your ribbon.


5. I made a 1/4" x 25" rectangle on my blue ribbon to add a stripe. Use the paint bucket tool to fill the selection with pink. Press ctrl-D to de-select.


6. Repeat step five, this time making a slightly taller rectangular box for a second stripe. (I made a .5" stripe below the pink stripe, leaving blue in between).


7. Select a color for the second stripe as you did in Steps 3 and 4. I wanted to use yellow for the stripe that will be below the pink stripe. Repeat Step 5 for a white stripe.


8. I want to turn off the guides now so I go to View and uncheck "Grids". Before I add texture, I make a copy of this layer by clicking ctrl-j

To give your ribbon some realism, make sure the layer copy is selected, go to Filter --> Texture --> Texturizer


9. In the dialog box that comes up, I changed the Scaling slider and Relief slider according to personal preference. Click ok to return to your document.


10. Next, I make a copy of that layer by clicking ctrl-j. I add a different texture to this new layer by going to the Special Effects menu on the right. It is the third symbol under Artwork. Choose Layer Styles, and in the second drop-down menu I chose Patterns. Double click on "Satin Sheets".


11. Next I change the opacity of this newest layer to about 12% allowing the first texture to show through. You can change the opacity to whatever looks good to you.


12. Your ribbon is ready to be used for your project. Flatten the layers, then drag it right onto your scrapbook page. You can see my finished project above in the first photograph.

Keywords: Adobe Photoshop, Advanced, Creative Team Member, Custom, Photoshop Elements PSE, PS7, Create Your Own Elements


Fill out your e-mail address
to receive our newsletter!


Subscribe Unsubscribe
Hosting by YMLP.com


Subscribe:
Daily Notifications

Enter your Email

Tuesday, November 14, 2006

Beginner Tutorial for Creating Digital Paper and Elements

Basic Digital Paper and Element Creation Tutorial for Beginners by Angela Spangler, Creative Team Member

I created one patterned paper and one element for this tutorial.

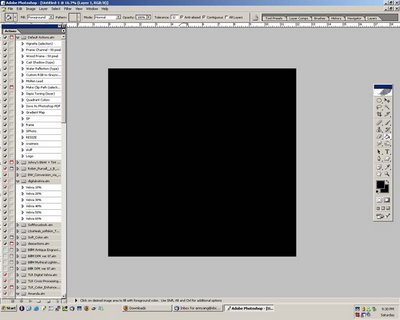
Papers are pretty easy. I started out with a 12x12 inch canvas that I
colored black with the paintbrush tool.


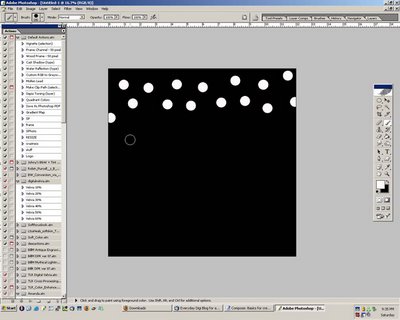
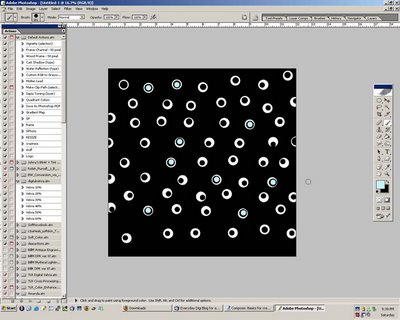
To make a simple pattern, I used my hard round brush to make circles on
the paper. You can make them uniform or scattered. This is where your
imagination and creativity come into play. Just have fun!


Now, add other shapes or brushes to your paper. I used smaller sized
brushes and different colors.


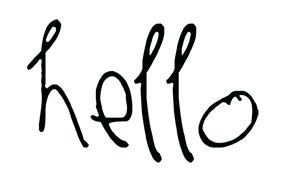
Brushes are really fun and easy to create in Photoshop. I made a simple
text brush, but you can make just about anything into a brush. Just make
sure that your subject isn't bigger than 2500 pixels on either side.
That's the maximum size of a brush, and it won't like it if you try to
make something bigger into a brush.

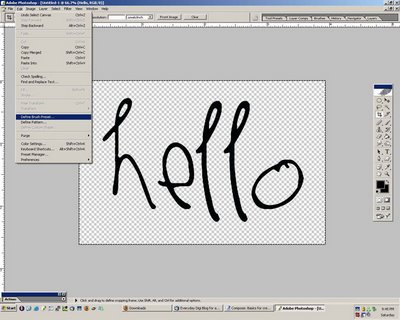
First, decide what you want to make into a brush. I used the word "hello".


Then Select All.
Then click Edit>Define Brush Preset


Name it whatever you want that's easy to remember.

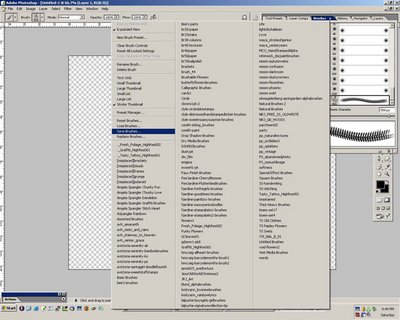
Now your brush is ready to use. Make sure you save your brush before you
close Photoshop.


Resources:

Creating Custom Papers with Paint Shop Pro

Create A Photo Alpha with Paint Shop Pro

Create a Photo Prong with Digital Image Pro

Create a Photo Prong with Paint Shop Pro


Keywords: Adobe Photoshop, Beginner, Creative Team Member, Custom, Create Your Own Elements, Digital Image Pro DIP, Photoshop Elements PSE, PS7, Resources

Monday, November 13, 2006

Creating Custom Digital Elements for Scrapbooking


DIP Digital Tutorial for Making Custom Floral Overlay
by Beth Price, Creative Team Member


...To further the interest
of the flowers,
I decreased the brightness setting
and increased
the contrast
slightly...


In this layout, the floral overlay was created from a photo from my own garden. It makes the page a bit more special to me.

In this tutorial I tell you how I went from this pretty photo to this elegant layout using Digital Image Pro 9 to make my own custom floral overlay.


  • First be sure to save a copy of the original photo.

  • I enlarged the photo and cropped until I liked how it was framed in a 12x12 page.
  • Increase the contrast, then using Filters in Digital Image Pro, I chose “Highlight Edges”
  • Then using the color selector (magic wand) I selected some of the darker green and deleted out as much as I thought looked good to me.
  • I then went to Effects and selected transparency. Set the transparency to 50%. You’ll probably want to play around with your own image from here. You can increase the contrast more, increase or decrease the transparency.
  • To check your overlay, select “insert shape, square, and fill with a color. Place this behind the overlay and you can see the overall effect.


Supplies:

Michele Coleman: papers (Guy Thing, tutti fruiti)

Mary Ann Wise: green frame

Shabby Princess borders and frames

Kay Miller brushstroke frame

Katy Pertiet paper flower


Keywords: Advanced, Blend Mode, Creative Team Member, Custom, Digital Image Pro DIP, Photo Editing, Artistic Photo, Create Your Own Elements