Showing posts with label photoshop elements. Show all posts

Monday, November 10, 2008

How to Use Photo Masks

How to Use Photo Masks in Photoshop Elements
by Julie Ann Shahin, Founder
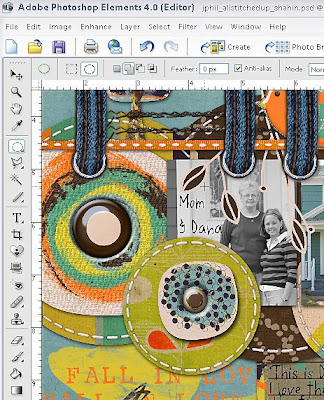
Close-up of photo in layout
******************************
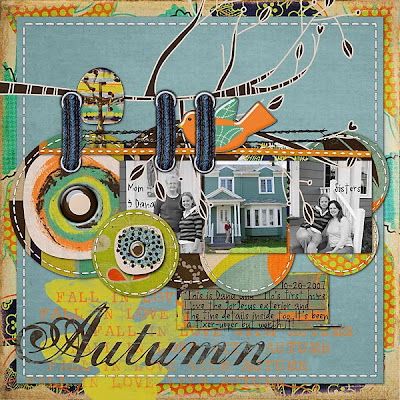
Final Layout. Credits: Nessa Kit by Erica Hite. Photo Masks Canvas by Amanda Sok. All available at Scrapgirls.com
*********************
Here is a simple technique to add texture and interest to your photos. The final result is posted above. For this example I am using {canvas} photo masks by Amanda Sok available at Scrapgirls.

The instructions for using these masks are very simple.
Step 1. Open your photo in PSE.
Step 2. Select the photo mask you wish to use, and open it in PSE.
Step 3. Drag the photo onto the photo mask so that it is the layer above the photo mask.
Step 4. Select ctrl+g to clip it together.
Step 5. To use it in a layout, select Layer--> Merge Visible.
Step 6. Drag the photo onto your layout.

Here are some looks that can be made with Amanda's photo masks.


Please leave feedback if you would like more new content on the EDS Blog!

Julie Ann Shahin, Founder

Tuesday, September 23, 2008

How to to Use the Embed Action In Photoshop Elements for Digi Scrapbooking

How to to Use the Embed Action In Photoshop Elements for Digi Scrapbooking
by Julie Ann Shahin

This is a tutorial to show you another option for drop shadowing on elements such as buttons, eyelets, and other things that "attach" to a page. I use the "Embed Action (Style)" from Scrapgirls. This tutorial assumes that you have followed the instructions provided from Scrapgirls on how to install the tool in your styles palette.


Here is the layout that I am using this tool on. I want to shadow the denim ribbon eyelets.

********************************************

Step 1. In the Styles & Effects palette on the right, chose Styles, then chose the Embed Action. Make sure the layer you want to use the tool on is selected. In this case, I am using the tool on the left denim ribbon with eyelets.

Step 2. Go to Layer --> Layer Style --> Scale Effects. You can see I adjusted the scale to 30
(Click on image to enlarge)
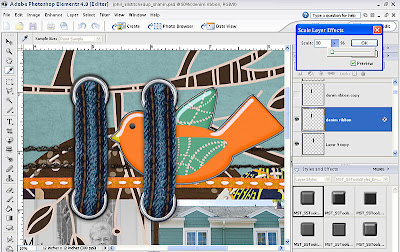
You can compare the Embed style with the regular drop shadow which I used on the right denim ribbon. The left ribbon is a more pronounced shadow, which I prefer in this case.

Note: There are 6 different types of this tool. I try different ones until I get the look that I desire. I do not have a rule about which type to use with certain embellishments.

********************************************
In the image below, I have applied the tool to all three ribbons.

********************************************

Next, I'm going to use the Embed Tool Style on a staple. This is the staple before.

********************************************
Now I've clicked on the tool and the style has been applied to the staple. (You can click on the image to enlarge if you wish).

********************************************

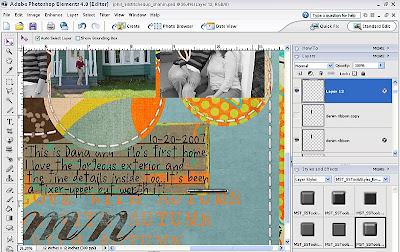
As I did in Step 2 above, I've adjusted the scale of the tool until I get the desired effect.
********************************************

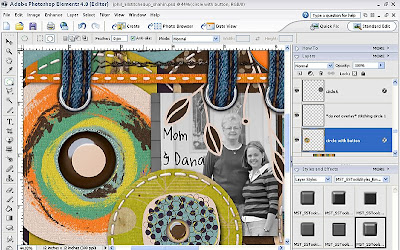
In my last example, I am going to apply the tool to the epoxy button in the middle of this paper circle. First, I want to duplicate this layer. Second, on the top duplicate layer -I applied the tool to the whole circle as the embellishment .png comes with the button in the middle.

********************************************
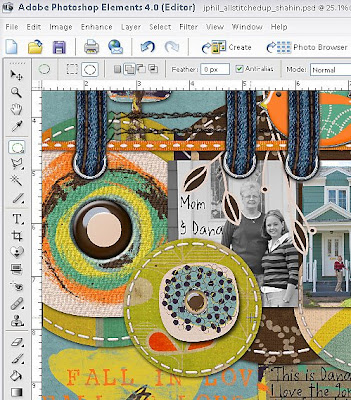
Next, on the same layer, since I want the style applied only to the button - I erase or cut away the outer circle. You can erase with the eraser tool or you can create a circle with the circle marquee tool around the button. Then, select inverse, then delete that selection.


********************************************
You can see I've applied the tool to both buttons below.

It's one of my favorite and most used tools that I use! Thanks for your support of the EDS Blog.
Credits: Falling for Fall by Two Sisters Designs at wearestorytellers.com; Daily Birdie Font by Audrey Neal at wearestorytellers.com; All Stitched Up template by Janet Phillips; Embed
Action 1801 by Scrapgirls

Please leave feedback if you would like more new content on the EDS Blog!

Julie Ann Shahin, Founder

Monday, November 12, 2007

Clearly Fresh Ideas for Hybrid Scrapbooking with Transparencies


Freestyle Hybrid Scrapbooking Class

{using 15 transparent items in one layout}

with Julie Ann Shahin, Founder


My layout is titled: Roots: Handle With Care
See below for larger images
Transparencies have been the rage for several years now, however new "out-of-the-box" ideas are still emerging. Recently scrappers were challenged by The Dares to scrap with eight transparent items. This week we will be bringing you NEW hybrid ideas for scrapping with transparencies - try them if you dare!!!


CLASS INSTRUCTIONS:
1. Open a new document in Photoshop Elements workspace editor that is the size of your transparency.
  • I buy 12x12 transperencies and cut them to 8.5x12 in order to fit them in my standard printer.
  • My new document size will be 8.5 inches wide by 12 inches high. (Actually, my epson printer will tell me at the exact measurement of 8.5x12 that some of the edges will be cut off so I get around that by making my new document 8.2 x 11.5)

2. Click on the brush tool. Load the brush of your choice. I am using Amanda Sok's Techno Grunge Mini Sets 1 and 2.

3. Add a new layer before applying the brush. I add a new layer for each different brush so that I can change that layer later if I want and not change the rest of the layout.

4. To use the second set of brushes, I have to go through the load process again.

Here you can see that each brush was put on it's own layer. Save this without flattening as a .psd file.


5. To print, I change the paper size by going to File-->Page Setup. For paper size, I chose "User Defined", then click on "Printer" in the lower right corner.


6. Click on "Properties". Under Paper Options, even if the size says "User Defined" go to the drop-down box and click on "User Defined" again - which brings you a pop-up box. For Paper Height, change the value to 1200. Click OK. Repeat clicking ok until all the page setup boxes have closed.


7. Go to File--> Print. The Print Preview pops up for my Epson printer and I can see that my design fits on the page.

8. Make sure to set your printer properties. I chose Best Photo, and Inkjet Transparencies at my Paper Type. For inkjet printers, if you use Scotch Brand Transparencies - put the transparency into the printer so that the printing will go on the rough side. For other brands, read the manufacturer instructions.


Mention this ad and get free May Arts Ribbon with your first order at The Shaker Box!


9. To give my photo the look that it has a transparency over it I add a new layer by holding down the "alt" key while clicking on the "Create a New Layer" button on the layer palette.
  • When you get a pop-up box, change the mode to soft light.
  • Click the box next to where it says "Fill with Soft-Light-neutral color (50% gray)".
  • When you do this a grey layer appears above your photo but does not cover the photo.
  • Using the brush tool, I apply my Techno Grunge brush to this gray layer.


10. Here is what the layer palette looks like. Layer 2 shows with my Technogrunge brush applied. Layer 3 is the same technique using a hard round brush painting white over the whole gray layer. This lightens the photo which I wanted because the photo was dark.


11. To crop my photo, I use the shape tool and select Geometrical Guides.


12. To keep the correct proportions, hold the shift key as you create the shape of the geomtrical guide. I chose this particular guide because of the larger width than the other guides.

  • To crop, use the crop tool and place it over the outer edges of your geometrical guide.
  • Click the check mark to confirm the crop.
  • I printed my photo on 4x6 glossy photo paper.


13. I tore a piece of cardboard to 12x12 then sprayed it with Krylon "Make It Acid-Free" I stapled most of my transparent items or used masking tape to attach.


This layout contains:
1 custom transparency designed by me
1 digital transparent overlay on photo
2 Narratives Transparencies
6 Heidi Swap Ghost Letters (Family) backed with paper from the Zingboom Kit Whimsy Woods
1 Heidi Swap acrylic word (Forever)
2 MME Bohemia Transparent Frames
1 MME Bohemia Transparent Butterfly
1 piece of bubble wrap
___________________
15 Transparent Items


Have you been inspired by our blog? Share with us what you create at our NEW Flickr group:
http://www.flickr.com/groups/everydaydigitalscrapbooking/


Wednesday, October 31, 2007

Discover the Joy of Creating Your Own Digital Charms


Charming Christmas Charms

Featuring November Sponsor April Staker
By Beth Price, Creative Team Member

One of my favorite things to do is play around with Photoshop Elements 5 filters and styles and see what I can do on my own. So for this holiday layout, I had seen some metal snowflakes in my local scrapbook store, and I wondered if I could add them digitally.
Here is my page with the metal snowflake charm.


Steps to create the charm:
  • I first opened a new file, with transparent background.
  • Then selected a brush I had already purchased earlier, Snowflake Brush kit by Michele Coleman.


  • Open a new layer and create a snowflake, filling with gray.
  • I duplicated the snowflake layer
  • I went to Effects – Styles – Wow Plastic and chose gray plastic style.


  • Then I went to Effects – Styles – Wow Chrome and chose Shiny Edge style.


  • I played around with the settings a little, but clicking on the sunshine icon in the right side of the layer palette next to the snowflake layer.


When I was happy with the effect, I deleted the unused layers and flattened the image, then saved as a .png file for use at any time.


Mention this ad and get free May Arts Ribbon with your first order at The Shaker Box!