Showing posts with label digital fonts. Show all posts

Thursday, June 12, 2008

Multi photo layout TREND

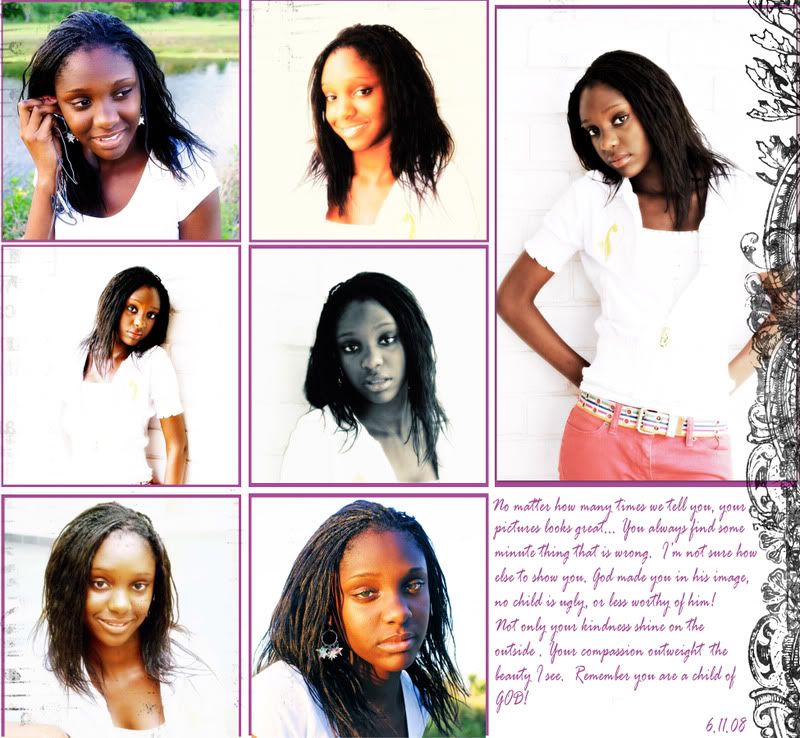
Creating a multi photo hybrid lay out!
by Maggie Lamarre

Multi photos are very trendy, specifically the inchies...Somerset Magazine has a call out for inchies. They are another way to let your imagination go wild...

Creating a grid lay out is very easy using graphic software, instead of a punch. It is more versatile and offers more possibility..

Let's begin!

Open your graphic software and open a document the size of the finish you want in my case mine is 6.5x6
Turn on the grid to the desire width you need

Use the rectangle marquee flood fill the square and repeat for each..


open all the pics you want to fill in then use the move tool holding down the shift key drag onto the document, use the deform tool to resize to fit the grid..


Fill the remaining grid then add brushes to the edges then journaling
Voila You are ready to print and start the hybrid process...


Edge with chalk, then adhere to the patern paper,
add ric rac, to the bottom of the grid..


Add the title and add flowers and other embellishments and you are done..
I created the title in a funky way to reflect how my daughter sees herself :)
Play around with the embellishments until you are happy.


I added miniature brads to the center of the flowers to the left..
Then reinforce the shine word by using stickles on the edges..


The whole process took 12 mtes from printing the grid... to creating the lo, easy uh?

Here's the finish lo


Have fun, create your ART..
Maggie


Credit
Cherry Arte, thickers from Acbaileyltd.com
Ric rac, brads Making memories
digital brush Cottage arts.com
Stickles Ranger
Prima Flowers
Bling Ck
Butterfly from my stash :)
FRED from my scrappingbuddy.com
PS we are giving away a FRED here

Tuesday, May 20, 2008

Create this fun wallhanging!

by Maggie Lamarre

This wall hanging will be great as a gift in any theme. The whole process took only 30mtes with a heat gun..this is great for any occasion!

I combine my luv of digital, stamping and paper into 1 fun project :)

I created this wall hanging for Mother's day base on a distressing challenge I'm doing at Acbaileyltd.
Supplies needed..
Printed Digital butterfly paper here,

please note this paper is pixelated it was expressly created this way to simulate more texture once used :0

Gel Medium,glue, sewing machine, ephemera, delta paint acrylic, foam stamp, fabric, fiber, tulles, chandelier crystal, jump ring, quote, stiffen quick, walnut ink spray.. CS from theshakerbox.. Ranger Stickle. Eyelet Making Memories, Cropadile.. graphic fairies...

Let's begin!


Cut the jean fabric into the size you need, I did mine 7.5x9.. Spray the fabric with stiffen quick and let dry..


cut the digital paper to desire size,use a soft brush and brush the Gel medium onto the printed side.. in 1 coat, make sure you get the edges really well.. let dry.


in the meantime get a large bowl fill with warm water... and add the dried gel medium to the bowl..


while the paper is soaking, gather the fabric, the stamp and paint, stamp the fabric well and the edges, let dry..


Go back to the gel medium digital paper and gently rub the back until the paper is gone and all that's left is the gel medium...

TIPS
What we're doing is call a transfer :) some people use tape and other techniques, for this one I like the gel medium, that way I have no line, it's not as filmy as the tape for this purpose it's fine. What we are after is texture...:)


Once the backing is remove let dry, then use a soft cloth like a chamois and remove any residue paper..

This is where you can let your imagination lose :)
Now we are going to add decorative stitching to the edge, then start assembling the collage..

Glue the digital transfer to the fabric.

Ps. don't worry it won't be this filmy it looks like that I didn't let it dry, I use a heat gun after I took this pic :)


Next collect your ephemera for the collage and spray walnut ink over them to give an age look :)

then adhere the pieces to the digital transfer.. Once satisfied add stickles to add more pizzazz :)


Cut 6 inches of tulles and fiber to create a bow, then loop a jump ring and chandelier to the tulle bow.


Use a cropadile to create 2 holes for the eyelet to thread the fiber to hang the wall hanging.. then adhere title and you are done Voila!


Here's the finish WallHanging! wasn't that fun????


Have fun, create your ART

Maggie

If you have nay questions please leave a message :)
TFL....

Wednesday, April 23, 2008

Create your own glitter rubon

By Maggie Lamarre
Hi Everyone:
This is a simple technique you can use other shapes, such as flowers etc...

Supplies needed
PC
Font of your liking
Printer
Paper
Glue
Sealant
Glitter

Page protector from the $ store, I brought a package of 10 for $1.00.

Let's begin!

Open your document and type your sentiment using any font in my case I needed love I use Lainie daisy font.

I also made sure the size will fit into the area I'm going to adhere the rubon on.

2. Print the word

3. Cut a piece of the page protector and put on top of the word.


4. Trace a fine line on top of the word


5. Add the glitter, flick the back of the glittered to remove excess.

6. Let dry 30 mtes then spray a thin coat of sealant let dry another 30 mtes and it will be ready to use..
Once it's dried use a brush to remove the excess glitter.

Voila you are done!


Have fun, Create your ART.

Maggie