Showing posts with label Creating Personal Stationary. Show all posts

Thursday, November 08, 2007

Card Template #4 - Scalloped Edges


Free Card Sketch Template
by Julie Ann Shahin, Founder

Card by Julie Ann Shahin
Credits: April Staker Jolly Holiday Kit
Inked Edge: Cheryl Barber Inked Tool Style 4101 Basics at Scrapgirls


Mention this ad and get free May Arts Ribbon with your first order at The Shaker Box!


Download Card Template Here

Please leave a comment if you download. If you wish to share this with others, please give them the link to this blog, so that we can track the numbers. This will encourage us to provide freebies in the future.
Thanks!

Friday, September 28, 2007

How to Alter a Plain Envelope into a Cleverly Designed Envelope


Creating Your Own Personalized Envelopes

Digital Scrapbooking Tutorial

by Amy Duquette, Creative Team Member

Instead of using personalized address labels why don't you go one step further and create your very own personalized envelopes. If you have a printer that will print on standard sized #10 envelopes then you are ready to go.


Instructions for Custom Envelopes:
1. Create a new 9.5 x 4.12/ 300 dpi document in Photoshop (or whatever program you prefer).
2. Decorate your envelope with your digital elements.
3. Type in your return address in the upper left corner. (be sure you leave some space above and beside your type to allow for any problems if your envelope moves in the printer etc) and type in the Mailing address in the center of the envelope.
4. Load your printer with your envelopes, making sure you have them loaded with the right side up
5. Change your page setup if need to print on envelopes and make sure your "Media Type" is set to "Envelope" before printing.
6. Sit back and relax while your printer does all the work :)


Some tips:
-Use a fairly good quality envelope for the best results.
-You can adjust this tutorial for any size envelope as long as your printer can print on envelopes.


Please let Amy know you enjoy her ideas and leave a comment! thanks!!! Then check out our sponsors.

Thursday, September 27, 2007

How to Turn an Ordinary Business Card into a Quick, Handy, Stylish Gift Tag


How to Create a Quick Tag

by Altering a Business Card


Digital Scrapbooking Tutorial

by Susan Rodriguez, Creative Team Member

Have you ever had your other half call you and tell you in a panic, "Honey we have just been invited out to dinner with my boss"?
Or better yet, it’s your best friend’s birthday and you completely forgot? Wouldn’t it be nice to have a quick tag handy to stick on a present?

In this tutorial we will be creating tags using printable business cards to stick on those last-minute gifts. I used Avery 8869 business cards for this project.


  • Create an image the size of your business card. Here is my image


  • I used Microsoft Word to create my business card tag.
  • Make sure you follow the instructions on your package when printing them out.
  • Once complete your word document should look something like this.


  • Print them out, tear them out and whalla you have your ready made tags.
  • You can also add some diamond glaze or glossy accents to poop out your letters even more.
  • ere is my completed projected with a little something I gave myself.

Isn't Susan's tutorial great? Please let her know you agree by leaving a comment! Thanks!


Wednesday, September 26, 2007

Discover Maggie's Hybrid Scrapbooking Stationary Matchbook Tutorial


How to Create a Matchbook Notepad

by Maggie Lamarre, Creative Team Member


For some reason when I need a pad to jot something, I can never find them in my purse.
I had just finished a matchbook for my daughter back to school, I started thinking I can use the same principles to create a note pad for my purse. Since I star school myself the theme fits perfectly..

Supplies used: Algebra, History, Biology, English, papers: School bound kit at dragonflairestudios.com; Stamps Art Warehouse; Brads Karen Foster; Silk flowers; Cardstock: Paper Company; Tim Holtz Distress ink; Paper piercer; Plain paper

Let’s begin to create this match book you can use 8.5x11 or 12x12 cardstock.

  • Cut the card stock 3.5x12, fold 1 inch down the bottom, then the top flap fold in to the bottom flap to create the top.
  • Use a bone folder to create a sharp crease or butter knife.
  • Stamp both side of the cardstock then adhere your paper.
  • Cut digital paper to adhere to the top, Ink the edges if desired with distress ink.
  • Attached the flower and embellishments on the digital paper then adhere to the top of the cardstock.


  • Next step: Cut plain paper 1 inch smaller than the matchbook,
  • use paper piercer and create 2 holes on the bottom to attached the papers to the bottom of the matchbook,
  • secure with brads or ribbons.


Voila you are done!
Have fun, create your ART

Please leave Maggie a comment and let her know what you think!


Tuesday, September 25, 2007

Hybrid Tutorial: How to Create a Customized Shopping List for You!


Create a Personal Shopping List Notepad

Scrapbooking How-to By

Sarah B. Meyer, Creative Team Member

Supplies Needed:
digital patterned paper by Sarah Meyer, Sweet Daisy available at www.gottapixel.net/store;
color printer; paper; small piece of cardboard; small length of twine or ribbon; hole punch; scissors or paper trimmer; magnetic strips with adhesive side or glue

Instructions:

1. Open a 8.5inx11in 300dpi canvas in Photoshop.

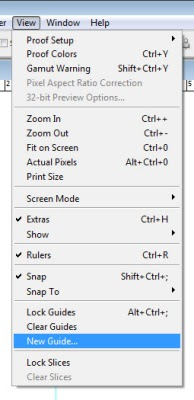
2. Create guides to separate the large page into smaller pages. Select "New Guide..." from the View Menu. Set a Horizontal Guide at 1650px and Vertical Guides at 850px and 1700px.


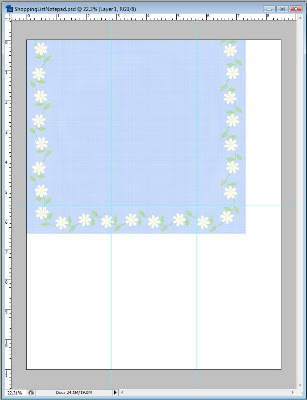
3. I want every page to look the same, but you could easily fill each section of your large page with different papers or embellishments. I simply brought one piece of paper onto my canvas and resized it to 61.1% to make the border pattern the size I wanted. Then I aligned it to the left edge of the background.


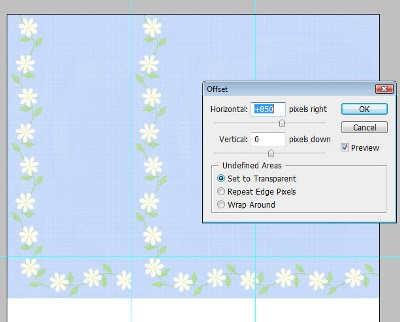
4. If you are want the same paper on each page, dupicate your layer and run the offset filter. Filter>>Other>>Offset... Choose a Horizontal Offset of 850px, a Vertical Offset of 0px and Set the Undefined Areas to Transparent. Duplicate your paper again and select Ctrl+F to rerun your filter and shift the paper again.


5. Duplicate those 3 layers and merge them into one with Ctrl+E. Switch to the Rectangular Marquee tool (M) and using the Guides as your reference, select the section of paper BELOW the middle horizontal guideline and hit Delete.

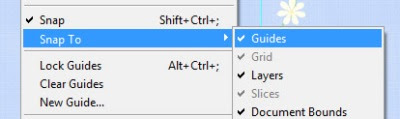
6. Select Edit>>Transform>>Flip Vertically. Then use the Move Tool (V) to shift it this layer into place, using the guides as a reference. As long as you have View>>Snap To>>Guides checked it should easily move into the proper spot.


7. I printed 6 copies of my page, you can print more or fewer depending on how thick you want your notepad to be (you might also make several, for yourself or as a gift). My home printer can't print edge to edge so it automatically shrinks the image a bit, leaving a white border. I trimmed this off with scissors, but a paper trimmer would be ideal for this.
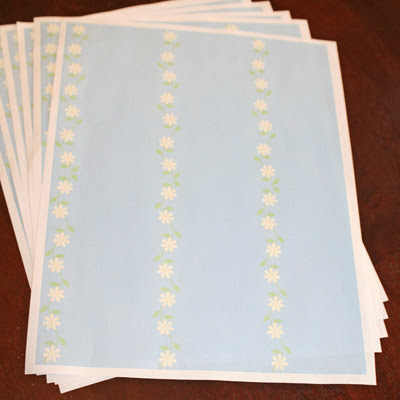


8. I simply folded one page in half horizontally and in thirds vertically to give myself guidelines. I cut on those lines and then used the resulting small page as a guide for cutting the copies and the cardboard. Then I folded the top edge of one small page vertically and punched a hole so the two holes would be evenly spaced and centered on the page. I used the holes on this page as my punching guide for all the other pages and the cardboard. I reused magnets from an old refrigerator notepade I'd used up, so I had to glue my magnets on to the cardboard.
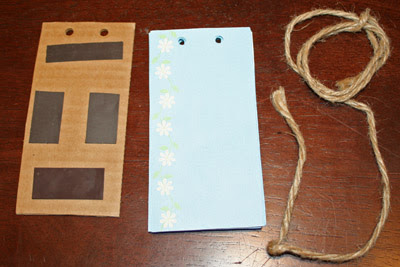


9. Now use your ribbon or twine to attach the pages to the cardboard back and tie a nice bow!
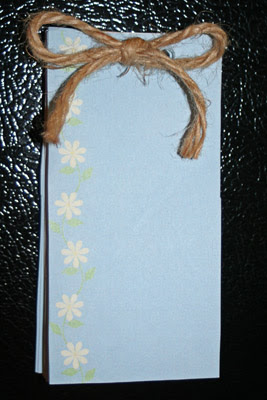

Please let Sarah know how much your appreciate her instructions with a comment! Thanks!!!

Monday, September 24, 2007

How to Create Personal Stationary Using Digital Products


Letterhead Stationary Tutorial

by Di Hickman, Creative Team Member

In this day and age many of us had family and friends in different states, or even (like me) countries, and even though sending the occasional email is great it is still nice to receive letters in the mail, or by snail mail as it's called these days! One of the things I do is send a letter periodically to family and friends back home in England. It really doesn't take long to type up (or handwrite) a letter and pop it in the mailbox, and if it's the recipients birthday or a holiday you can send a card too!

In this basic tutorial we'll make a letterhead for use in a word processing program.
  • First open a new document in photoshop, my preference for these is 7 inches x 2 inches (remember to account for your margins in your word program), having the image narrower than the letter size page means the page looks more uniform.


  • Using the text tool, chose the font and color you wish to use and type your header. For this example I kept it the same font and colors as my blog.


  • In keeping with my blog I wanted the row of dots, I did this by choosing a round brush and altering the spacing to 150%


  • Open an image you wish to use, this is a flower I created, I used this on my business cards so having it on the letterhead also ensures continuity.
  • You can see here too that I changed the dots to brown instead of the turquoise. I did this by adding a layer style> color overlay, and choosing a brown. Simple way to instantly change the color without having to bucket fill each dot!
  • I also changed the alignment, moving things around till I was happy with a design.


  • Underneath the dots I could add my address, website address, phone number, email or a tagline.
  • Imagine the main header said "Merry Christmas", the tagline could read "and a happy New Year".
  • This is where you save your image as a jpg file.


  • To use the jpg in a word processing document, here I use Open Office (http://www.openoffice.org/), a free download word processing program.
  • Simply: insert>picture , you'll may need to move it around a little, and you can resize it should you need to.


  • I changed my side margins to 3/4", just my personal preference and my top margin I made 2 1/2 inches to allow for the header.


  • You can choose to add a footer with either your address or tag line or website url.


  • You can see an example page filled out below.
  • You could get real fancy with digital designs but remember that the more colors you put in the more ink you are going to use when printing! This could really add up if you are printing off 100 Holiday letters for family and friends.
  • Imagine the possibilities for your Christmas letters, thank you letters, baby announcements, achievements and more!

Please let Di know what you think of this free tutorial she has provided! Thanks!!!
Be sure to be signed up for our newsletter to get your free REALLY BIG digital kit created by the EDS Creative Team for our big birthday bash October 1st - 5th!!! Look for it in the newsletter on October 7th and celebrate with us!