Showing posts with label Altering Objects Tutorial. Show all posts

Monday, March 31, 2008

Hybrid Journaling Blocks How To

by Michele Ciola

Designing using hybrid techniques is not only fun but very versatile. You can create and/or use digital elements that will perfectly compliment your project whenever you feel like it. No more waiting for your order to arrive or spending countless hours searching for that perfect embellishment. You have everything you may need at your fingertips already.

In today’s tutorial, we will be creating a wonderful journaling box from scratch using a digital program and then dressing it up to perfectly match any project.

First, let’s open your photo editing program of choice and select a new document 6x4 inches, 300 dpi with a white background.


Then choose a font and color you would like to use. I will be using the Time New Roman left parenthesis bracket along with a chocolate brown color (#5B4B26).


Now simply type the { bracket character at approximately 276 points. Position the bracket at about ¾ inch in from the left-hand side of your document while centering it vertically.


Next we will work on creating the journaling lines. First select a new layer in your layers palette. Then using the same color simply select the brush tool at size 2 with a 51% opacity and draw a straight line. A great way to do this is to press and hold your shift key as you draw your line. This will keep it perfectly straight.


Once you have your line simple duplicate that layer and position it below the previous one. By duplicating each layer, all of your lines on the journaling area will be the same length. You can eyeball the spacing or you can turn on your grid lines if you would like them perfectly even. In my example, the lines are spaced about every 5/16 of an inch.


Now your journaling block is ready for printing but you don’t have to stop there! You can add digital embellishments now along with various other layers or you can simply print and have fun with all your traditional supplies. You can also vary your cardstock and font colors to come up with various combinations.

If you prefer to computer journal on your project, here are a few pointers: Select the Times New Roman font and use a font size of 12 along with spacing set at 25.3. This will ensure your text lines up perfectly with your journaling lines.

For the final project, I used Deanna Patterson’s kit Monday ‘s with Dah, I printed out her beautiful frame and used it to surround my journaling block instead of a photo. I then heat embossed the photo corner and the name plate to give it added dimension.

Let’s see what you can do using this hybrid technique!! Can’t wait to see your projects.

Friday, November 16, 2007

How to Create a Dry-Erase Board with Transparencies & Digital Art

Hybrid Scrapbooking Instructions
by Maggie Lamarre, Creative Team Member


Transparencies are the hottest things right now. I love this medium because it is so versatile.

I created this notepad for my mom she is forever saying she can’t find a pad when she needs to jot info down. The transparency will be use like a dry erase board.

Supplies
Fleur de Lis from the shakerbox.com kit club
Ribbons Offray and bowtique
Glitter alpha meandmybigideas
Stickers I created
Stazon stamp pad
Tranparencey
Glue
Magnet
Chipboard

Mention this ad and get free May Arts Ribbon with your first order at The Shaker Box!

Let’s begin

  • Cut the transparency 7"x 9"
  • Cut cardstock and chipboard 9"x 11"
  • Cut paper 9"x 9"
  • Cut another piece of cardstock 9"x 2"
  • Adhere the cardstock to the chipboard, then the transparency to the paper, edge with Stazon Ink and let dry.
  • Add the cardstock 9"x 2" to the bottom, then cut 2 pieces of ribbon 24 inches and wrap around the notepad to cover the seams.
  • Print Notes from a thick font adhere the sticker cut and leave 1/8 of an inch around and ink with stazon.
  • I use a dry erase board from the $ store and take the pen and cut a strip of 2 inches by 15 and roll it around the pen, use liquid glue to seal the edges.
  • Then I added Velcro to the pen and the notepad.
Voila you are done, a great way to use to transparency
Have fun, Create your ART
Maggie


Thursday, October 25, 2007

Instructions for Halloween Party Favors using Digital Art


How to Make Classmate Halloween

Goody Bags


By Michele Ciola, Creative Team Member

These little bags were so much fun. . not to mention, easy to make!! Verna Grant’s Spookfest kit at DragonFlaireStudios had the PERFECT colors and the cutest little tag to make this project a breeze. Let’s get started.

You will need the following supplies:

Sizzix bag die cut
Black cardstock
Spookfest Kit - Verna Grant at http://www.dragonflairestudios.com
Spooky Fiber
Green Mesh Ribbon
Adhesive - terrifically tacky tape and glue dots
Candy
Printer

Instructions:
To begin, die cut the small bag from textured black cardstock. Fold accordingly and glue well.


Next choose one background paper from Verna’s Spookfest kit and size to 2 ¾ x 2 ¾. Print two of these.


Then open your tag element and resize to approx. 1 ¼ x 2 inches high for the front of your box.


Next pick a coordinating brad from that same kit and slide it over to cover the tag hole.

Now choose your scariest font and type “Trick or Treat” to place in the center of the tag. Get creative with this step to personalize it.


I also typed the name of the child in the lower right hand corner. You can then save this element as a template to make creating the rest of the tags easier.

After you print and cut out the various pieces, simply ink the edges of the squares and tags to give them a distressed look.


Next, cut 2 strips of your mesh ribbon to a little over 2 ¾ inches wide.

Now it is time to decorate your bag. Glue your paper squares to the front and back of each bag. Place your mesh ribbon about ½ inch from the bottom and adhere.


Next cut a smaller piece of ribbon for the tag, affix to tag on the bag. Then using a large glue dot, adhere the tag to the bag.


Finally tie a bit of coordinating fiber to the right front handle and fill with candy. That’s it!


This makes a lovely little Halloween gift for classmates or simply use as party favors at your next Halloween party. Get creative with yours and as always, I can’t wait to see your projects!


Mention this ad and get free May Arts Ribbon with your first order at The Shaker Box!

Used in this project: Sponsor Verna Grant's Spookfest


Also by Verna Grant: Hallo-doodle-ween

Friday, August 10, 2007

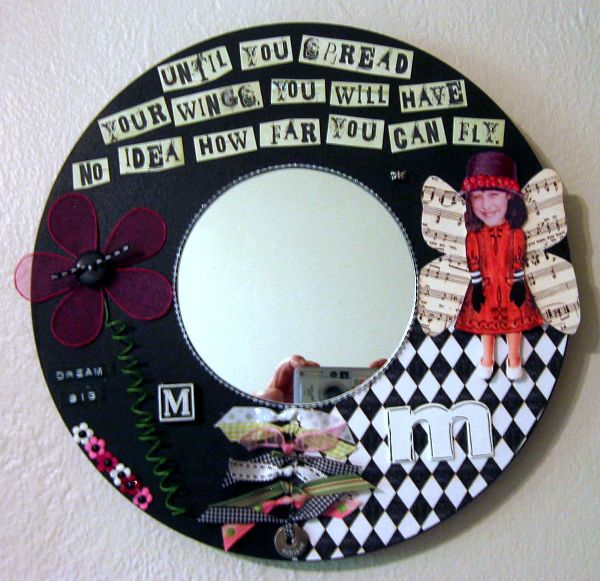
How to Make An Altered Mirror with Digital Art that Will Inspire You Daily


Do you ever start your day with a sense of dread about going to work, or all that needs to be done?
Janet Lawrence, a contributor to the Scrapbook Dimensions 16-Month Weekly Calendar for Scrapbookers shares an adorable altered mirror that she made, and shows us how easy it is to make one for yourself too. Just imagine checking your makeup or hair before you walk out the door, and be reminded with this inspirational message:
"Until you spread your wings, you will have no idea how far you can fly."

That would be sure to start your days off in an up-beat way!

Featured Reader: Janet Lawrence
(originally posted on Nov. 10, 2006 with permission)

Project posted with designer's permission

Janet's instructions:

The base is an mdf circle from Lowes.
I painted it black and I glued a piece of digital paper on 1/4 of it then glued a round mirror in the center.
I used some pearl ribbon around the mirror to finish it off.
The rest is just some ribbons, game pieces and misc.


Supplies used:
Digital Products
Alphabet is from Miss Mint at Peppermint Creative
Digital paper is my own design
Doll part by Maya at Scrapbook Graphics
Dress, hat and wings by Hope Wallace at ScrapArtist

Additional Products
Dream Big is a Dymo label
Square M is a vintage game piece
Prima flowers w/mini brads
Chipboard M and washer word from Making Memories
Flower was purchased at Craft Warehouse
MDF round from Lowes
Mirror from Dollar Tree (in their candlescaping dept)
Pearl ribbon from JoAnn

Keywords: Altered, Home Decor, Hybrid


Newsletter Archives Do you get our newsletter? If you did not and you are signed up, please let me know! If you d0 get the newsletter, let us know how we are doing!


Shutterfly.com


Thursday, August 09, 2007

Our Focus on Altering with Digital Continues with Internet Finds


(Light House by Sande Krieger, posted with permission on November 7, 2006)

Ten Places to Surf for Altering with Digital Inspiration


1. Go Make Something - over 100 how-to articles covering collage, mixed-media, and altered art. Get yourself registered, grab some instructions, and Go Make Something! Also offers free printables.


2. Samples from Paper Mojo
Exotic, hand-made, or imported papers

3. How to Gild - apply gold-leafing


4. Altered Stuff Blog
Digital Altered Art Projects. She offers printables here.

5. Inspiration: Art & Design Online

6. Altered Art Obsession - The Blog

7. Patricia DiBona

Award-winning Graphic Artist and Art Teacher, Patricia Dibona, has taken her distinctive style of art into the imaginative world of altered art and bookart. With over 20 years experience in graphic arts and teaching, Patricia is known nationwide as one of the outstanding artists in her field. Known as "The Artist Who Journals on Canvas," Patricia became widely recognized in the art community in the late 80's for her ability to express her intuitive spiritual nature with a unique style of painting, which offers a message of love, healing, and inspiration.

Over the years Patricia has reproduced her original artwork into writing journals, greeting cards,and prints. Since 2001, she has expanded her art to include altered art, Life Books, scrapbooking accessories and components. Especially noteworthy are her collage papers, rubberstamps, and digital image CD's. Patricia's art has also been published in Somerset Studio and Legacy Magazines in addition to other art publications.


8. Sally Jean
See Sande Krieger's Light House above made during a Sally Jean Workshop

9. Lara Berch Art Tutorials

10. Papier Valise - Provisions for the Creative Journey link


Wednesday, August 08, 2007

5 Simple Steps To a Rockin' Altered Frame


Digital Tutorial for Home Decor by Cammy Plummer,

Former Creative Team Member

This is a re-post. The original posting was October 2006.
Click on image to enlarge

Instructions for Photoshop Elements

  1. Create a new document to fit your frame.
  2. Select a background and add to document.
  3. Use shapes to arrange ovals and rounded rectangles.
  4. Lay photos over top and group with shapes (Ctrl + G).
  5. Add elements and words that will fit the theme.
Hints:
  • Convert photos to black and white for a unified look.
  • If your frame is larger than 12 inches long, create the document at 200 dpi to keep your program running quickly. You will still get a crisp, clear print.
Credits:

Pattern paper: Michelle Colemen, Savoir Faire (red and black);
Michelle Underwood, Live Out Loud (newspaper print)
Heart and flower shapes: Karen Hunt, Funky Doodle Hearts
Star shape: Cammy Plummer
Buttons: Robin Carlton, Fudge Dream Supreme


Tuesday, August 07, 2007

The Complete Guide to a Hybrid Altered Purse


Using Digital Papers to Create an Altered Purse

by Sue Kristoff, Creative Team Member


Who says you're limited to two dimensions when working with digital papers? When you're creating a hybrid item, digital papers are a great way to get exactly the patterns, scale and colors you want for your project.

I created an altered wooden purse as an example.
The purse was found in the unfinished wood products section of my local craft supply store .
  • I chose the papers I wanted to use, as well as a flower element,
  • and printed them out on white cardstock.
  • The digital papers and the flower element are all from the Raspberry Marmalade kit by Carrie Stephens for Scrapbook Dimensions magazine. (given to the first 500 subscribers)


  • I began by removing all of the hardware from the purse, so I wouldn't have to worry about cutting paper around the hardware.
  • I then painted all of the edges of the wood a dark green.
  • When the paint was dry, I traced the purse outline onto the printed digital paper and cut the shapes out.
  • I used Ranger Distress Ink and a Cut and Dry Foam pad to give the edges of the paper an aged look. (I used Antique Linen and Walnut Stain inks.)
  • I then cut strips of paper to cover the sides of the purse, and I inked them the same way.
  • Finally, I hand cut the flower element from the paper and inked all around the edge, being sure to get the ink into the nooks and crannies of the petals.

Once all my paper was ready, I used Mod Podge decoupage medium to adhere the paper to the wood. I've found that if you work quickly, and don't rub the surface of the paper too hard, the ink will not run or smear. (Or you can spray your inkjet printouts with Krylon Preserve It first to ensure it doesn't smear.) I like to put a quick coat on first just to seal the ink, then go back and apply more coats after it has dried. I repeated this with all of the papers, then added the flower element over the top and front of the purse.

After all of the parts were dry, I reassembled the purse, then added some jewels to give it some sparkle. I had a total blast with this project, and I'm looking forward to using my digital elements for other altered items!


You are invited to join me,

Julie Ann Shahin,

in an online chat on Wednesday, August 8th

at www.dragonflairestudios.com at 8 pm EST!

hope to see you there!

Monday, August 06, 2007

Let's Alter! Home Decor Idea today...

Join in...get your Scrapbook Dimensions 16-Month Planner and see what everyone is talking about!
How to Alter a Frame with Digital Scrapbook Products

by the rockin' Julie Kelley, Creative Team Member


If you love to alter items, and you love all the digital kits and elements that you have in your stash, then it's quick and easy to use those digital kits to create altered items!

I had this unfinished frame that I wanted to alter as a gift for a friend. I found papers and elements that my friend would like (Royanna Fritschmann's "Where I Live" kit).


After I decided on the kit, I measured the frame, and created a new canvas that was 9x7 (the actual size of the front area of the unfinished frame. I filled the area with papers and elements from the kit, keeping in mind where the hole for the picture was. I will be cutting out the hole, so I just let the elements go into the space that will be cut out.


When I print the "page" I want to be able to fold it over the edge of the frame to make a nice finished edge, so I want the design to wrap around. I resized the canvas so that it was an inch bigger, when you resize, be sure that you choose to keep the image centered, this way it will add half an inch all the way around. It will keep all your elements right where they were, but add an edge around. If your background paper doesn't fit, move that layer over a little until it does.


Here's what it will look like:


I wanted some dimension to the final project, so I created a blank canvas and dragged over the flowers and the butterfly (I had resized them, so copying from the frame was important so that they would line up correctly on the finished project). Placing them in the center of the blank canvas, I will print this, cut out the elements, and place on the finished frame, folding them out a little so that they will stand out.


Print both pages, I used a heavy weight matte paper, I like to use a matte mod podge to attach papers to my altered items, and the heavier paper is easier to work with and will wrinkle less.
Once printed, lay flat on the table, line up the paper, and trace the photo hole. Cut out with sharp scissors or an exacto knife. Use the matte mod podge to attach the papers. Cut out the extra butterflies and flowers, partly fold the butterflies (so that the wings will stand up off the frame, and attach with glue dots or your favorite adhesive. Do the same with the flowers.

Replace the glass in the photo area, and you are finished!!


If you enjoyed this tutorial, please leave feedback as this is a free service for you!