Discover the Hottest Trend - Curved Photo Tutorial
How To Install and Use Actions in PSE 5.0
Create Curved Photos
Computer Scrapbooking Tutorial
by Cammy Plummer, Creative Team Member

Create Curved Photos
Computer Scrapbooking Tutorial
by Cammy Plummer, Creative Team Member
1. Download action of your choice. There are many good sites for interesting actions. Check out:
Atomic Cupcake - www.atomiccupcake.com
PanosFX - www.panosfx.com
Traci Murphy Designs - www.tracimurphydesigns.com
The one that I will be demonstrating comes from PanosFX. It is an action that adds a border to your photos, bends the edges, and adds a drop shadow.
2. Unzip the download. Make sure that Phoshop is closed.
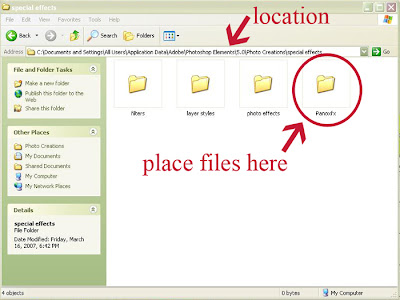
3. With Photoshop Elements 5.0, the only files you need are the files ending with .atn. You may delete the .psd files. Move the .atn files to the following folder:
C:\Documents and Settings\All Users\Application Data\Adobe\Photoshop Elements\5.0\Photo Creations\Special Effects
In the Special Effects folder, create a new folder called Panoxfx. Place the files in this new folder.
*Note: If you placed PSE 5.0 into a different location, the path may differ slightly. Also, ensure that you have the SHOW HIDDEN FILES option selected in FOLDER OPTIONS.

4. To use the action, select a photo and start PSE. The program will automatically refresh the actions to include your new download.
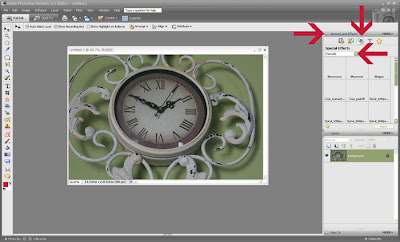
5. Make sure your palette bin is open (Window > Palette Bin).
6. Click Artwork and Effects, then Special Effects. Select Pansfx from the drop down menu. With this action there are two options Bbconcave (a concave photo will result) or Bbconvex (convex photo). Choose one.

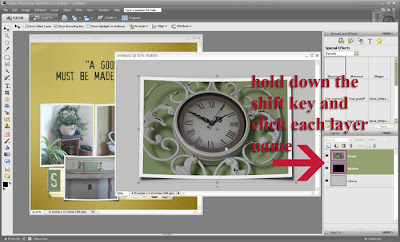
7. Drag the Image and Shadow layers to your layout. To select both layers, click the name of the layer in the Layers Palette, hold down the shift key, and then click the second layer.

If you are inspired by today's tutorial or have a question, share your thoughts!

Credits:
Note paper: Linda Gil Billdal, Stationeries Revamped, ScrapArtist; Meredith Fenwick, Holiday Punch
and Pieces of Me: Sentimental, Scrapbook Graphics
Ribbon: Natalie Braxton, Perfectly Pinned, The Lilypad
Date Stamp: Karen Hunt, It’s A Date, Scrapbook-Bytes
Actions: Traci Murphy, Drop Shadows, Traci Murphy Designs; Border & Bending, Panos Efstathiadis,
PanosFX; BriAnna Shultz, Sponge Paint, Chipboard, and Rubon, Atomic Cupcake
Fonts: Abuse Lite; SP Wonderful Wendy


8 comments:
Thanks for sharing. I'm new in the Digital Scrap world, so I need all the help I can find!
~H
thanks for sharing the link to your blog... can't wait to try some of your lessons out!
Cool idea...I'm just getting into digital scrapping so I'm trying to learn all I can.
-----------------------------------------
Immediate Influx of High Quality Traffic & Links!
Click Here
Cammie - Got the DL but I am running Vista and your install insructions don't match the new OS. Can you help me?
Kimberly
Thank you for your kind comments. I'm so glad that your have found this tutorial useful.
Kimberly,
Sorry it took me so long to reply! I think I found a solutions for Vista users. Try this path to get the folder:
Local Disk ( Usually C )
C:\Documents and Settings
All Users
Application Data
Adobe
Photoshop Elements
5.0
Photo Creations
Special Effects.
If that doesn't work, please email me at mulvahill AT gmail DOT com.
Cammy
Help! Your wonderful instructions got me so excited that I purchased the monthly actions from AtomicCupcake. However, when I went to copy the .atn file, I got only as far as:
Desktop
MyComputer
Local C Drive
Documents & Settings, All Users
AND THEN I COULD NOT FIND THE APPLICATIONS FOLDER (I don't have VISTA but 5.0). I found Adobe PSE 5.0, but could not find the Applications folder. What am I doing wrong pls! Tks (your instructions sounded so easy, but I've doing something wrong).
This tut is really helpful to me, as I never really got the hang of actions before. Thank you =)
Post a Comment