Bonus Gift Project Tutorial
Featured Reader: Lisa Pace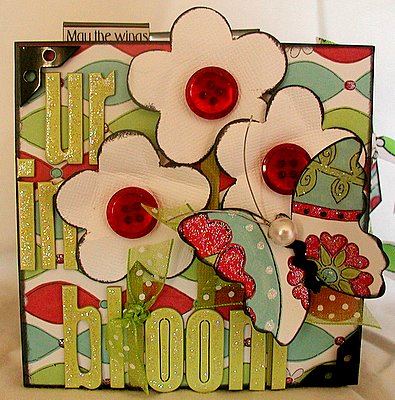 U R in Bloom
Mini Album by Lisa M. Pace
Posted with Designer's Permission
 U R in Bloom
Mini Album by Lisa M. Pace
Posted with Designer's Permission
Supply List:
Accordion Mini Album: Junkitz
Cardstock: Die Cuts With A View
Pattern Paper: Junkitz
Ribbon: Junkitz; Offray
Buttons: Junkitz
Chipboard Letters: Heidi Swapp
Photo Corners: (black) Unknown
Ink: Staz On (Jet Black); ClearSnap (Charcoal)
Tabs: Office Supply
Punch: Whale of a Punch
Paint: (Black) Making Memories
Stickles: (Star Dust) Ranger
Black Thread
Sanding Block
Mini Envelope
Instructions:
1. Paint mini album black
2. Cut 10 pieces of pattern paper 3 5/8 x 3 ¾ squares (well we will say squares even though they are not truly square)
3. Using black thread stitch around each square and cover outer edges with Black Fluid Chalk Ink.
4. Adhere tabs to top of album pages and insert journaling or quote.
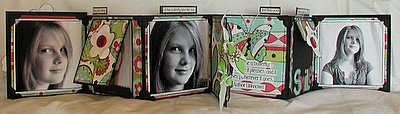
5. Adhere photo corners to each square.
6. Adhere pages to album.
7. Create a matchbook 2 ½ inches wide x 3 ½ inches long
8. Stitch around edges and then cover outer edges with Black Fluid Chalk Ink.
9. Punch out; flower cover edges with Black Fluid Chalk Ink attach button, stem and ribbon
Accordion Mini Album: Junkitz
Cardstock: Die Cuts With A View
Pattern Paper: Junkitz
Ribbon: Junkitz; Offray
Buttons: Junkitz
Chipboard Letters: Heidi Swapp
Photo Corners: (black) Unknown
Ink: Staz On (Jet Black); ClearSnap (Charcoal)
Tabs: Office Supply
Punch: Whale of a Punch
Paint: (Black) Making Memories
Stickles: (Star Dust) Ranger
Black Thread
Sanding Block
Mini Envelope
Instructions:
1. Paint mini album black
2. Cut 10 pieces of pattern paper 3 5/8 x 3 ¾ squares (well we will say squares even though they are not truly square)
3. Using black thread stitch around each square and cover outer edges with Black Fluid Chalk Ink.
4. Adhere tabs to top of album pages and insert journaling or quote.
5. Adhere photo corners to each square.
6. Adhere pages to album.
7. Create a matchbook 2 ½ inches wide x 3 ½ inches long
8. Stitch around edges and then cover outer edges with Black Fluid Chalk Ink.
9. Punch out; flower cover edges with Black Fluid Chalk Ink attach button, stem and ribbon
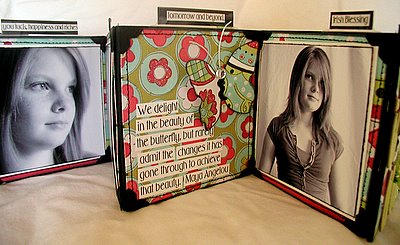 10. Create pocket measuring 3 3/4 x 3 ½ inches and adhere in between pages. Insert two tags measuring 4 ¼ x 2 1/8 inches each.
11. Cut out three butterflies and decorate with ribbon, and embellishments of your choice. Add quote or journaling.
12. Attach one to the page after the pocket you created.
13. Cover a mini envelope with cardstock, pattern paper and embellish.
14. On back of album place another butterfly and either put a quote or journal
15. Cut out 2 4 x 4 pieces of pattern paper. These will be for your front and back cover. Attach to the mini album, using your sanding block smooth edges of front and back cover in order to make your pattern paper flush with the album.
16. Using the punch create three flowers and adhere to front cover.
17. Place Chipboard letters to front cover and cover with stickles.
18. Adhere butterfly and buttons.
19. Adhere your photos and enjoy your finished mini album.
Reader Questions:
- Recently I had a reader ask if I could link to the designer's projects in online galleries so they could leave praise. That is a great question. I would ask you all to leave praise right here on the blog so that we can track which of our tutorials are most helpful and what people are looking forward to learning more about. Thank you very much.
- Feel free to ask questions any time. Please allow me some time to find the answers of our various designers and I will post the answers as soon as I have them! Thank you!
Share your thoughts on all the tutorials this week! Please leave us a comment.
Subscribe To Our Newsletter
Subscribe for Daily Updates Delivered to Your Inbox (or enter your email into the sidebar box to the right)
Keywords: Hybrid, Digital, Gift, Christmas, Holiday, Photoshop, CS2, Adobe Photoshop, Advanced, Digital Image Pro DIP, Featured Reader, Paintshop Pro, Photoshop Elements PSE, PS7, Resources, Gift Ideas, beginner, hybrid, Paint Shop Pro, PS7


No comments:
Post a Comment