How to Vectorize Your Images Easily and Quickly

Here is my hybrid tutorial:
1. Scan the vintage card from the ZingBOOM kit at 300 dpi. Open in Photoshop Elements.

2. Use the Magic Eraser tool to click on the white background, which erases the background leaving it tranparent. Save this as a .png

3. Next I found and downloaded a vintage book cover from the Flickr Group: Vintage Ladybird Books. However, since the image was very small & pixelated (150 pixels x 227 pixels), I decided to make it into a Vector Image. Making a vector image without Illustrator is quite simple by using the online tool Vector Magic
First, upload the file.

Next the program will ask you what kind of image you have uploaded - whether it is a photo or logo with blending at color boundaries or without blending. Chose the correct type and click NEXT.

Next, it asks you to chose the quality of your image. To accurately determine this, click on the 1:1 button to the left of your image. My image quality was High. Click NEXT.


Mention this ad and get free May Arts Ribbon with your first order at The Shaker Box!
The next step is to confirm whether your image has less than 12 colors or many colors. Click NEXT.

The program vectorizes your image and takes a few minutes.

Next, it compares the vectorized image to the original and if the image is off, you can troubleshoot and recompress. If you are satisfied with your image, you can download it by clicking on "Download EPS"

Here you can see the difference between the BEFORE and AFTER

To scrap this image, you open the EPS document in Photoshop Elements. Be sure to change the default resolution from 72 dpi to 300 dpi. Click OK.

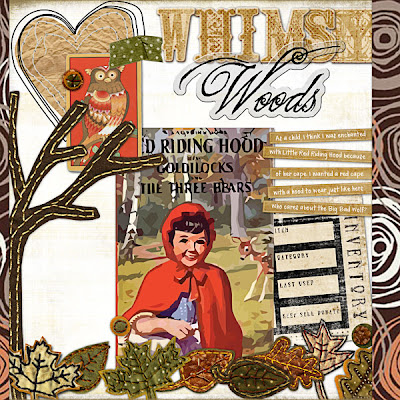
Here is the final image and you can download it for personal use ONLY at this link

Here is my finished hybrid layout utilizing the ZingBOOM Whimsy Woods kit and my vectorized image.
 Credits:
Software: Photoshop Elements 4.0
Online tool: Vector Magic
Paper kit: October Kit from ZingBOOM kits/SIS TV (SEI paper and vintage playing card)
Digital tree, leaves, felt circles: Natalie Braxton Enchanted Autumn Leaves - The Lily Pad
Background paper: Michelle Underwood Owl Love
Vintage inventory card: Jen Wilson Designs Daily Dose 24 7 Cards No. 3
Journal strips, green tape: Shabby Princess Harvest Spice
Whimsy letters: Meredith Fenwick
Stitched heart: Marys Scrapgalerie Late Autumn
Transparency action: Atomic Cupcake
Fonts: The King & Queen, TXT Annesia
Please visit our generous sponsors!


3 comments:
JA you have outdone yourself such a great lo. BRAVO
Maggie
Thanks! This is really informative. And I totally didn't know PSE had a magic eraser tool. That is way cool information to know.
This is a great tutorial, thank you. I never knew about the magic eraser tool, I use it all the time now.
Post a Comment