Discover More Ways to Design Your Own Paper for Scrapbooking

11 Steps to Floral Paper
Digital Scrapbooking Tutorial

by Di Hickman, Creative Team Member
Instructions:
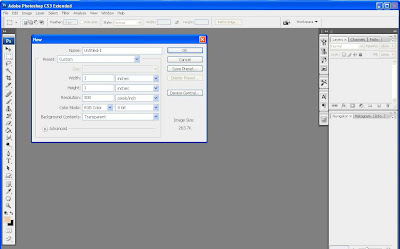
1. Open a new document 1” x 1” at 300ppi
2. Select the custom shape tool, and from the box select the flower shape of your choice.
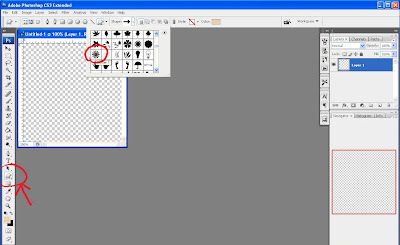
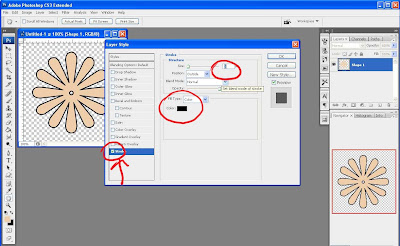
3. Click and drag your mouse to create the flower shape. Holding shift whilst doing this keeps the flower “square”. One done click layer>layer properties (you can right click the object and select layer styles instead). In the pop-up box check the stroke box, and select your color. You can change the size of the stroke too, I left mine at the default of 3 pixels. Remember to click OK!

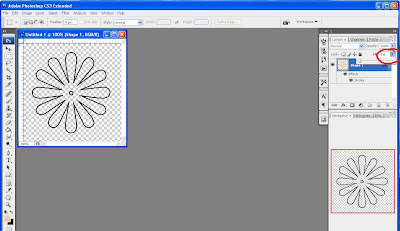
4.Next, look at your layers, and click the “fill:” slider all the way to zero. This should leave you with the flower stroke only! And the design for our pattern!
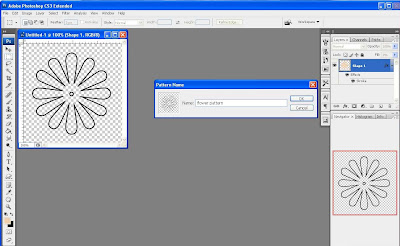
5. Now we have to save the pattern so we can use it. To do this, select: Edit>define pattern
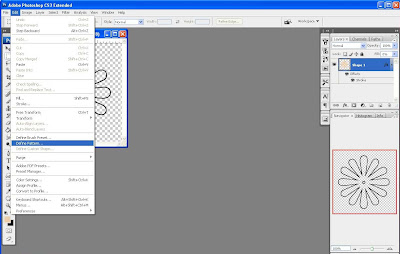
6. A pop-up box should appear with space for you to name your pattern, fill in the text of your choice (or leave as default) and click ok.
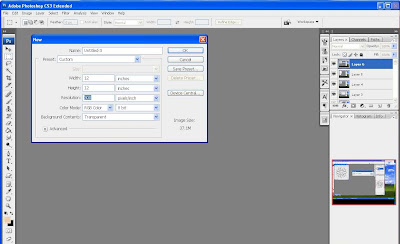
7. Ok now we need to open a new document for making our paper. File>new make this one 12” x 12” at 300 ppi for a full size paper sheet.
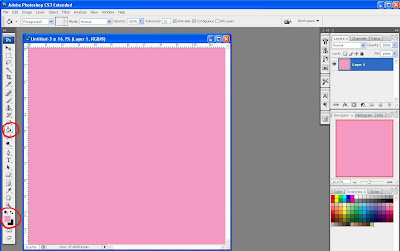
8. Fill with the background color of your choice using the paint bucket fill tool.
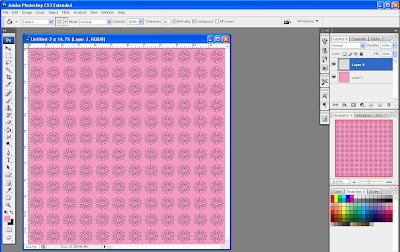
9. On a new layer we'll add the flower pattern. To do select the paint bucket tool, then using the drop down box at the top change “foreground” to “Pattern”. The box next to the “pattern” should change. Again using the drop down box, select the pattern you just made. It's usually the last one in that palette.

10. The click on the image to fill with the pattern
11. If you want the flowers a different color, simply create a new layer, fill with a sold color and create a clipping mask (Ctrl G) to link the new solid color and the flower layer together.
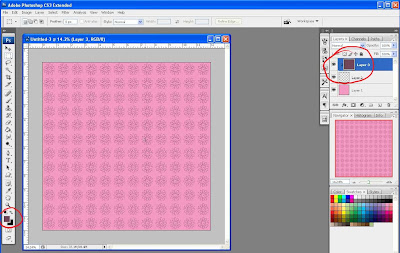
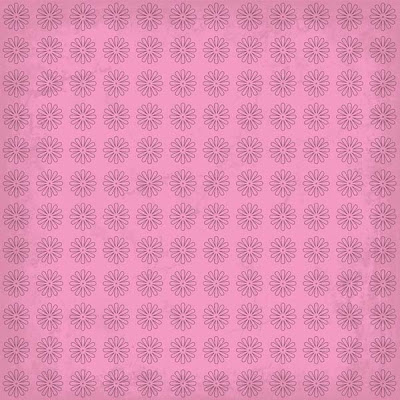
From here you can add the texture or overlay of your choice and then your paper is done and ready to use!
 If you enjoyed and learned from today's tutorial, please leave a kind comment for Di! Thanks!!
Digital Scrapbooking Tutorial
by Di Hickman, Creative Team Member
Instructions:
1. Open a new document 1” x 1” at 300ppi

2. Select the custom shape tool, and from the box select the flower shape of your choice.

3. Click and drag your mouse to create the flower shape. Holding shift whilst doing this keeps the flower “square”. One done click layer>layer properties (you can right click the object and select layer styles instead). In the pop-up box check the stroke box, and select your color. You can change the size of the stroke too, I left mine at the default of 3 pixels. Remember to click OK!

4.Next, look at your layers, and click the “fill:” slider all the way to zero. This should leave you with the flower stroke only! And the design for our pattern!

5. Now we have to save the pattern so we can use it. To do this, select: Edit>define pattern

6. A pop-up box should appear with space for you to name your pattern, fill in the text of your choice (or leave as default) and click ok.

7. Ok now we need to open a new document for making our paper. File>new make this one 12” x 12” at 300 ppi for a full size paper sheet.

8. Fill with the background color of your choice using the paint bucket fill tool.

9. On a new layer we'll add the flower pattern. To do select the paint bucket tool, then using the drop down box at the top change “foreground” to “Pattern”. The box next to the “pattern” should change. Again using the drop down box, select the pattern you just made. It's usually the last one in that palette.

10. The click on the image to fill with the pattern

11. If you want the flowers a different color, simply create a new layer, fill with a sold color and create a clipping mask (Ctrl G) to link the new solid color and the flower layer together.

From here you can add the texture or overlay of your choice and then your paper is done and ready to use!
 If you enjoyed and learned from today's tutorial, please leave a kind comment for Di! Thanks!!


4 comments:
Thank you! Just an aprrentice at PS, and this helped me get going!
Thank you for the great tutorial!
DI! You always ROCK!
Tammy Gray
thanks for the great tut very easy to follow
Post a Comment