How to Create a Quick & Easy Layout with a Cool Sketch Inspired by an Art Print
Digital Sketch Tutorial for Photoshop Elements
by Cammy Plummer,
Creative Team Member
by Cammy Plummer,
Creative Team Member

This layout was based on a collage by Norman Wyatt Jr.
http://www.art.com/asp/sp-asp/
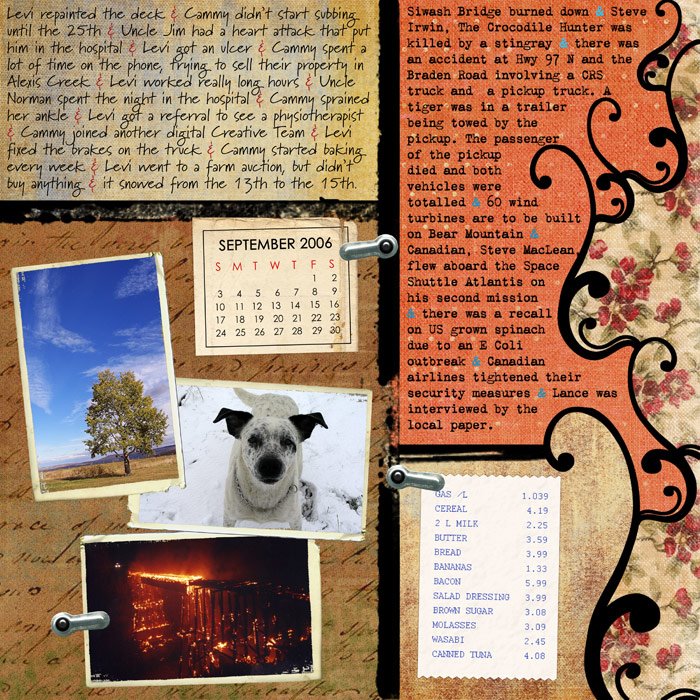
Title: September in Review
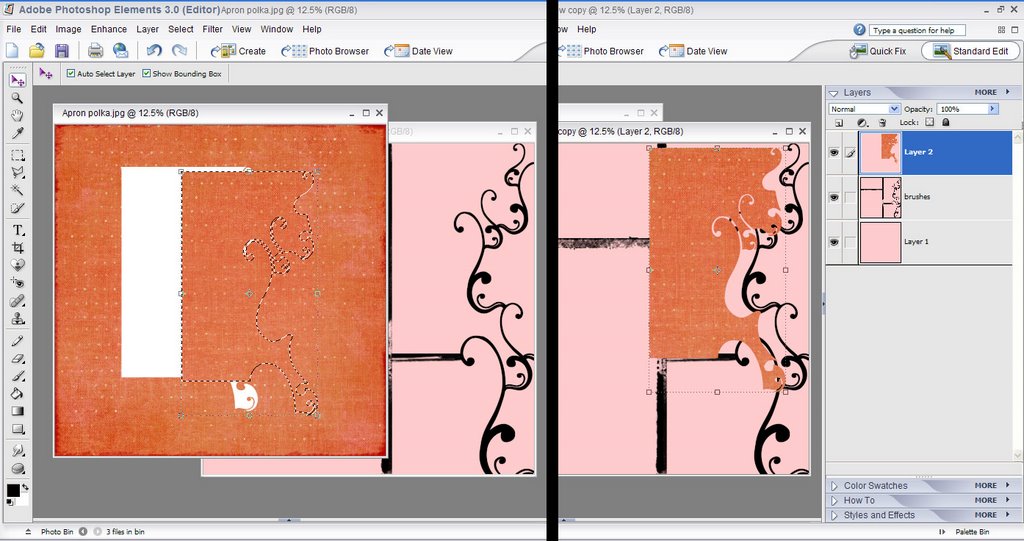
Instructions for Photoshop Elements
- Create a new layer. Add the brush lines to create sections in your design. Make sure each line goes to the edge of the page. You may have to resize the layer to stretch to the borders.
- Open your first patterned paper file that you wish to use. With the magic wand tool, on the brush layer, select one of the empty boxes. Go to SELECT>MODIFY>EXPAND. Enter 5 into the box and click OK. Click inside the selected area and drag selection to the opened paper file. Switch to the move tool and drag the selection back to your layout and place in the appropriate space. Repeat with each space in your block design.
- Add journaling that summarizes what your and your family did in the last month.'
- Write a summary of local and national news events.
- For fun, write a brief list of expenses or costs.

Categories: adobe photoshop advanced brush - brushes Photoshop Elements PSE sketches


6 comments:
I am already signed up for the newsletter so I will leave a comment too =) That is gorgeous!!! What a wonderful way to be inspired to create a unique layout! This is something I will definitly be trying! TFS!
I use art all the time for inspiration but I've never really thought of actually making a sketch. This is terrific and the page is gorgeous.
This is really helpful for me, because I have no creativeness. I'd love to know how to make the stamp, for the template. Or any stamp to make a sketch like this!
Thanks
Maisie- please leave us an email address and I'll forward your request to Cammy. Or check back here later to see if Cammy has replied. Thanks!
Maisie,
The credits were omitted from this post, so first off, here they are:
Paper: Michelle Coleman (red floral), Savoir Faire; Iron Orchid Designs (orange), Apron Strings; Donna B. Miller, Letters Home
(script; recoloured); Meredith Fenwick, Pieces of Me - Quirky; Michelle Underwood, Antique Mini Kit
Polaroid Back: Jen Wilson, Fading Days
Photo Turn: Michelle Underwood, Antique Mini Kit
Brad: Shabby Princess (recoloured), Tropical Winter
Date stamp: Cammy Plummer
Brushes: Jason Gaylor (swirl), Fresh Foliage Part II; Cirratus, Cirratus032
Actions: BriAnna Shultz, Crumple; Traci Murphy, Drop Shadow
Fonts: Marydale; Vintage Typewriter; Courier
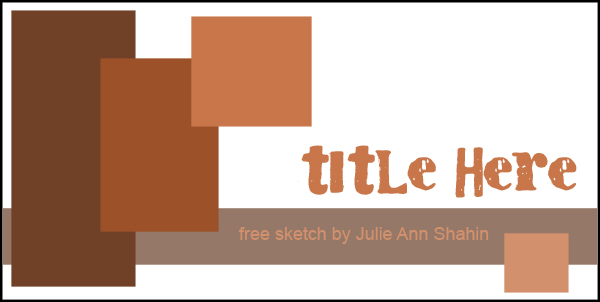
The template, or frame, for this layout was made with three sets of brushes. The swirly brush is made by the talented Jason Gaylor (google his name... his brushes are free and fabulous). To make the frame, I opened a new document in 12x12 and used the brushes to stamp out the basic shape of the frame. I resized some of the layers to fit.
I am not sure what program you are using (I use Photoshope Elements), but if you have further questions, email me at mulvahill at gmail dot com and I will help you as best as I can.
Cammy
Cammy,
Thanks for all the info!
I have PSCS, and I have some of Jason's brushes.
Now that you explained it all. It sounds so simple!!!
I'll give it a try, and let you know if I could do it, OK?
Thanks,
Maisie
mhmattson@verizon.net
Post a Comment