Two-Page Layout with Altered Photo Tutorial
You asked for tips and instructions on altering photos - and that is exactly what I give to you today. I will also give you several links at the end of today's post that you might find helpful for altering your photos.
This layout is an 8.5x 11 two-page layout that features an altered photo, grunge overlay (or "tranparency"), and simple brush work. Level: Beginner to Intermediate
1. Open Photoshop Elements 4.0
2. Click edit and enhance photos to get to your workspace
3. File -->New-->Blank File
4. Type in name of your layout, width = 17" for 2 pages 8.5x11 portrait. Height =11" Resolution 300. Background contents: White. Click ok.
5. Open your photo. Drag your photo down to the photo bin onto your new layout.
6. Re-size your photo by dragging the corners until the photo spans both pages. Click the checkmark when you are finished. (If you ever are trying to do something and the program won't let you move on, check to see if there is a checkmark you need to click.)
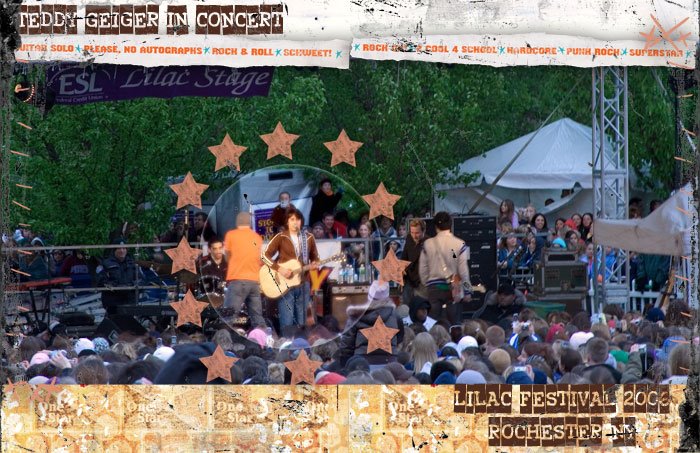
Layout designed by Julie Ann Shahin, click on image to enlarge
7. Download the free kit at 2peas by Chris Ford called Future Rock Star to your desktop. Scan with your Norton Anti-virus before unzipping. Once it is unzipped, delete the zipped version because you no longer need it. Save the file in a location where you plan to keep all your digital kits.
8. In PSE, open the Future Rock Star kit and find the paper you want to use, and open it. Use the rectangular marquee tool, and "cut" out a piece of the paper at the size you want to use. Ctrl-c to copy the selection.
9. On your layout, click ctrl-v to paste. Drag the paper layer under your photo layer. Repeat this step with until all paper elements are in place.
10. To alter your photo, use the circular marquee tool to select an area of the photo. Here I made a circle around the musician Teddy Geiger. I then copied the selection (ctrl-c), then paste (ctrl-v) which gives the selection it's own layer.
11. With this layer selected, adjust the photo to your taste. Here I used the filter plug-in Virtual Photographer, with the radiant setting.
12.Open from the kit the grunge overlay 8.5x11, and drag it over your layout. Line the left side of the overlay to the left side of your layout. Erase the right edge of the grunge overlay because it covers the middle of your layout.
13.Drag the overlay onto your layout a second time for the right side of the layout. Align the right edge of the overlay with the right edge of your layout. Erase the left edge of the grunge overlay because it covers the middle of your layout.
14.Open the Future Rock Star kit embellishment folder. Drag the word strips onto your layout and line them up along the upper edge of your photo.
15.Use the eye-drop tool to define the color orange by clicking on one of the letters in the word strip.
16. Go to the main photograph layer. Select the brush tool.
17. Go to the drop-down menu for the brush tool. Click on the arrow that points to the right. Select "Load Brushes." Go to the Future Rock Star kit, brushes folder, and load the grunge star brush.
18. Make a circle of stars around the musician.
19. Use the stitches from the kits' brushes folder to embellish the upper right and lower left edges of the layout. Add stitches that run along the left edge of the photo and the right edge of the layout.
20. Add title and sub-title using font "xerography" downloaded from internet.
Links and resources for altering photos:
Fast fix for photos by Microsoft
Digital Art Photography by Lifetips
Tips for Maximizing Quality by Photoshare
Tips for Photo Restoration by Plum Digital
Classes that start TODAY at betterphoto.com: Photoshop Tips, Tricks and Filter Magic
Keywords: artistic photo, beginner, brush - brushes, photo editing, photoshop elements PSE, resources


1 comment:
When I see layouts like this, I wish I could do digital scrapbooking!!
Post a Comment