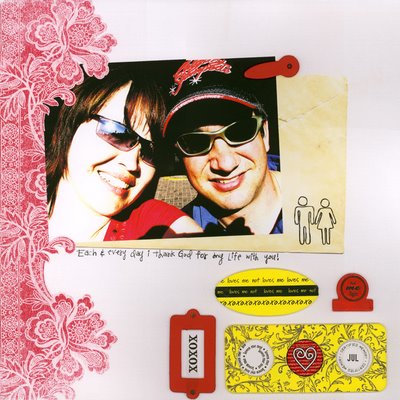
How to Add Chipboard and Rubons to a Digital Layout: Tutorial
Today's tutorials feature different ways to print out your digital creations and add to it with paper, embellishments and glue to create what we call hybrid layouts. Check it out and please let us know how we are doing!
Tutorial by Cammy Plummer, Creative Team Member

1. Sharpen photo by going to Filter>Sharpen>Unsharp Mask and apply these settings:
Amount - 60%
Radius - 2.0
Threshold - 0
2. Adjust levels by going to Control+L. Move the sliders inward so they are on the edges of the black pixels.
3. Apply the photocopy filter from Virtual Photographer (optikVerve Labs).
To Create This Layout:
1. In your software program, cut out the patterned paper along the design and lay the photo on top where it will fit in the design.
2. Duplicate the patterned paper layer and move above the photo layer.
3. Erase the parts of the paper that will go behind the photo. This will give the appearance that the photo is tucked into the paper.
4. Add the envelope or other element as a photo mat and apply a digital stamp.
5. Print layout.
6. Paint chipboard elements and alter as desired. ie. stamp, apply rubons, use pens.
7. Apply rubons to background where you would like them to appear behind chipboard bookplates.
8. Glue elements in place and add journaling.
Credits:
Red patterned paper: Amy Tanabe, Summer Flowers, A Cherry On Top
White Canvas: Gina Cabrera, Book Bag Essentials, Digital Design Essentials
Envelope: Michelle Underwood, Antique Finds, Scrapbook-Bytes
Doodles: Tia Bennett, Doodle People
Brush: BrushworX, brushworx.artflower.de
Chipboard shapes: BasicGrey
Paint: Delta Technical Coatings
Rubons: EK Success (heart); Creative Imaginations (date); 7gypsies
Pen: American Crafts
Stamp and ink pad: Stampin' Up!
Featured Reader: Danielle Holsapple
Danielle's How To:1.Digital papers printed on cardstock.
2.Adhere to layout.
3.Embellish.
Credits:
Digi supplies from JennaLynne.com
Bazzill cardstock
Signo white pen
Embroidery floss
K & Co photo corners painted white
Danielle's How To:
1.Digital papers printed on cardstock.
2.Adhere to layout.
3.Embellish.
Credits:
Digi supplies from JennaLynne.com
Prima flowers
Making Memories alphabets and brads
Coming next week!
Next week this blog will focus on how to alter your photos artistically! Look for layouts by readers Cathy Pascual, Debbie Hodge, Thaos Cosgrove, and by our talented Creative Team!We want to feature YOU!
Email your ideas to thedigitalproject@gmail.com by October 22nd to be considered as a featured scrapper.
We are looking for:
Gift Ideas
From cards to mini-albums - innovative and creative projects never seen before
Home Decor Ideas
Fresh ideas to personalize your scrapbook space and all the rooms in your house
Creating Custom Papers and Elements with Your Computer
Basic information on how to make your own paper and elements
Computer Shortcuts
Keyboard and Image-Editing Program shortcut tips
Using Sketches
Provide a sketch or use a sketch from the many online resources
Email your ideas to thedigitalproject@gmail.com by October 22nd to be considered as a featured scrapper.
Email your ideas to thedigitalproject@gmail.com by October 22nd to be considered as a featured scrapper.
We are looking for:
Gift Ideas
From cards to mini-albums - innovative and creative projects never seen before
Home Decor Ideas
Fresh ideas to personalize your scrapbook space and all the rooms in your house
Creating Custom Papers and Elements with Your Computer
Basic information on how to make your own paper and elements
Computer Shortcuts
Keyboard and Image-Editing Program shortcut tips
Using Sketches
Provide a sketch or use a sketch from the many online resources
Email your ideas to thedigitalproject@gmail.com by October 22nd to be considered as a featured scrapper.
Keywords: Adobe Photoshop, Advanced, Gift Ideas, Hybrid, Photo Editing, Photoshop Elements PSE, Printing, PS7, Resources, Digital Scrapbooking


No comments:
Post a Comment