Thursday, June 21, 2007

Layered Templates 101 - Internet Finds!!!

There are an infinite number of time-saving templates out on the market right now. Here are some of my favorite templates that you can find online. If you know of a great template, free or for sale, please feel free to share the links in our comments today!


Perfectly Pieced Templates #1

$5.99

Love the look of quilts or a pieced background? Now you can achieve the same look on your layouts with ease! It's also a fun and easy way to test out color schemes for actual quilts before you make a cut or stitch!

Each template comes with a PSD file with layer styles applied, a layered TIFF file, a flattened PNG file and each layer as a PNG file.

Contains the following quilt patterns:

Irish Chain,
Double Irish Chain,
Trip Around the World,
Rail Fence,
Barn Raising and
Log Cabin Star.

Finished sample shown on preview are created with papers from my Sweet Daisies and Little Gingham Dress Page Kits. Also try my line of fabric textured paper packs, Off The Bolt!

ScrapSimple Paper Templates: Sage $3.49
Oooh, look at the bordered papers you could make, or flower patterns, lots of dots, the possiblities of combining these ScrapSimple Paper Templates is limitless. This is a set of SIX 12 x 12 digital sheets (300 dpi png files) ready for you to create your own unique paper sets.

ScrapSimple Templates are designed to work with popular software programs including Adobe Photoshop, Photoshop Elements and Paint Shop Pro among others. Includes instructions with step-by-step screenshots and sample ideas.


Add a modern flair to your digital pages with this set of retro embellishment templates.

Includes ten embellishment templatein png format.


Speed Byte No. 04
LT86455 Designer: Pattie Knox $2.50

If you're suffering from a case of "scrapper's block" or just need to create a layout in a hurry, "Speed Bytes" are the solution! The basic framework of the design is already in place for you. Load one of these layered .psd files into your program and "cut" your own papers and photos to the shapes in the template quickly and easily.

Illustrated directions for use with Photoshop CS/CS2 and Photoshop Elements 3/4 are included.

Try rotating the template in different directions, add or subtract components, and add your own embellishments to create a layout with your own unique touches.

Speed Byte No. 4" is a full 12" x 12" - 300 dpi template and includes space for l large photo and an optional smaller photo. Text paths are included for several lines of shaped text. Just replace the sample text with your own! "Inked" outlines of the flower and stem are also included on separate layers.

PLEASE NOTE: The text paths are not editable in versions of PS prior to PSCS or PSE2. File Size: 1.6MB


Paper Reveals Layered Template Pack
LT891900 Designer: Katie Pertiet $4.99

Paper reveals made easy with layered templates! Simple 'snap' your paper to the layer and presto--paper reveals! 4 - layered Photoshop files. WILL ONLY WORK WITH PHOTOSHOP AND PHOTOSHOP ELEMENTS. File Size: 10MB



Shutterfly.com


Support This Site


Wednesday, June 20, 2007

Quick and Easy - Quick and Easy - Quick and Easy !!!

Support This Site


Tantalizing Templates

Photoshop Tutorial

by Beth Price, Creative Team Member


Editor's Note: Please check out our Team Search!!! Please submit your written tutorial to be considered by June 27th! Thanks!!!!


Today's Tips: Using some of the amazing digital templates available, we can create beautiful shaped background papers and fill them with flourishes. This tutorial features last month's sponsor Kim Hill at CG Essentials!

To create a scalloped paper shaped layout:
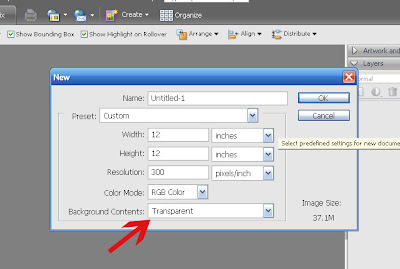
1.Open a new file with transparent background:
FILE>NEW>BLANK FILE
be sure transparent is selected under background contents.


2. Open the scalloped template you want as your shape for the background. Here I used a template by Rhonna Farrer.
3. Open the patterned paper you want to use for the background.


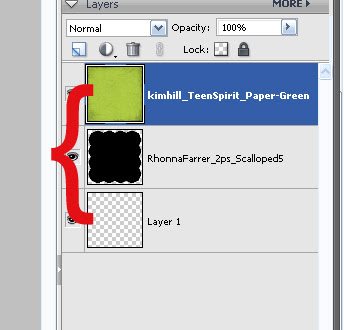
4. Make sure the colored paper is layered on top of the template in your layer palette as shown:


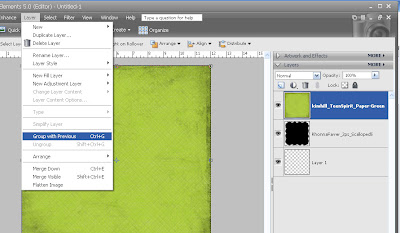
5.In PSE Select LAYER>GROUP WITH PREVIOUS
In PSCS2 LAYER>CREATE CLIPPING MASK
In PS LAYER>GROUP LAYERS


6. Now your paper should have taken on the form of the template below. You can move the patterned paper around if you want to position a pattern.

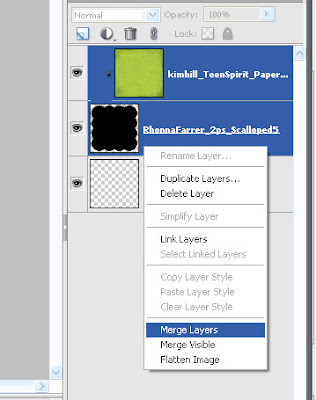
7. When you’re satisfied with the position, merge the layers.

8. Use the same steps to create colored flourishes, and layer them on the page.

Please leave feedback for Beth as we work hard to bring you free tutorials! Thanks!!!

Shutterfly.com


Tuesday, June 19, 2007

Missing the Newsletter?

If you have not received the newsletter sent on Sunday,

please check your Spam Folder. You may also view it online

at Everyday Digital Scrapbooking Newsletter Archive.

How to Create a Template from One of Your Scrapbook Layouts

Shutterfly.com

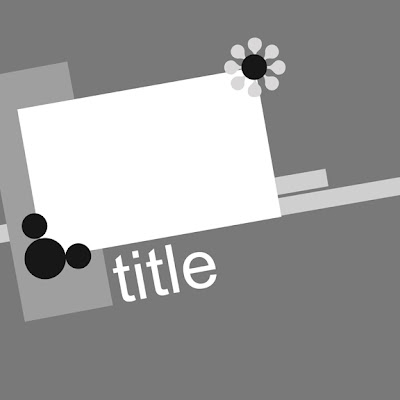
Digital Scrapbooking Tutorial and Free Template

by Amy Duquette, Creative Team Member

When it comes to creating sketches and templates from scratch that is so not a me thing. I am not a planner in that respect. My layouts take on a mind of there own after I get a few elements on the page so creating unique and never before seen templates is not something I think I would excel at.

BUT...

I CAN make templates to share with others using my already completed layouts and now you can too after reading this tutorial. :)

There are a variety of ways to do this but I am a simple person and like to take the easiest way possible to do things so that is what I did.

Steps (for Photoshop CS)
1. First thing you need to do is open your layout. I used the original .psd of my layout and flattened the layers. Then SAVE AS...making sure to name it something other than its original name.

2. Add a new layer and fill it with a shade of grey, black or white. Then label that layer you "Background layer". When you are finished hide this layer by clicking the little eye beside the layer in the layers pallette.


3. Add a new layer above your background layer. Take your rectangular marquee tool and make a shape similar to that of your photo. Fill it with white and free transform it so that it is the same as your photo on your original layout.

4. Add a new layer and repeat step 3 for EACH of your elements and fill them with a different shade of grey.

5. You can use your Custom Shape Tool to add extra emellishments for visual purposes (see my template with the circles for buttons and the custom shape for a flower) but usually these layers are deleted and the user will add their own embellishments when they are using the template.

6. You can now add a title or journalling block. Just add a new layer and type "Title" then free transform it and move it to where you would like it to go.


Support This Site


7. Now you can make your "Background Layer" visible again by clicking on the eye beside the layer. This step lets you double check to see if you missed anything.

8. Now that your template is complete you can delete your original layout layer (should be the very bottom one) and save your template as a .psd.

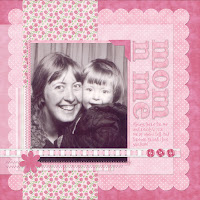
Here is my original layout and my finished template! Simple yet effective! I have included the template as a freebie (below) for you so enjoy!


Download Amy's Template Here - and please leave a comment!

Thanks~!


Monday, June 18, 2007

Introducing Miss June: Di Hickman - Creative Team Guest Member

Shutterfly.com


Making Your Own Templates:

Scallop Edged Template

By Miss June: Di Hickman,

Creative Team Guest Member


{Please note: Everyday Digital is looking to expand it's team. We have a new compensation package in place since the last team search we held. Please see this post for all the information!}


Scallop edges are so HOT right now!
Everywhere you look you'll see scallop edges on patterned paper and cardstock, from big scallops to small everything comes with a decorative scallop edge! You can make your own scallop template and turn any digital paper into a scallop,

I'll show you how...


* First open a new document 12" x 12" @ 300 dpi, with a transparant background


* select your brush palette, ensure that the round brushes are selected (this should be your default set)


* select [brush tip shape] and you can change the brush diameter and spacing. For this template I chose a brush diameter of 300pixels (1") and the spacing to 90%. You can use anything from 1 - 100% depended on the depth of the scallop you wish to create.


* Press shift and then click and drag a line of the brush along the page


* Copy the layer, select the new layer and rotate the image 90 degrees, then move to overlap the original layer


Then Merge the two layers together (control E)


* Again copy the layer, rotate 180 degrees this time, and merge the layers. You should now have a frame of dot brushes


* open a new layer, and using the selection tool click and drag a square overlapping the scallops, fill with the same color and merge the layers (this avoids any stray pixels not being filled)


* once merged as a single layer, save as a .png file to retain the transparant background


* Use the template the same way you would any other template.
* Open your template and the paper you wish to scallop. Drag the paper onto the same document as the scallop template, and use control G to create a clipping mask


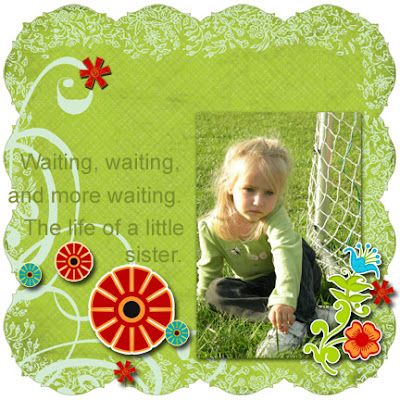
and VOILA! (credits: pink paper by Sarah Meyer, SarahB Designs, www.gottapixel.net )


Final layout
Credits: Gummy Grins Girly kit by Sarah Meyer, SarahB Designs, www.gottapixel.net ; font: SP wonderful wendy, Scrapsupply.com


Please leave feedback for Diane! we work hard to bring you free tutorials!!! Thanks.


Support This Site


Sunday, June 17, 2007

Friday, June 15, 2007

More Ideas for Creating A Digital Kit from Scratch with freebie!


Creating a Digital Scrapbooking Kit with CS2

by Sue Kristoff, Creative Team Member


Creating a digital kit is a fun way to personalize your layouts. I've made a few digital elements, but I've never make a full kit before. So, I'm documenting my process to share with the readers of the EDS blog. For software, I use Adobe Photoshop CS2, thought the general concepts can be applied using any software package.


Step 1: Choose an Inspiration or Theme

I was inspired by a shorts/t-shirt set that belongs to my younger son. It contains a bright blue and bright orange color combination, which is very vibrant and striking. I decided to create my kit around those colors.

Step 2: Choose a Color Palette

Because my inspiration was based on a color scheme, choosing my color palette was easy. Blue and orange are complimentary colors on the color wheel, so they create a natural color combination.

Step 3: Sketch Ideas for Paper and Embellishments

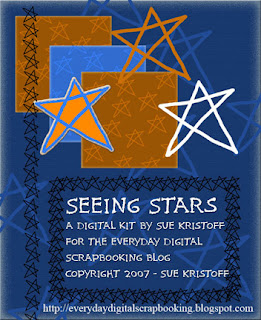
I wanted to have a playful and kid-like kit, to match my two young boys. I decided to go with a hand-drawn star motif as my major design element. I digitally drew stars until I created one I liked, that wasn't too perfect, but not too messy either. I saved the basic star as a brush, so I could use it in creating additional elements.

Step 4: Creating and Saving Papers

All of my papers and elements were created at 300dpi.

I started my kit by creating the papers, since they would form the base of my layouts. I picked a vibrant blue for the base, then gave it a texture using the "Blending Options" for that layer. I then used my star brush to "stamp" stars onto my paper using a slightly lighter blue. I scattered the stars around the paper until it was uniformly filled. I then "distressed" the edges of the background layer so that the edges of the paper were slightly lighter. I did this by adding an "Inner Glow" under the "Blending Options" for that layer, then playing with the variables until I was happy with the look. I saved my paper as a .jpg, then I altered the colors to create a darker blue paper. I saved that paper also as a .jpg, and did this two more times to create two orange papers.

Step 5: Creating and Saving Embellishments

I used my star brush that I created in Step 3 to create a star element, that I saved as a .png file. Saving elements as .png files allows you to preserve the transparency of the element. I used the color picker to match the color of my stars to the papers I had created, so I had an assortment of stars in coordinating colors. I took one of the blue stars, filled it with a contrasting orange, then applied a chipboard action by Atomic Cupcake to the star so it would look like a distressed chipboard accent. Finally, I created a frame and a border using the star brush. I saved all of these elements as .png files.

Step 6: Packaging Your Kit

Once you have created a complete kit, you may want to package it to share with others! Create a terms of use file, and a preview image, then zip all the items together into one zip file. You can then upload the zip file to a free file sharing site, and share your kit with your friends! When I created my terms of use file, I looked at TOUs from other digital kits I had, then modified one to fit my own needs.

Now that you've seen how I made my kit, go out and try one of your own! If you would like to download my kit, please click this link: http://www.fileden.com/files/2007/4/23/1010244/stars_sbk_kit.zip Please leave a comment here if you download my kit!

Stay tuned later in June for a mini-album created using this kit!

Please leave feedback for Sue!

Support This Site