How to Create a Template from One of Your Scrapbook Layouts
When it comes to creating sketches and templates from scratch that is so not a me thing. I am not a planner in that respect. My layouts take on a mind of there own after I get a few elements on the page so creating unique and never before seen templates is not something I think I would excel at.
BUT...
I CAN make templates to share with others using my already completed layouts and now you can too after reading this tutorial. :)
There are a variety of ways to do this but I am a simple person and like to take the easiest way possible to do things so that is what I did.
Steps (for Photoshop CS)
1. First thing you need to do is open your layout. I used the original .psd of my layout and flattened the layers. Then SAVE AS...making sure to name it something other than its original name.
2. Add a new layer and fill it with a shade of grey, black or white. Then label that layer you "Background layer". When you are finished hide this layer by clicking the little eye beside the layer in the layers pallette.
3. Add a new layer above your background layer. Take your rectangular marquee tool and make a shape similar to that of your photo. Fill it with white and free transform it so that it is the same as your photo on your original layout.
4. Add a new layer and repeat step 3 for EACH of your elements and fill them with a different shade of grey.
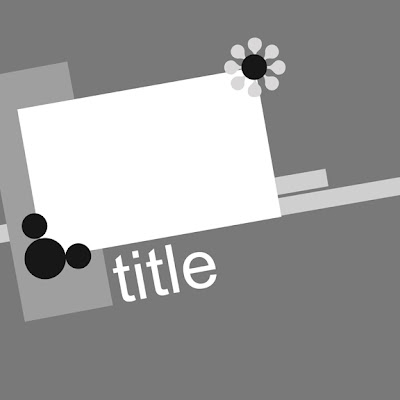
5. You can use your Custom Shape Tool to add extra emellishments for visual purposes (see my template with the circles for buttons and the custom shape for a flower) but usually these layers are deleted and the user will add their own embellishments when they are using the template.
6. You can now add a title or journalling block. Just add a new layer and type "Title" then free transform it and move it to where you would like it to go.

7. Now you can make your "Background Layer" visible again by clicking on the eye beside the layer. This step lets you double check to see if you missed anything.
8. Now that your template is complete you can delete your original layout layer (should be the very bottom one) and save your template as a .psd.
Here is my original layout and my finished template! Simple yet effective! I have included the template as a freebie (below) for you so enjoy!


Download Amy's Template Here - and please leave a comment!
Thanks~!


5 comments:
Excellent job Amy!
Great tutorial Amy! TFS!
Thanks for the template and what a cute layout!-jsj
Thanks so much for the tutorial (and the template)! I look forward to using both while I'm recuperating.
Thanks for the tutorial =)
Post a Comment