How to Create Felt Embellishments for Scrapbooking
Are you looking for Christmas Gifts for a Scrapbooker?
Are you creating a wishlist for yourself for scrapbooking?
Well...I've done the searching for you for all your photography, altering, album, scrapbooking, digital, technology, and scrapbooking tool needs!
Are you creating a wishlist for yourself for scrapbooking?
Well...I've done the searching for you for all your photography, altering, album, scrapbooking, digital, technology, and scrapbooking tool needs!
Please stop in to our sponsor!

If you’re working in paper, there are new products coming out in felt. If you’re working in digital, felt is just hitting the market too. Here is how I created a felt mushroom in PSE 5. I used it in the layout at the bottom.
Some Preparation is needed:
1.Select a clip art shape that you want to turn into felt. I found one in the shapes drop down menu in PSE. You could also get one off the internet (that’s what I used for my mushroom).
2.If the clip art isn’t solid color, in PSE choose EDIT – FILL LAYER and fill with a solid color like black.
3.Now delete the background (use the magic wand, then SELECT-INVERSE and delete. You should be left with a transparent background.
4.To clean up the edges you can simplify your image and then use the EDIT- STROKE/OUTLINE tool to give it better form.

Mention this ad and get free May Arts Ribbon with your first order at The Shaker Box!
Now we’re ready to create felt.
1.You’ll need 2 colors for your image. A darker shade and a coordinating slightly lighter shade. For the mushroom I chose dark green and a medium green. You’ll have to play around with your choices. Use your color selector to choose these for your fore and back grounds.

2.Now we’ll add a couple filters and we should have something that looks a lot like felt.
3.In the Artwork and Effects Palette, chose Filters.

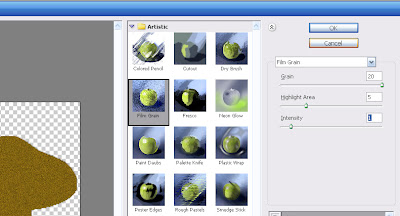
4.Go to Artistic Effects – Film Grain. Adjust the grain to the highest level.

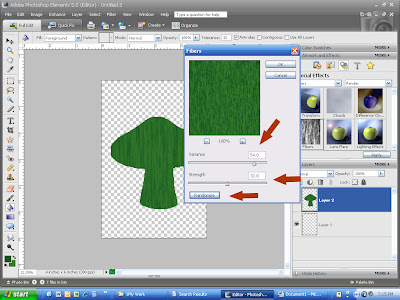
5. Now under Filter, go to Render – Fiber. Here is where your color selections will make a big difference. Adjust the Variance, Strength, and the Randomize. If you don’t like the effect, undo the filter, and then change your color selection and apply the filter again.

6.Continue to work with the image until you’ve got all the detail you want. I personally like to add a beveled edge for more depth. You could add more layers, stitching, and drop shadows. I printed it and cut it out.
Here is the finished product in the layout.


4 comments:
Thanks a lot for this tutorial. Can you tell me what kind of paper did you use to print the felted mushrooms, please?
Thank-you from the bottom of my heart for this tutorial. I have have been searching high and low to find out how to create a felt effect for my scrapbooking elements, and when i did find some, they weren't free, they had to be purchased. You have made this woman very happy! wishing you a safe and Happy New Year!
Wow. Awesome! Thank you. I'm so happy Google keeps bringing back to your site.
mposlot
Post a Comment