Two Tutorials in One - Find Out How to Use Martha Stewart Stickers

Last Day of EDS Birthday Celebration 2007
Thank you so much to everyone who helped us have a wicked cool week as we celebrate turning one years old at EDS. Remember you have until midnight Pacific time tonight to get your answers in for our trivia contest. Right now we only have a handful of responses so your odds of winning are superb! Continue to this post to enter the RAK contest!
Our newsletter will be sent on Sunday morning (October 7th) where we get to show our appreciation to all EDS Fans with our first ever FREE digital/hybrid kit with over 100 pieces~!
Sign up for our newsletter if you haven't yet in the sidebar of this blog.
Thanks again!
Now for the last birthday-themed tutorial:
Combining Martha Stewart Printable Clipart
with Julie Ann's Bubblewrap Brush
Digital Scrapbooking Tutorial
Did you know you can open Adobe PDF documents in Photoshop Elements to use when scrapbooking? It's too easy so I'll show you how to use clipart stickers from MarthaStewart.com along with tips for using the Bubblewrap Brush I created just for you - which will be in Sunday's FREE kit in the EDS Newsletter.
Instructions for Using PDF Clipart:
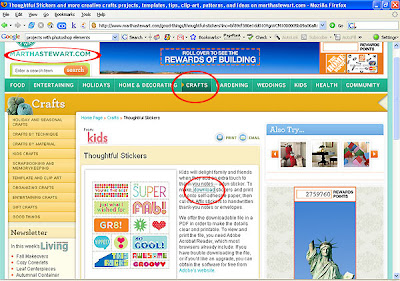
1. Go to Martha Stewart's website, click on crafts, and you'll see these stickers. Click on the sticker, then click on download.
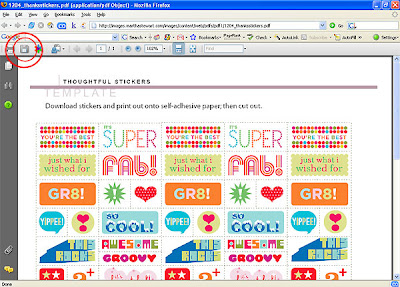
 2. When the sticker opens in PDF format, click on the button that saves it to your desktop.

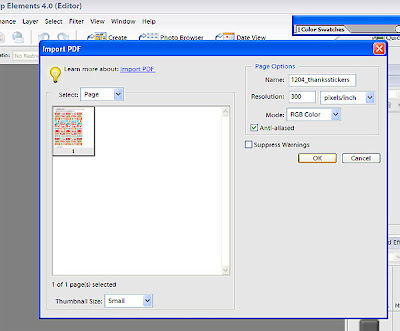
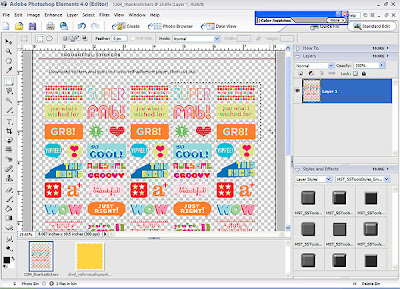
3. Open Photoshop Elements Editor. Open the MarthaStewart PDF document you just downloaded. Click on the image icon. I changed the resolution to 300. Click OK. It will open in your PSE Editor workspace.
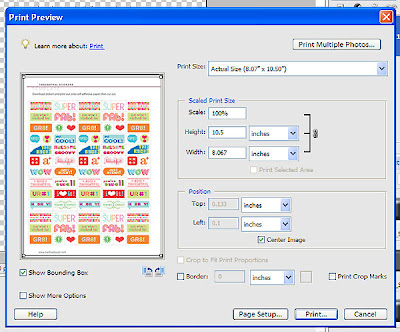
4. If you wish to print it now with a white background, you may do so now. I'm going to use just a few of these stickers in a digital layout, so I chose not to print at this time.
5. To select just a few stickers to use on my layout, I use the rectagular marquee tool to draw a box around the top six stickers in the upper right corner. (If you are not familar with the marquee tool, Go to Photoshop Elements Help. Type in the search box "rectangular marquee" and read "To Use the Rectangular and Elliptical Marquee Tools").
Once the box is drawn around the stickers you want, click ctrl-c to copy.
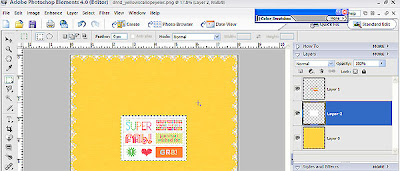
6. Next I have opened Amy Duquette's scallopped paper that you will get in Sunday's Free Kit from the Newsletter. Note that this paper is 8x8.
Click ctrl-v to paste the stickers onto the background.
Create a new layer just above the background.
Use the rectangular marquee tool to draw a box around the stickers, but stay on your new layer. Fill that box with the color white.
Continue to create your layout.
Instructions to Use the Bubblewrap Brush from the EDS Free Kit:
1. If you are unfamiliar with how to install and use brushes, please refer to these past tutorials:
How to Load Brushes
Using Brushes
Tip: I repeat the brush in the same place more than one time so that the color becomes opaque.
To make it look more like real paint, I'll use a filter. Go to Layer Styles, then to Glass Button. I click on Translucent Button.
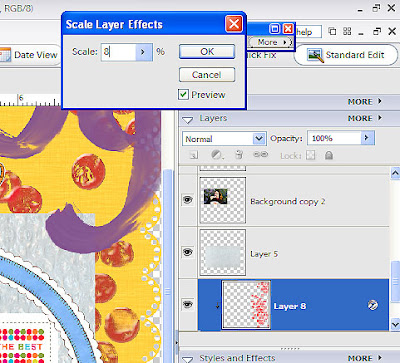
2. Then I adjust this layer style by going to Layer -->Layer Style--> Scale Effects.
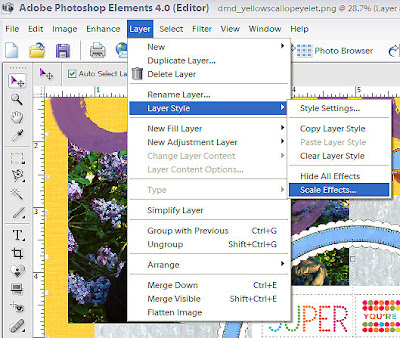
I set the scale to 8. You may play around and adjust it according to your own personal tastes. Alot of great effects come about just by taking the time to play around with the styles, effects and filters. Have fun! Go wild!
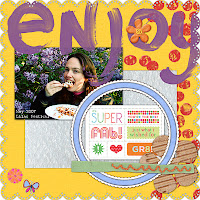
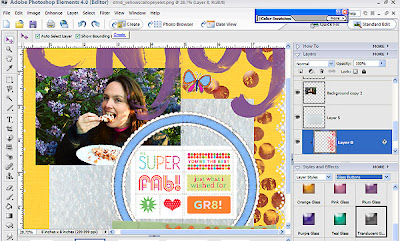
Here is my finished layout using Martha's clipart and my bubblewrap brush.
Instructions for Using PDF Clipart:
1. Go to Martha Stewart's website, click on crafts, and you'll see these stickers. Click on the sticker, then click on download.
 2. When the sticker opens in PDF format, click on the button that saves it to your desktop.

3. Open Photoshop Elements Editor. Open the MarthaStewart PDF document you just downloaded. Click on the image icon. I changed the resolution to 300. Click OK. It will open in your PSE Editor workspace.

4. If you wish to print it now with a white background, you may do so now. I'm going to use just a few of these stickers in a digital layout, so I chose not to print at this time.

5. To select just a few stickers to use on my layout, I use the rectagular marquee tool to draw a box around the top six stickers in the upper right corner. (If you are not familar with the marquee tool, Go to Photoshop Elements Help. Type in the search box "rectangular marquee" and read "To Use the Rectangular and Elliptical Marquee Tools").
Once the box is drawn around the stickers you want, click ctrl-c to copy.

6. Next I have opened Amy Duquette's scallopped paper that you will get in Sunday's Free Kit from the Newsletter. Note that this paper is 8x8.
Click ctrl-v to paste the stickers onto the background.
Create a new layer just above the background.
Use the rectangular marquee tool to draw a box around the stickers, but stay on your new layer. Fill that box with the color white.
Continue to create your layout.

Instructions to Use the Bubblewrap Brush from the EDS Free Kit:
1. If you are unfamiliar with how to install and use brushes, please refer to these past tutorials:
How to Load Brushes
Using Brushes
Tip: I repeat the brush in the same place more than one time so that the color becomes opaque.
To make it look more like real paint, I'll use a filter. Go to Layer Styles, then to Glass Button. I click on Translucent Button.

2. Then I adjust this layer style by going to Layer -->Layer Style--> Scale Effects.

I set the scale to 8. You may play around and adjust it according to your own personal tastes. Alot of great effects come about just by taking the time to play around with the styles, effects and filters. Have fun! Go wild!

(click on image to enlarge)

Layout credits:
Background and circle frame: Amy Duquette for EDS Blog
Bubblewrap brush, bubblewrap, felt ribbon: Julie Ann Shahin for EDS Blog
Dough flower and cardboard flower: Sara Amerie for EDS Blog
Butterfly sticker: Julie Kelley for EDS Blog
Stitched flower: Sarah B. Meyer for EDS Blog
Not included in kit: Enjoy brush by Rhonna Farrer 2peas; Stickers by MarthaStewart.com

Mention this ad and get free May Arts Ribbon with your first order at The Shaker Box!


1 comment:
Great tutorial, thanks! Found your blog through your interview in ScrapGirls newsletter, and I'm adding it to my favorites!
Post a Comment