Get Addicted to Making Your Own Stunning Transparencies!
Editor's Note : We are going to have a lot of fun today with
our Guest Member - Miss April: Rhonda Palmer!
She kicks off a week of HYBRID SCRAPBOOKING TUTORIALS with some fantastic tips for transparencies.


our Guest Member - Miss April: Rhonda Palmer!
She kicks off a week of HYBRID SCRAPBOOKING TUTORIALS with some fantastic tips for transparencies.


Hybrid Scrapbooking With Custom Transparencies to Save Money
Tutorial by Rhonda Palmer, Miss April
Our Creative Team Guest Member
Tutorial by Rhonda Palmer, Miss April
Our Creative Team Guest Member
Are you a scrapbooker that tries to save money any way you can so you can buy more supplies? I mean come on, the more you use the more money you spend. The more money you spend the more your spouse begins to wonder if dinner will be steak and potatoes or romain noodles. We’ve all been there at one time or another. I think I am there all the time but that isn’t the point. The point is I want to use you how you can use brushes in Photoshop to save you some cash so you can buy more stuff.
Brushes, like any other tool in scrapbooking, is addicting. They are basically rubber stamps via computer. Digital scrapbookers love this tool to enhance their backgrounds and photos. How can paper scrapbookers use brushes to help them save money? Easy. If you have any of the Photoshop programs you have brushes in the program. You can adjust your brushes to any size. You can also make them any color you want to match colors in your layout.
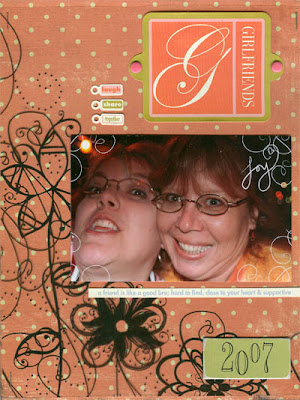
My layout is what is called hybrid. I used digital elements and mixed them with paper. Transparencies are the rage today but they can be expensive. What if you learned to make your own you could save a lot of money plus pick what ever style you wanted. Great for the scrappers like me that are up till 3am scrapbooking.

Here is how to make a transparency in Photoshop. Note…I am using an 8 ½ x 11 printer.
- Open up a new file. Your settings will be 8.5 inches width and 11 inches high. Your dpi should be set at 300. Set at transparent.
- Click on the brush tool. You will need to load your brush. And by loading I mean you will need to pick which brush you want to use.
- Think about if you want it to be a basic black brush or if you want color. You can pick colors with your color palette tool.
- Place the brush where you want it to go. Ex. In my layout I wanted them to be on the bottom and one side. Remember you can use more than one brush. The more you use, without looking too crowded, the more of a stylish look you will have.
- When you have “stamped” the background with brushes you can print them off on transparency. Note that you will need to set your printer to transparency to get the right setting.
Additional Things to Try:
- Brushes can also be used on photos. This technique can help give your photos a new look.
- Brushes can also help to take out background clutter in your photo. You can use any brush you want.
- There are even brushes with letters and numbers, try those on your photo. To use brushes on your photo you will want to make a copy of your photo first. Use the copy photo for your brush use. Once you are done simply print off your photo and you are ready to scrap. These can also be sent to your photo lab to be printed off.
Where to Find Brushes
Brushes are a great addition to any layout rather they be paper or digital. Easy to use, they can be found by going to google and typing in “Photoshop Brushes.” There are some digital designers that make their own and sell so be sure to check out the online stores for those. Here are a few links to get you going:
Supplies used for layout:
Pattern Paper: My Mind’s Eye
Stickers: 7gypsies
Brads: Karen Foster Designs
Chipboard: Heidi Swapp
Brushes:NRJ.EW. Doodles
Feeling Groovey Kit Michelle Coleman at Scrap Artists
Rhonna Farrer's Swirls at two peas.
If you are inspired by Rhonda's tips, please be kind and share your thoughts. Would you like to apply to be a guest team member? Check out how to apply here.


3 comments:
Oh, I love Rhonda! Excellent choice for April! :)
I love this! 2 questions...Can it be done in DIP and where to get blank transparencies??? And would the transparency have to be PVC free like page protectors??? Forgive me if these are sill questions. This is all new to me!
This was a great how to get started doing your own transparencies. You have opened a new creative outlet for me and as I get better, it will save me money.
Post a Comment