Create A Compelling Layout with Journaling and No Photographs

Digital Scrapbooking Tutorial
by Cammy Plummer, Creative Team Member
Focus on Journaling
by Cammy Plummer, Creative Team Member
Focus on Journaling
 Click on image to enlarge please.
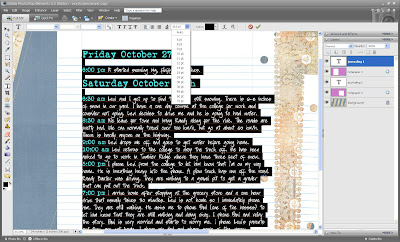
The journaling for this layout was taken from my blog. This was a big event in our lives and there were no photos.
INSTRUCTIONS
1.To create the diagonal stripes for a background. Use the shape tool and then skew to the desired angle. Group patterned paper over the stripes.
2.Add stitching.
3.Add notepaper. Duplicate layer and reverse one to give the appearance of two pages from a notebook. Write journaling. I like to use a font that mimics handwriting. Adjust the kerning (space between lines) to match the lines on the notepaper. Change fonts and font colours to highlight sub-titles within your journaling.
4.Add snowflakes. Move some below and above the notebook paper layer.
5.Write your title and justify right so it lines up on the right border of your page. Change colour as necessary. Apply the sponged canvas filter from Atomic Cupcake to your title.
6.Place staples at the corners of your page.
7.Apply drop shadows to your page elements.
CREDITS
Paper: Jen Wilson, Nostalgia No. 3 & Fading Days, Jen Wilson Designs; Gina Cabrera, Book Bag Essentials, Digital Design Essentials
Snowflakes: Karen Hunt, Paper Flakes, Scrapbook-Bytes
Staples: Fee Jardine, Chocolate Cupcake, The Digi Chick
Stitches: Jackie Eckles, Big Quirky Stitches, No. 1, Designer Digitals
Paper Tear: Stephanie Krush, 2005-straights, Digital Paper Tears
Actions: Traci Murphy, Drop Shadows, Traci Murphy Designs; BriAnna Shultz, Sponged Canvas, Atomic Cupcake
Fonts: Soli; Love Letter TW; Jailbird Jenna
If you are inspired by today's tutorial, please take a second to let your designer know! Thanks.
INSTRUCTIONS
1.To create the diagonal stripes for a background. Use the shape tool and then skew to the desired angle. Group patterned paper over the stripes.
2.Add stitching.
3.Add notepaper. Duplicate layer and reverse one to give the appearance of two pages from a notebook. Write journaling. I like to use a font that mimics handwriting. Adjust the kerning (space between lines) to match the lines on the notepaper. Change fonts and font colours to highlight sub-titles within your journaling.

4.Add snowflakes. Move some below and above the notebook paper layer.
5.Write your title and justify right so it lines up on the right border of your page. Change colour as necessary. Apply the sponged canvas filter from Atomic Cupcake to your title.
6.Place staples at the corners of your page.
7.Apply drop shadows to your page elements.
CREDITS
Paper: Jen Wilson, Nostalgia No. 3 & Fading Days, Jen Wilson Designs; Gina Cabrera, Book Bag Essentials, Digital Design Essentials
Snowflakes: Karen Hunt, Paper Flakes, Scrapbook-Bytes
Staples: Fee Jardine, Chocolate Cupcake, The Digi Chick
Stitches: Jackie Eckles, Big Quirky Stitches, No. 1, Designer Digitals
Paper Tear: Stephanie Krush, 2005-straights, Digital Paper Tears
Actions: Traci Murphy, Drop Shadows, Traci Murphy Designs; BriAnna Shultz, Sponged Canvas, Atomic Cupcake
Fonts: Soli; Love Letter TW; Jailbird Jenna
If you are inspired by today's tutorial, please take a second to let your designer know! Thanks.


1 comment:
Wow - scary story - glad it had a happy ending. Cool tutorial - thanks for sharing it :)
Post a Comment