You Don't Need to Be a Digital Scrapper to Make A Gorgeous Home Decor Tissue Box with Digital Products
Update at the end of this post!
What is a fast way to personalize your space but you don't have the right decorative paper?
You can create the paper yourself with your digital software or download immediately a purchased digital paper kit.What is a fast way to personalize your space but you don't have the right decorative paper?
Just imagine looking through your paper stash, and getting frustrated that you don't have just the right pattern or colors for your altered project. Your solution is simple. Jeanne demonstrates how easy it is to use digital products for her altered item which is a creative tissue box!
Featured Reader: Jeanne Molle
 Project posted with permission from designer
Supply List
Iron Orchid Designs (Digital designers) Bramble Manor papers kit.
Making Memories paint (celery)
Found wooden tissue box
Liquitex Matte Gel Medium
Xacto knife
Instructions in Jeanne's words:
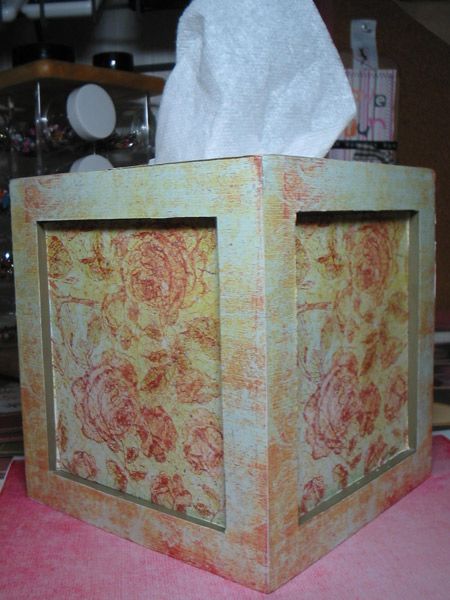
I am Junk Market style :) I found the wooden tissue box at a thrift store.
I selected some yummy Iron Orchid printed papers in two complimentary styles, then printed it from my computer. I have an awesome HP inkjet printer and the quality is fabulous. However, when working with a project 3-d, you need an item either from a laser printer or a photo copier to prevent the bleeding which can occur in inkjet paper applications.
After copying the papers for a couple of cents at my local copy center; I measured the box sides and top for accuracy in cutting the paper to fit, allowing 1/4 inch all around for error.
Sand the box and wipe off any dust remnants.
There were parts of this box, I did not intend to cover with paper. It was at this time I painted those portions with Making Memories paint in Celery. Allow time to dry.
Apply the matte medium in a even light coat to the area in which you are going to attach the paper. Immediately attach the paper and smooth with your bone folder.
After it dries use an Exacto knife to cut off any "overhanging" paper.
Apply a top coat of matte medium to seal entire project.
Iron Orchid Designs (Digital designers) Bramble Manor papers kit.
Making Memories paint (celery)
Found wooden tissue box
Liquitex Matte Gel Medium
Xacto knife
Instructions in Jeanne's words:
I am Junk Market style :) I found the wooden tissue box at a thrift store.
I selected some yummy Iron Orchid printed papers in two complimentary styles, then printed it from my computer. I have an awesome HP inkjet printer and the quality is fabulous. However, when working with a project 3-d, you need an item either from a laser printer or a photo copier to prevent the bleeding which can occur in inkjet paper applications.
After copying the papers for a couple of cents at my local copy center; I measured the box sides and top for accuracy in cutting the paper to fit, allowing 1/4 inch all around for error.
Sand the box and wipe off any dust remnants.
There were parts of this box, I did not intend to cover with paper. It was at this time I painted those portions with Making Memories paint in Celery. Allow time to dry.
Apply the matte medium in a even light coat to the area in which you are going to attach the paper. Immediately attach the paper and smooth with your bone folder.
After it dries use an Exacto knife to cut off any "overhanging" paper.
Apply a top coat of matte medium to seal entire project.
Be sure you are signed up for our newsletter to get exclusive tips and ideas!
UPDATE:
Please note that there is more than one way to decoupage an object, and I - Julie Ann - am learning right along with all of you. I am confident Jeanne's instructions work very well. I also wanted to share yet another way to decoupage if you have the right products: one of our readers & a pal of mine, PC Smart, emailed me to share with me her tips on decoupage:
Another way to decoupage using inkjet printouts… "ink jet will work if it is on good paper and treated with preserve it or another sealer first. Also, another way to create the pillow is to print it on inkjet fabric – there are so many types out there – I have even dyed them first and then printed on them."
She adds: "The key to decoupaging with inkjet (printouts) is to spray BOTH sides of the paper to seal…. Test a small area first and put one light coat on first, let dry and then you can do heavier ones."
Thanks!


No comments:
Post a Comment