Easy Epoxy Stickers You'll Want to Create Over and Over Again: Digital Tutorial
Custom Epoxy Stickers: Digital Scrapbooking Element Tutorial
by Julie Ann Shahin,
Founder and Editor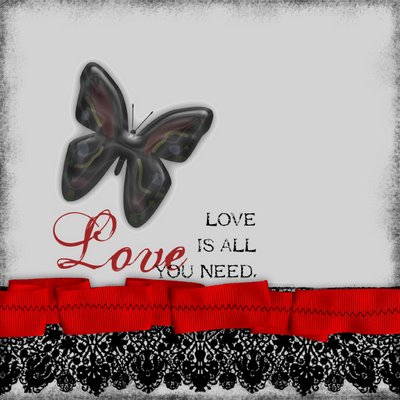 Click on image to enlarge
by Julie Ann Shahin,
Founder and Editor
 Click on image to enlarge
Supplies used:
Photoshop Elements 5.0
Rhonna Farrer Designing with Digital Cabaret kit word art
Jan Crowley Little Black Dress kit Inked edge
Amy Martin Stitched Folded Ribbon
Dawn Stocsill aka hunibuni Angelic Funk kit black lace
Photoshop Elements 5.0 tutorial:
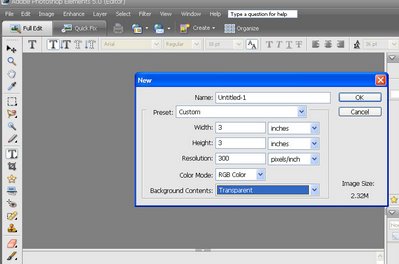
1. Start a new document. I want my sticker to be no bigger than 3"x3" so I will make my document this size.
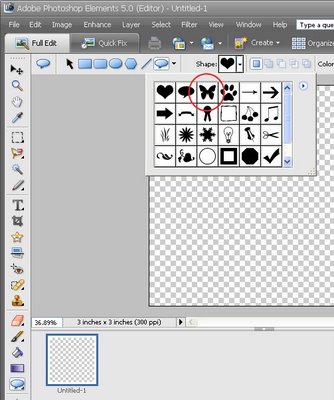
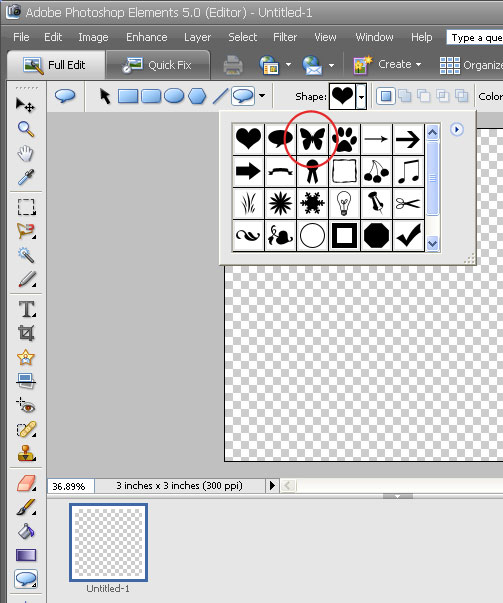
2. Selecting the shapes tool, I click on the drop-down menu, and select the butterfly shape.
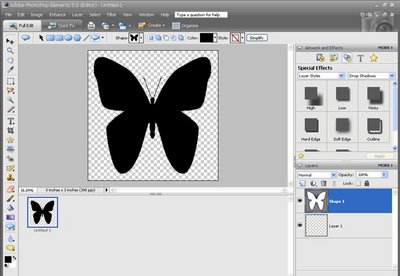
3. With the shape selected, I click in the upper right corner of the document, hold the mouse key down, and drag the shape across and down, eyeballing the size that I want.
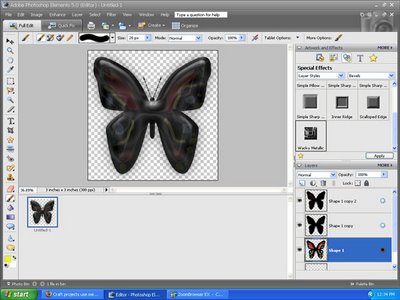
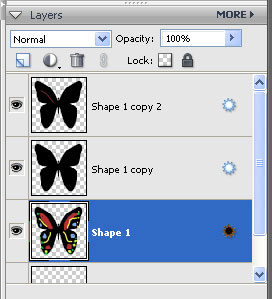
4. I want to make a copy of this layer so I make sure the layer is selected and then click ctrl-j. Now I want to work with this new layer so I make sure the new layer is selected. Next I go to the palette on the right side, and choose the Special Effects menu. I select "Layer Styles" and "Glass buttons" from the drop-down menus. I double-click on the translucent glass effect.
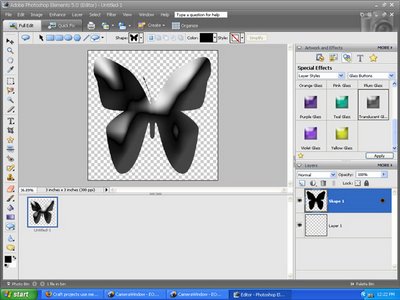
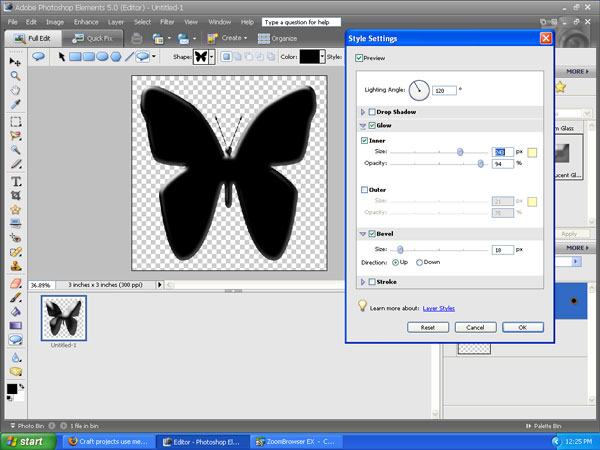
5. I want to adjust the effect. If you go to that layer in the layer palette, you will see an icon on the right side. If you hover over the icon, it says "Indicates layer styles" - double-click that icon to get a dialogue box. I adjust according to taste. Next I create a copy of the layer by clicking ctrl-j.
 (Click on the image to see it larger).
Photoshop Elements 5.0
Rhonna Farrer Designing with Digital Cabaret kit word art
Jan Crowley Little Black Dress kit Inked edge
Amy Martin Stitched Folded Ribbon
Dawn Stocsill aka hunibuni Angelic Funk kit black lace
Photoshop Elements 5.0 tutorial:
1. Start a new document. I want my sticker to be no bigger than 3"x3" so I will make my document this size.

2. Selecting the shapes tool, I click on the drop-down menu, and select the butterfly shape.
3. With the shape selected, I click in the upper right corner of the document, hold the mouse key down, and drag the shape across and down, eyeballing the size that I want.

4. I want to make a copy of this layer so I make sure the layer is selected and then click ctrl-j. Now I want to work with this new layer so I make sure the new layer is selected. Next I go to the palette on the right side, and choose the Special Effects menu. I select "Layer Styles" and "Glass buttons" from the drop-down menus. I double-click on the translucent glass effect.

5. I want to adjust the effect. If you go to that layer in the layer palette, you will see an icon on the right side. If you hover over the icon, it says "Indicates layer styles" - double-click that icon to get a dialogue box. I adjust according to taste. Next I create a copy of the layer by clicking ctrl-j.
 (Click on the image to see it larger).
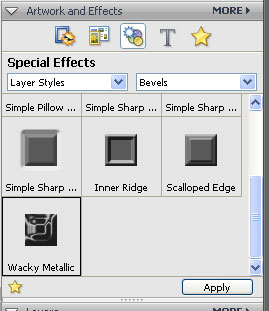
6. On the new layer, I want to add a bevel, so I go to "layer styles" and select "bevels". This time I double-click on Wacky Metallic. Now I adjust the opacity of the different layers according to taste.

7. My next step is to add my personal artistic touch. Using the brush tool, I add strokes of color to the original layer (shape 1)
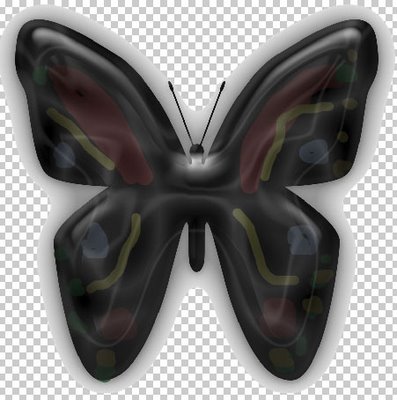
8. When I am finished, I flatten the image by going to the layer menu --> Flatten image. This makes the whole area around the butterfly gray. I used the magic eraser tool to take away that background leaving a transparent background (the checks mean the background is transparent.) Now you are ready to use your epoxy sticker! See my finished product above in the top photo!
Sign up for our weekly newsletter at the bottom of the blog!


8. When I am finished, I flatten the image by going to the layer menu --> Flatten image. This makes the whole area around the butterfly gray. I used the magic eraser tool to take away that background leaving a transparent background (the checks mean the background is transparent.) Now you are ready to use your epoxy sticker! See my finished product above in the top photo!

Sign up for our weekly newsletter at the bottom of the blog!


1 comment:
Great Tutorial !
Thanks so much !
Post a Comment