How to: Creatively remove unsightly backgrounds in photos
Tutorial by Betsy Veldman, Creative Team Member
Layout Title: Dandelion Wishes
(I've included my original photo to show what the background originally looked like)
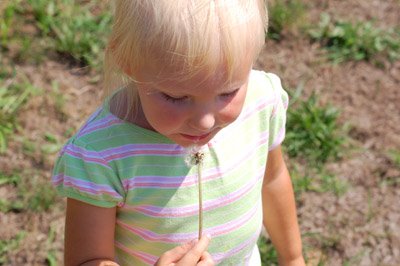
I loved this sweet photo of my daughter blowing dandelion seeds, but I didn't like the unsightly dead grass in the background!! The following technique is a great way to give a photo a dreamy look and get rid of ugly background elements. It's also a fun way to "highlight" a small portion of a photo to make it really stand out as the focal point. In my photo I wanted my little girl's face and the dandelion to be the focal point of the photo and of my layout.
1. Open the photo you want to use and adjust the levels, brightness and contrast to your liking.
2. Open a new document at 12x12 300dpi, or the size of your choice and drag your photo into the new document
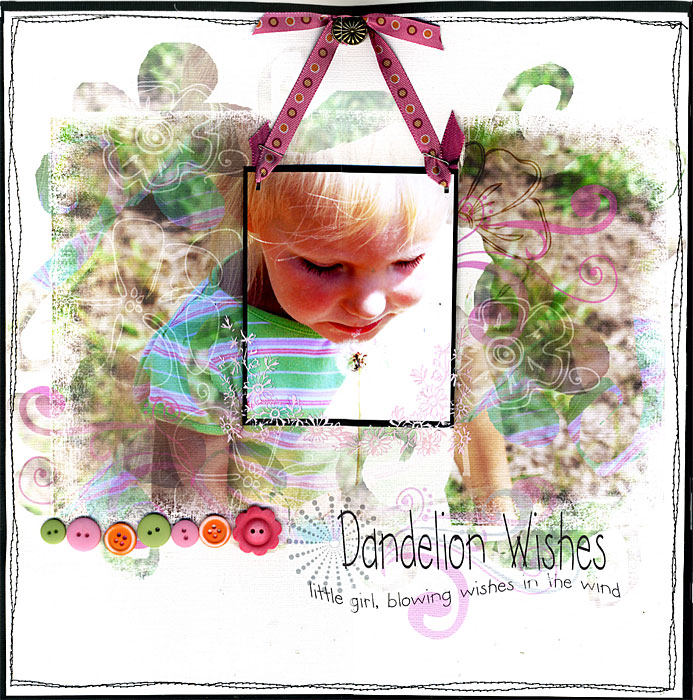
3. First I added a sanded overlay to the edges of my photo. The one I used was by Katie Pertiet, downloaded from DesignerDigitals.com. This starts out the softened look for the photo.
4. I then started filling in my background with brushes and swirls. I created my own "swirls" cut directly from my photo by using the "lasso" tool on the side bar. To do this, make sure your photo is selected, then using your mouse, simply "draw" a swirl, something like this:
any where on your photo, I chose areas in my photo that had interesting colors, such as the area of my daughter's shirt. Your "swirl" doesn't have to be perfect, later we will adjust the opacity, so the edges aren't distinct.
5. After your "swirl" is drawn, click on the select tool so that your swirl is selected. Now go to "Layers" in the drop down menus and select "New> Layer via copy". Your swirl is now a new layer all it's own and you can duplicate it, adjust the opacity and rotate it as desired.
6. Follow the steps above to create several more swirls of different shapes and sizes, cut from different areas of your photo. You can play around with different shapes as well. I also made some flower shapes.
7. Once you have lots of different swirls made, begin layering them over your photo, over the unsightly parts of you background. Play around with adjusting the opacity, rotating them and letting them flow off the edges of your photo until the desired effect is achieved.
8. After I felt I had enough swirls and the background of my photo was sufficiently disguised, I added some digital brushes. I used some swirls by Rhonna Farrer and flowers by Anne Langpap which are available for download from 2 Peas in a Bucket.
9. I then added some text and printed my altered photo and text onto textured cardstock.
10. To highlight a certain part of you photo like I did (may daughter's face and the dandelion), take the original, un-altered photo and crop out just the portion you want to use. Print this onto photo paper, making sure it is the same size as your altered photo so that you will be able to line it up once printed.
11. I matted this photo onto black cardstock and mounted it with foam adhesive over the altered version of my printed photo. I then added some ribbon and buttons as well as some stitching around the outside edge.
p>Keywords: Adobe Photoshop, Advanced, Artistic Photo, Beginner, Blend Modes, Photo Editing, CS2, Photoshop Elements PSE, PS7


3 comments:
wow-stunning!
Wow I love this look! Thank you
great idea to get rid of a distracting background
Post a Comment