How To Create Hybrid Scrapbook Layouts for Illustrator and Photoshop Elements: Tutorials
Today's tutorials are amazing. First, I challenged one of our readers to re-create a paper layout into a digital layout. Imagine all the possibilities for using this knowledge. Infinite! Second, our Creative Team member Betsy Veldman demonstrates how she gets gorgeous looks for her handcrafted paper layouts using a touch of digital magic! Enjoy today's tutorials. As always, your comments and questions are appreciated.
Featured Reader: Sue Kristoff

 Click on images to enlarge. Layouts posted with permission from the designer.
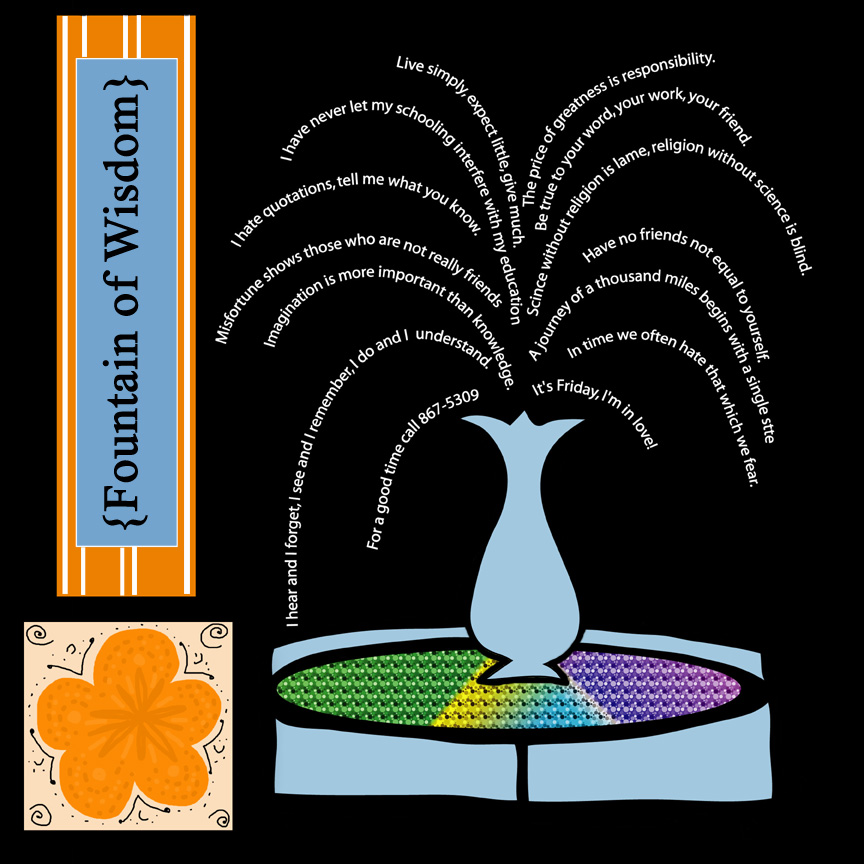
Julie Ann asked how I did the fountain and quotes, thinking I had done them digitally. In actuality, I just cut out the fountain pieces by hand, then drew lines for the quotes and wrote them in. But the question got me thinking, was there a way to do it digitally?
I am a beginner digi scrapbooker, and I've been trying to learn different techniques to create the looks I want. I redid the layout from scratch, using Adobe Illustrator and Photoshop. I am by no means an expert in either program, but I am happy with the results. To create the quotes in Illustrator, I used the Paintbrush too to create a curve that I liked, then I took the text tool and clicked on the beginning of the curve. The text then follows the curve and the curve path is no longer visible, just the text. One word of caution, the text will follow the direction of the curve. So the curves on the right of the fountain started in the center and flowed outward, whereas the curves on the left of the fountain started away from the fountain and flowed in towards the center.
The fountain was also created in Illustrator, although it was quite awkward to make the shapes. This will require more learning on my part to make this work.
The remainder of the layout was created in Photoshop. The squares and rectangles were made by creating a shape with the marquee tool and then using the fill tool to fill the shape with color. The flower and doodles were drawn by hand with the paintbrush tool.
Editor: Thank you Sue!
Hybrid Tutorial by Betsy Veldman, Creative Team Member
How to: Printing a digital background with dimensional flowers
This page features a printed grunge border and a dimensional flower border created from digital images
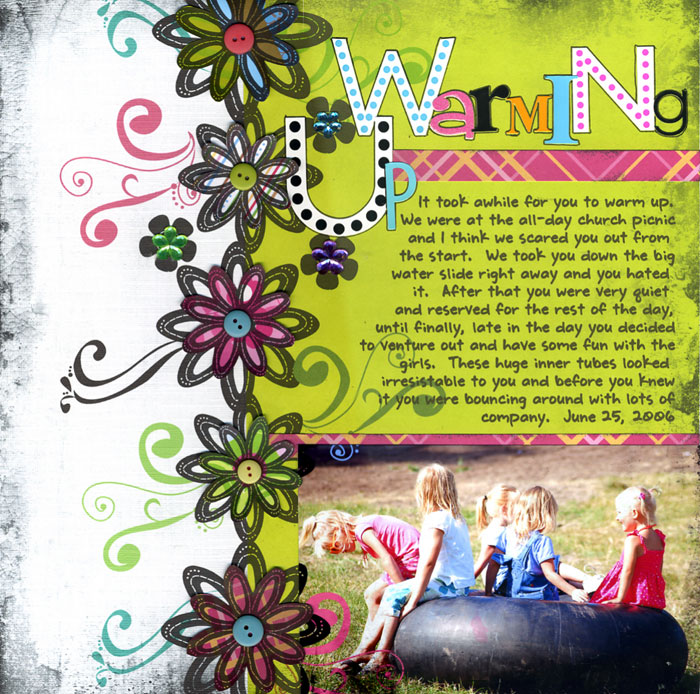
Layout Title: Warming Up
1. I started by doing the basic layout in PSE. I put my photo in place and added my grunge border.
2. Next, I added a border of digital flowers (the ones I used were by Anne Langpap - downloaded from Two Peas in a Bucket) and swirls (by Rhonna Farrer, also downloaded from 2 peas). I also added my journaling.
4. I prepared my paper for printing by layering a piece of green patterned paper over white cardstock, making sure the two papers met where my flower border would be printed. This can be done by using the ruler feature on your PSE document. For example, I knew by looking at the ruler on my document that the center of my flower border was at 4" from the left edge, so I layered an 8"x12" piece of green patterned paper over my white cardstock. Now when I print it, the flowers will print over the intersection of the two papers.
5. I then hid my photo by clicking on the little eye in your objects menu
6. I printed the grunge border, swirls, flowers and journaling onto the paper I prepared in step 4.
7. After you have printed the background, click on the photo layer to unhide your photo.
8. Now you want to print your photo. If you notice on my layout, some of the swirls and the grunge border overlap onto my photo. When I printed my photo, I wanted those elements to print on my photo as well. To do this, use the rectangular marquee tool. Using the marquee, draw a border around your photo, then go to Layers>new>layer via copy.
9. Now drag this new layer onto a new document - it should be your photo as well as any overlapping swirls. Print onto photo paper. Make sure not to change the size of your photo or you won't be able to re-align with your printed background.
10. To create the dimensional flowers, I reduced the size of the flowers in my border slightly, then printed them onto several different patterned papers. I cut them out and layered them over the printed background and added some buttons to the center of the flowers.
11. I added my title with some letter stickers. I also added a few strips of patterned paper and some rhinestone flowers.
Keywords: Adobe Photoshop, Advanced, CS2, Digital Image Pro DIP, Gift Ideas, Hybrid, Photo Editing, Photoshop Elements PSE, Printing, PS7, Resources, Illustrator, Digital Scrapbooking


1 comment:
Wow I love this! You totally hit the nail on the head for me :) This is so where I want to head with my scrapbooking. Now to spend some time playing and learning. THANKS!! - Brooke
Post a Comment