Watch for a Coupon for This Printable Ornament In the Newsletter on December 8th


Digital Supplies
* Sarah Meyer's Printable Ornament Templates (look for the coupon on Sunday)
* Digital Paper and Elements of your choice, Sponsor April Staker's Jolly Holiday used here
Hybrid Supplies
* Cardstock
* Color printer
* Scissors
* Adhesive
* Tape
* Twine or ribbon
Instructions and screenshots are for Photoshop CS3. Similar steps are followed for any Photoshop software. For other programs, use the png template and the jpeg preview for reference.
1. Open the psd template file and your designed paper.

2. Drag the paper on to the template file. Place the paper just above the template layer. Press Alt+Ctrl+G to clip the paper onto the template.
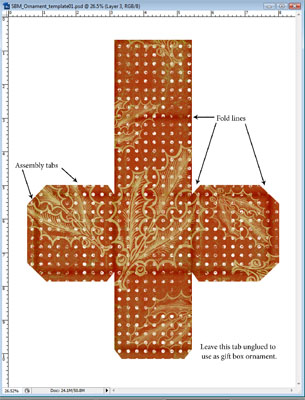

3. If desired, adjust the fill or blending mode for the edges and fold lines layers.
4. Digitally embellish as desired. Ensure that embellishments stay within the filled area of the template.

5. Save and print on heavy paper or cardstock.
6. First, crease on fold lines. Then cut ornament out exactly on the edges.

7. Prepare your ornament hanger.
- Cut and tie a loop of twine or ribbon to the desired length.
- Tape the knot to the INSIDE of the ornament--not on the printed side.
- The loop can be placed to hang at one corner or with an edge at opposite corners.

8. Place adhesive on skinny tabs and assemble your ornament. If desired, leave one side unglued to use as a gift box.


Mention this ad and get free May Arts Ribbon with your first order at The Shaker Box!


