Learn to Create Digital and Hybrid Alphabets!
This week the EDS Creative Team will show you our best tips for creating digital alphabets. First, though, here's a great idea for making an alpha for hybrid scrapbooking! Yay!
Create Dimensional Letters at Home!!
Introducing Michele Ciola,
New Creative Team Member
Create Dimensional Letters at Home!!
Introducing Michele Ciola,
New Creative Team Member

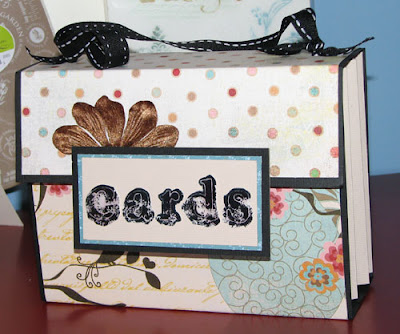
In this tutorial, I will be showing you how to create your very own raised dimensional letters! This technique is very versatile and allows you to create that perfect embellishment to finish off your project. All you will need is:
Photoshop CS2
Font of your choice (thicker fonts work better) -
Cardstock (8 ½ x 11)
Diamond Glaze (or any other dimensional adhesive that dries thick and clear)
Scissors
Printer
I’ve recently been creating these card organizers for my friends (from a class at (www.self-addressed.com) and I couldn’t find the right alpha stickers to finish off the front of the boxes. So, I went into my stash of fonts and found this beautiful one that I knew would be perfect for my project! Let’s get started!
First decide what size you would like your phrase to be. For my card organizer, I knew I wanted it to be 4 x 1.25 inches so simply open the CS2 program and click: File - New
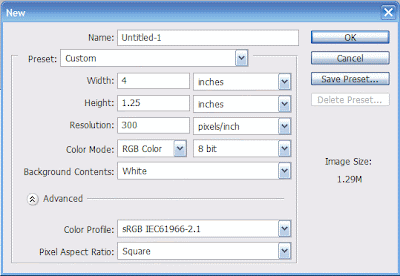
In the dialog box, enter the size of your area in inches. Above I have entered 4 for the width and 1.25 for the height. I’ve set my resolution at 300 (for better printing) and set my background to white. I’ve selected white because it makes it easier to see the alpha characters in the following steps.

If you are using a regular font that can be found on your computer, simply select the Type tool on the toolbar located to the left of the program window. Then click in the white area and type your text. Finally, adjust the text size and font chosen if necessary. I decided to pretty much fill my area with the text as I really wanted the letters to stand out on the front of the box.
If you are using a pre-designed font from a designer and each letter is a separate image, I have a tip that will help you in getting your text lined up properly.
Rulers are your friend! The best tip I could give is to definitely use the rulers. I love this feature. Once the document is opened and to the size needed, simply click on View - Rulers. This will activate the ruler bar to the top and left hand side of your image. Simply point to the top of the ruler and click and drag a ruler line down to your image. See images below:
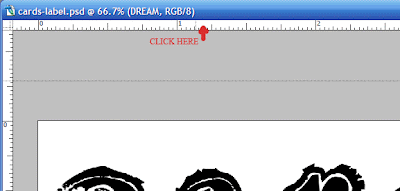
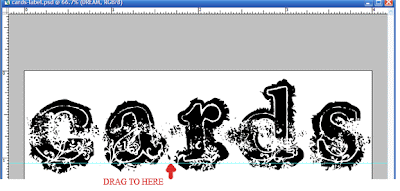
This ruler will help in keeping letters aligned as each character is added. Once they are all aligned, then we are ready for the next step: printing the image.
For dimensional letters, I find it is best to use cardstock as it is a bit heavier and easier to work with.
Since I am printing using black ink only, I’ve set my printer at the regular printing setting and then changed my paper selection to heavy weight cardstock. If you do not have a cardstock option, please use the matte brochure setting. This will work just fine. When creating multi-colored images, please select the best printing option available.
After printing , please let dry for about 10 minutes. This will allow the ink to soak into the paper and prepare it for the Diamond Glaze application.
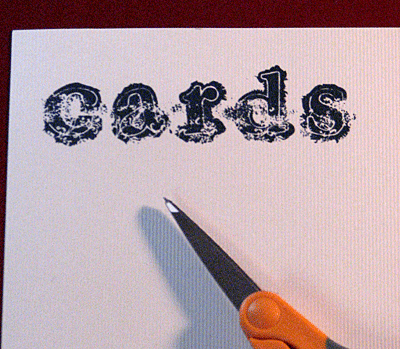
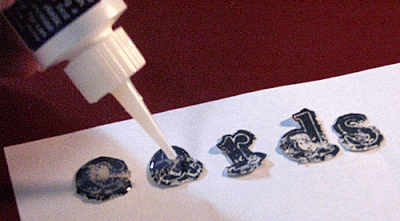
Then simply trim out the alpha letters and lay them on a scrap sheet of paper. Apply a layer of the Diamond Glaze product to each letter. I use my nail to hold the piece at the bottom and then I start applying the glaze from the top down. Be sure to poke any bubbles with a pin to ensure a smooth finish.
Repeat after it dries (usually 20 minutes) if you would like the letters to be thicker. I repeated the application once for a really nice raised look.
Once the glaze is dry, simply attach your letters with your favorite adhesive and you are done.
I hope you enjoyed this tutorial and I can’t wait to see the lovely creations you come up with!!


4 comments:
I love this place and all your tutorials, thanks!
Thanks for all the great tutorials. Love this 3D for hybrid scrapping.
DrGranma
GREAT tip! Certainly a new one to me that I am going to try! I was sad to see DigiScrapShak.com not on the list of Hybrid sites. Each month their newsletter features a Hybrid project complete with instructions as well as freebie printables. The article has featured projects such as clocks, framed art, plug in wall night lights, glass block lights, artist canvas wall art, chipboard coaster photo frames, ceramic tile coaster/wall hangings.
wow!...Nice! very nice tutorial. Thank you for sharing it.
bizee1
Post a Comment