Creating a Digital Kit from Scratch Part 1

Digital Kits 101
by Julie Kelley, Creative Team Member

The first step in creating a digital kit is to choose a color scheme, and possibly a theme. I often use the site http://www.colourlovers.com for color schemes that are beautiful and easy to use. Here's what I chose for this kit:

The next step is to create the papers. Start by creating a blank 12x12 300dpi canvas. To create a basic textured paper, first use the color picker and paint bucket to fill your canvas with your color.
Click on image to enlarge.
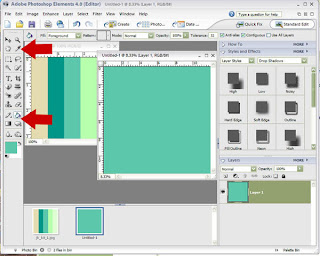
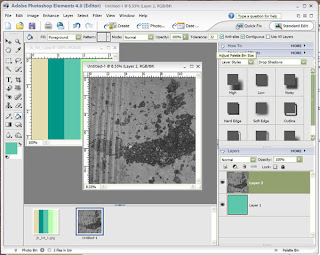
I like a little more depth and texture for my papers. THere are many sources on the web, I sometimes use http://www.mayang.com/textures/ there are many texture photos that you can use and adjust to create lovely textures for your papers. There are also many commercial use overlays and textures that you can purchase. Once you have your texture, copy and place on top of your solid color.
Click on image to enlarge.
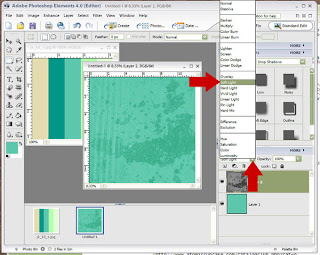
Use the soft light or overlay option in the layers menu to get the texture on your paper.
Click on image to enlarge.
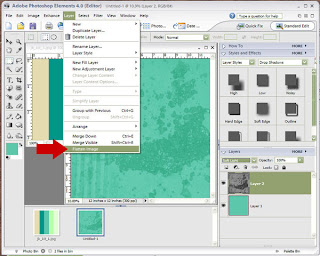
when you are done with your paper, flatten the layers, and save it as a .jpg
Click on image to enlarge.
Follow the same basic directions to create more papers. Use different brushes, add polka dots, or stripes, anything you want to have in your kit!
Tomorrow: Part 2 of Creating A Digital Kit from Scratch plus a freebie from Julie K!
Please leave feedback for Julie Kelley! Thank you.


11 comments:
THANK you SO SO much! I've been playing around, creating a modern cute/stylized apple, and a modern art curves and angles mosaic paper, as well as something else that I'm trying to cut out from it's background.
Anyway, my modern art-ish paper is in Photoshop Friday Gallery at JessicaSprague.com (if any of you want to let me know what you think! Obviously it needs a little polishing up, which I don't know how to do yet, but anyway! I'm so excited about learning to make stuff!)
Lol can ya tell?
Sara (eagerly awaiting tomorrow's; off to go use a nice stormy skies pic of mine to make a background! And maybe cut some letters out of it . . .)
Oh, this was so informative..I thank you so much...I am going to have to try this..I am anxiously awaiting part 2 of this tutorial..thanks again...this was great! 8^)
This is great! I have lots of texture photos I've taken myself but never played with to get them onto my papers. Thanks!
This is brilliant! I only wish I could download it to make my newbie efforts so much easier.
Thanks so much for this! I eagerly await the next installments!
Thanks for this tut - it's something I've always wanted to do, and never finished, so this will be a great way to finally get that done!
Is there anyway to set this up so the lesson can also be for PSP users?
Hi Corri, Please see the tutorial posted today June 13th written especially for Paint Shop Pro. If you still have questions about Monday's tutorial, please email them to thedigitalproject@gmail.com and I will have Maggie Lamarre respond. Thanks!
Thank you for the tutorial - I noticed you use Photoshop Elements 4. Will this also work for Photoshop CS2? Just wondering.
This is a great tutorial!!! I have always wondered how it all worked.
Cassandra
Yes, most of the techniques will work in PSCS2, but some of the menus and tools have different names, or are in different places.
Post a Comment