Wednesday's Tutorial
First you need two things –
A. FxFoto Creative or Media Edition v 5.0 or higher. You can upgrade for free by going to the website at www.FxFoto.com, click on the download and choose Run.
B. Sketch Template that is a jpeg, tff or png sketch template and is FxFoto ready. You can find how to make yours ready to use in the Preparing Templates for FxFoto tutorial on the Everyday Digital Scrapbooking Blog.
1. Start your layout by clicking on the New button in the upper left pane of FxFoto. You will see the choices below. Click on the Quick Sketch Template button.

Now the dialog box below will appear. Navigate to the folder with your FxFoto ready templates. We’ll be using the Kim Hill PDQ Templates Set 1 which I used in the preparation tutorial.
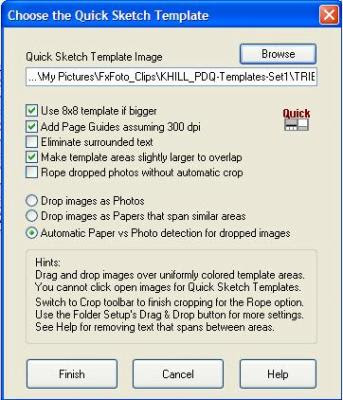
Click Finish and your template is ready to use.

2. I’m using a kit by Rikki Donovan called Bootleg Flowers. Add papers by dragging a paper from the left folder and dropping it onto the colored block of your choice. If you don’t like it there, simply drag another paper and drop it over the first one. Below you can see the paper being dragged over to the medium pink paper.
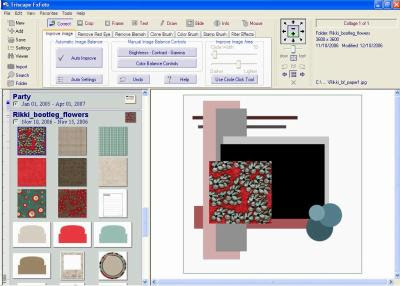
And now the paper has dropped in:
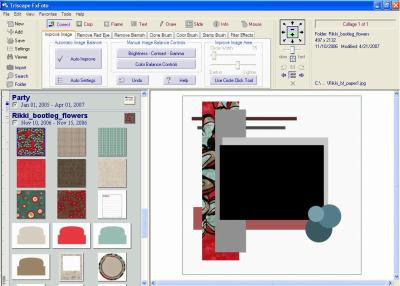
Keep dragging and dropping until you are happy. Drag and drop a photo too!
3. Sometimes you may want to adjust the photo to get the subject centered or to crop it. Here I’ve used a stock photo from Stock.chng. You can adjust the photo after it has been dropped by using Frame Adjust. First, click on the photo to select it. Then click on the Frame tab in the upper tool box. Now click on the Adjust button and here is what you will see:

Grab and move the photo using the blue grab boxes. You can pull out on the photo to make it bigger. The red and white dotted line marks the edge of the frame. The parts of the photo outside the frame are partially transparent and will cropped once the frame is applied. Click Apply when you are done. Here it is close up:
[Insert close up of frame adjust step 3 photo 7]
4. Now let’s add some elements. Just click on them in the left folder and then move around and adjust. Add a shadow in the usual way (Info > Image Placement & Shadow > Add shadow and adjust sliders). Add a shadow to the papers in the template by right clicking on them to select them and use the path above.
5. Add your title and journaling. Click on the Text tab and then choose New Text Object. You will see the tool box below:

Use the Font & Size button to choose any font on your computer. Here I used Stamp Act. Choose the color using the Text Color button. Type in your text and then click on Spelling to check it and click on OK. Now grab and move your text box to the place you would like it on your layout. Not happy with it? Click on the text box to select it and click on Edit Existing Text Object. Then you can change text, fonts, colors etc.
So here’s my layout.

6. Save your layout as both a collage file and a jpeg. The collage file means you can go back and re-edit it later. The jpeg is a final copy and cannot be edited but is the format used for printing.
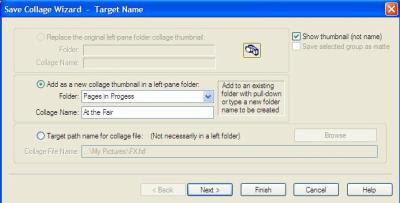
To save as a collage file click on the Save button in the upper left pane and then choose the Save Collage Wizard. Now as in the box below, choose Add as New Collage, then choose the folder and name your collage. I’ve chosen my folder called Pages in Progress and I’ve name it At the Fair. Click on the Finish button.
To save as a jpeg, click on the Save button and choose Save Image As. Just as in the screenshot below, make sure the Entire Collage button is pressed down and then on Next.
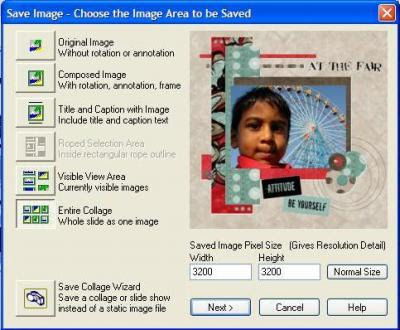
Now, as above, add the jpeg as a new picture to your folder. Choose Add as New Picture, select the folder and name the layout if you wish and then click Finish.
That’s it! Happy Scrapping!
You can puchase FxFoto ready templates at The Scrapping Garden www.scrappinggarden.com. These are already colored and ready to use!


No comments:
Post a Comment