Tuesday's Tutorial
ETA: 10:20 AM May 17 - First Random Winner is luann.mcelduff for being the first one to post a comment
ETA 12:52 PM May 18 - Second Random Winner is BrynnMarie82 - I picked #13 one of my favorite numbers
NEW! ETA: 9:51 PM May 21 - Third Random Winner is Melissa Matley! She was the most recent person subscribe to our newsletter
More Random Winners to come!
ETA 12:52 PM May 18 - Second Random Winner is BrynnMarie82 - I picked #13 one of my favorite numbers
NEW! ETA: 9:51 PM May 21 - Third Random Winner is Melissa Matley! She was the most recent person subscribe to our newsletter
More Random Winners to come!
Preparing Sketch Templates for FxFoto (Part 1 of 2)
By Miss May: Susan White


Layered sketch templates are loads of fun. Not only are they fast but they can be used over and over again with different papers for a whole new page. Plus you can add embellishments to make the page unique.
In FxFoto Creative Edition v 5.0 or higher you will find the new Quick Sketch template tool which lets you drag and drop into a sketch template. You can upgrade your FxFoto Creative for free by using the download on the website at www.FxFoto.com – just click on the download and choose Run and it will install over your old version.
You can puchase FxFoto ready templates at The Scrapping Garden www.scrappinggarden.com. These are already colored and ready to use!
To use a sketch template in FxFoto is will need to be a jpeg, png or tff file so check to make sure the sketch templates you buy come with those formats. You may need to prepare them just a little bit if you want total control over what paper goes where. FxFoto Quick Sketch tool works by using the colors on the template to place and crop papers. That means that if more than one area of the template is colored medium gray, then the same paper will drop in all the medium gray areas. Take a look at Kim Hill’s PDQ template below:

In this template, the three horizontal strips of paper are the same color of grey so paper dropped in one will appear in both strips. If you change the color of the strips before using the template, then you can drop different papers into each strip. When I purchase templates, I take a minute to bring them into my FxFoto, change the colors and then save them so they are all ready to use when I want to scrap.
Changing the Colors
Start by opening your FxFoto and putting the template into the main right pane. Now click on Correct and then chose Color Brush. You will see the tool box below.

Click on the check box marked Flood Color Around Picture Click Point. Set the Transparency slider to 0 and the Color Match Tolerance to about 20. Now click on the area you would like to recolor. Click on the button marked New Color and choose a new color and click on another area. As you can see below I’ve colored a the three strips of paper with three different colors.

Removing Text
I love when designers suggest where the title and journaling should go on the page. But to add my own text I first need to remove their text on the template. I usually save both the original and the FxFoto ready template so I can refer to their design later.
Use the Clone Brush to remove the title and journaling lines. A clone brush is like a paint brush which uses part of the photo as ‘paint’ to cover over another part of the photo. Here you will use the white background color to cover over the words. Click on Correct and then click on the Clone Brush tab. Choose the square brush, set Feather to 0 and the Brush Width to 29. Right click on the white background to set your ‘paint’. Left click and hold and sweep your mouse over the word Title to remove it. I find it easier to zoom into the template as you can see below:
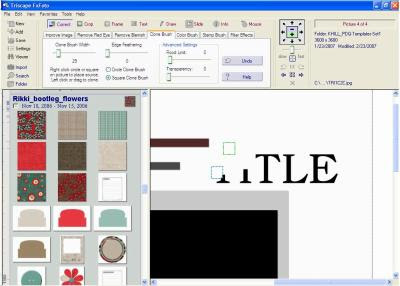
Here is the template now and it’s all set to use! Just save it!
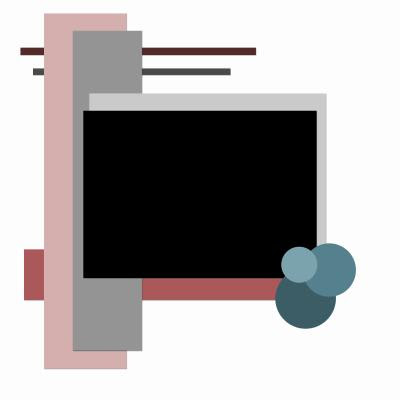
Saving the Template
Here’s a little trick for saving your FxFoto ready templates so they are easy to find. When you are recoloring several templates, first move them into FxFoto so they are in the left pane. The easiest way to do this is to use the Install Zipped Kits feature. Click on the Folder button and choose Folder Order & Set Up. Then click on the Install Zipped Kits button and browse to where you have stored the zipped kit. Click Open and a box will open that lets you rename the kit. Do NOT rename it. That way once you save the fixed template it will go directly in that folder making it much easier to find.
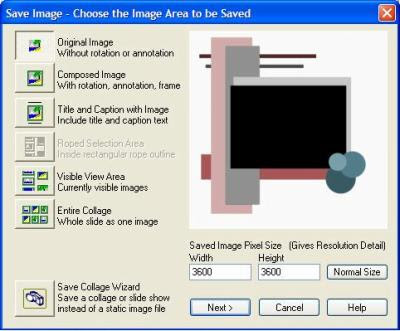
To save your new template, click on the Save button in the upper left pane and choose Save Image As. In the next dialog box which you can see below, make sure the button marked Original Image is pressed down and click Next.
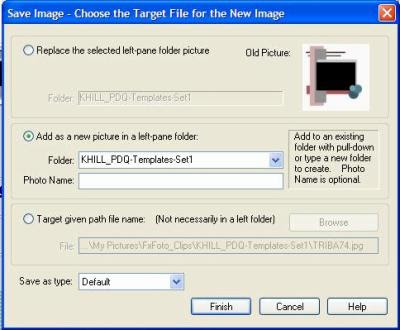
Then final box is below. Choose Save as New Picture and choose the original folder which contains all the templates. Click on Finish and the new template will appear in the left folder. At the same time it will be also saved in a folder in My Pictures which is marked FxFoto_Clips. The FxFoto_Clips folder contains all the kits you have installed using the Install Zipped Kits feature. So your new template will be in a folder marked KHill_PDQ-Templates-Set1 which is the original name of the Kim’s file. And the KHill_PDQ-Templates-Set1 will be in FxFoto_Clips folder and that will be in My Pictures. That will make it easy to find when you want to use the template.
And we will use this template in the next tutorial “Using Sketch Templates”.


1 comment:
Great tutorial Susan!
Post a Comment