Digital Photography Tricks in Photoshop Day 2
Removing Things from Photos in PSE5
by Beth Price, Creative Team Member

by Beth Price, Creative Team Member

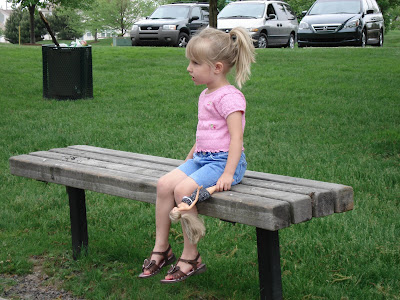
I have a shot of my daughter at the park, and its not the best shot in the world. But there is a story to go with the photo, so I decide to use it anyway. However, I want to remove a couple things that distract me from the focal point. Here is how I do it in Photoshop Elements 5.
- The original photo has some problems that bug me – there is a trash can in her line of view, and there is a pole sticking out of her head.
- I don’t really like the cars either, but if I clean up the other things, maybe they won’t bother me too much.
So the easiest thing I can do is remove the trash. For this one, since it’s mostly surrounded by the grass, I’m going to use my clone stamp. I
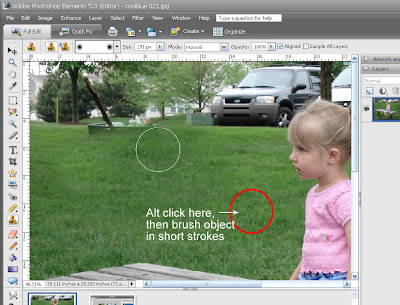
When I have removed the part of the trash can that is surrounded by grass, I am left with the more difficult area on top that is near the trees and houses. Now I’m going to take some creative license and just try to blend the background, not worry about making it look like the real thing. So first I use the clone tool and alt+click to the right of the trash can, on the trees and window. I try to select a brush size that matches the object I’m getting rid of, so that I only have to click once over it.
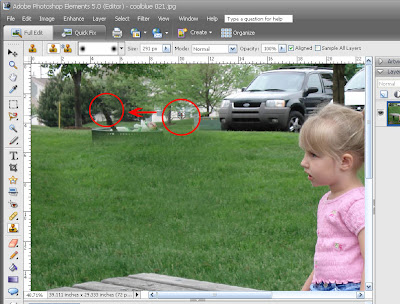
When I’ve finished this part my edited area will have more trees and more windows, but hopefully, no one will be looking closely enough to realize I did some remodeling.
In the next frame, I saw that my grass line looked pretty messed up after cloning the trees and windows, so I again just clicked on the grass line near the single tree on the left, then cloned that area in short strokes to make a new grass line. Again – its not the same as the original, but as long as I can get it to look simple and even, I don’t think anyone will be distracted by it.
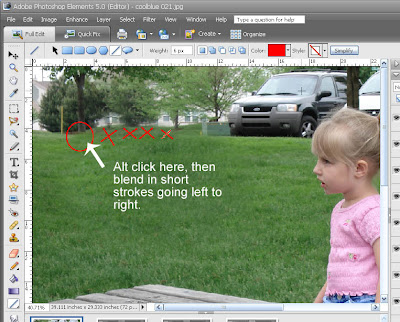
Next I’m going to take the pole out of my sweet girls head. This is messy so I’m going to work in very small chunks, in a very zoomed in area.
My first step is to select the area in front of the white van. I use the polygonal lasso tool to outline the area as closely as I can. When I’ve selected the area and get a tiny little circle sign, the area turns to blinking dash marks (marching ants) and I can then start cloning in the white from the other part of the van. Using a selected area is just a simple way to define the area to be removed, and prevents me from erasing the stuff next to it that I need to remain there. We’ll fine tune in just a minute.

The next figure shows that I selected the clone tool, and I’m filling in the lassoed area.
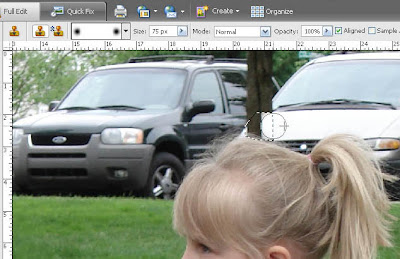
Now I’ll fine tune this area, because my edges are pretty sharp and don’t blend well in the picture. So I select the >Blur Filter>Radial Blur to soften the edges. I still have the area selected/lassoed. Now I will adjust the amount of blurring so that it blends better.
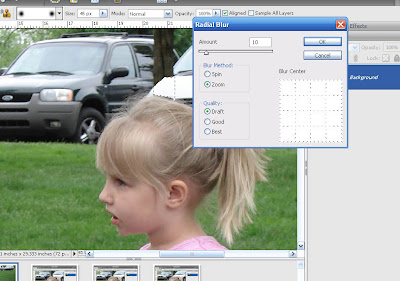
I continue to work on small sections of the pole. Now I’m going to go back to my clone stamp, and Alt click on an area just above the pole, and try to continue to line of the windshield down to the van.
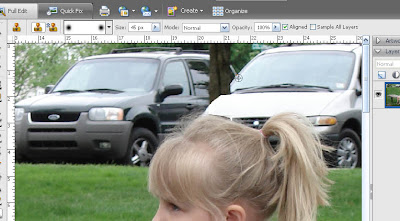
Then I try to clone the SUV window. Since this is a dark image, I stand a pretty good chance of faking it, and carrying the window over the pole. I just play around with the clone stamp until I get a good approximation of what is there. The thing that helps cloning is playing around with the brush size. Try to use a brush size that is as close to the size of the object being erased as possible, so that you don’t have to do it in lots of sections.

Then I try to clone the SUV window. Since this is a dark image, I stand a pretty good chance of faking it, and carrying the window over the pole. I just play around with the clone stamp until I get a good approximation of what is there. The thing that helps cloning is playing around with the brush size. Try to use a brush size that is as close to the size of the object being erased as possible, so that you don’t have to do it in lots of sections.
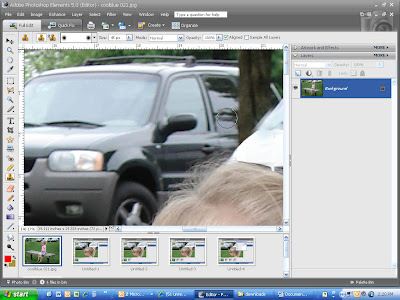
After I get the pole removed from the SUV, I’m done with the hard part. When I move out or zoom out, the photo really looks pretty good. I can get away with this because I have a busy background with a lot of smaller objects going on. This looks better to me. So I can quit here, save the photo and do my page.
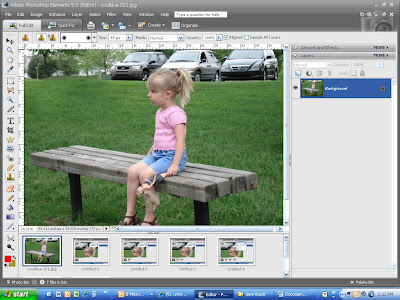
But since I’m here… why not save the photo then play around a little bit more…
So I select the blur tool and I’m going to reduce the impact of all those parked cars. The blur tool is represented by a water drop. It might not be shown in your tool bar, in which case look for the sharpen or smudge tool, and then change the effect.
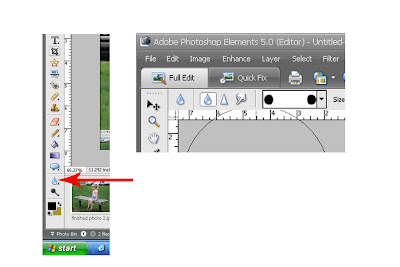
I adjust the size of my brush to cover the vehicles and go over it a few times, until I feel the blur is not distracting but still diminishes the impact of the vehicles.
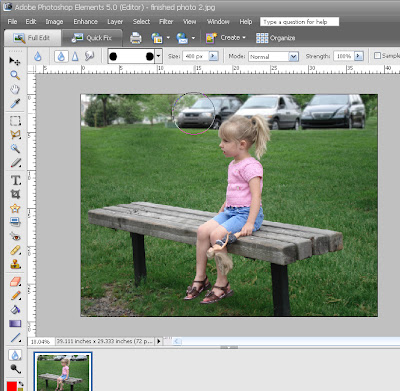
OK, I could go on playing, but you get the point. Have fun!
Here is the finished picture! Ready for my story.

Please give Beth feedback on her tips! Thanks!!!


16 comments:
Wow, this is awesome! Thanks for stepping it out like that; even though everyone's photos are different, of course these are applicable to all sorts of photo issues.
Thank you so much ... I loved this tip.. I love hearing how to use PSE 5.
Joy
I have used DIP for several years and am now switching over to PSE5. All the tips I can get are very appreciated!
Linda
This tutorial was VERY helpful! As a somewhat newbie, you ansered a lot of questions that all the books I've collected didn't quite address. Tks for such a helpful
step-by-step approach!
Leslie
knitterfan1000s@sbcglobal.net
Love this tutorial!! I haven't played around with this *much*- maybe I will be more motivated to do so now!! Thanks!
that was super helpful! i've been trying to figure out how to remove objects for awhile now. thanks for the tip on using short strokes!
:) M
Excellent! Thanks for nice tutorial to correct the flaws in photos. Now I am able preserve the photos of the dear ones(family) even better.
Thanks again!
Great tips. One thing I've been doing with distracting backgrounds is selecting my subjects, then inverting the selection to select everything BUT the subject, then applying a blur filter to make everything but the subject a little blurry. This kind of mirrors the effect of using a wide open setting on your camera lens.
This is an excellent tutorial.
I have been struggling with this topic for a while.
Now there will be no holding me back!
Many, many thanks, Beth.
What a clear and concise tutorial. Excellant, thanks.
thanks. i'll practise this. you could of course have cloned the grass to the top of the photo? what did we do before photoshop...
Thanks for the tutorial
Appreciate every effort to guide or get assisted freebies....and
beside all, what i actually noticed is your cute daughter sitting on the bench....seems sooooooo cute
Excellent tutorial. Made simple and straightforward. Just what we, the 3rd grade guys, need.
Luis
Nice tutorial, but I Want to recommend another easy to use photo retouching software Inpaint:
http://www.theinpaint.com
This kind of editing will really come in handy for shots you upload when selling from microstock agencies websites. Have been using free software up to now but PS is the industry standard really
Post a Comment