Introducing our January Creative Team Guest Member
Introducing our January Creative Team Guest Member: Audrey Prolix
 Tutorial : "Basics of digital scrapbooking"
 Title : "Séducteur"
Supplies list :
- Designer Digitals : - Clean & Grungy stamp by Dana Zarling
- Scibbled Spotches by Katie Pertiet
- Journaling stamps Clean & Grungy by Katie Pertiet
(freeebies on http://www.designerdigitals.com)
- Digitals Designer Essentials : - Lucky Star Alpha Essentials (freebies on http://digitaldesignessentials.com)
- Font : Vivaldi
- PhotoShopElement 4
How-to :
1- Open a 8x8" white LO on PSE4.
2- Open the black splotche, and add it in the middle of the white layer.
3- Open and add your pic (of course, correct its light, its contrast, and if necessary, crop it) in the middle of the splotche.
4- Open and add a stamped frame (here by Dana Zarling) to your pic. Resize it if necessary.
5- Open & add a journaling block on the bottom, at the right of your LO.
6- Add your title, by "gluing" the letters eachother, finishing it on the journaling block.
7- Make your journaling : go on "T" to create a text block, and apply it to your digi journaling block. Choose Vivaldi as a font.
Write by respecting the space from the spotche and the title. Use the "space" touche in order to put your text farer.
Félicitations!
You've got your first basic digi LO with a french touch! ;o)
Prolix
{ThE fReNcH tOuCh}
http://prolix.typepad.fr
Featured Reader: Susan White
Tutorial: A Basic Layout in FxFoto
Tutorial: A Basic Layout in FxFoto
 We will be using FxFoto Creative Edition software and the 100 Percent Boy kit by Katie Mann that comes with it to create the layout you see above. You may, however, use any digital kit and install it directly into your FxFoto using the directions in step 9. Let's get started.
1. Start by clicking on the New button in the upper left corner. This will open a wizard that will step you through setting up the layout.
a. Choose the size you want 8x8 or 12x12 Scrapbooking Page Collage. (Hint: if you are planning to print a 12x12 then choose that size. You can print a 12x12 as an 8x8 however if you print an 8x8 as a 12x12 you may find some things like text and elements may be a bit fuzzy.)
b. Click on File and then look down for the space marked Choose the Left-pane Folder to Use. Click on the down arrow to get a list of all FxFoto folders. From the drop menu, choose the folder named 100 Percent Boy kit which is highlighted in blue below and click on Jump to Folder box.

c. Now click on Continue and the box below will appear. Choose the paper you want and click on Open.

Now your screen should look like the screenshot below. The background paper is surrounded by a green dotted line that marks the edge of the layout. The background paper is fixed within that green line so it is not mobile. Items outside the green line will not be saved when you save your layout as a jpeg so keep things inside it.
 2. Add some elements and papers by clicking on them in the left pane folder. They will open into the right main pane. Go to the folder with your photos and click on one to open it onto the layout.
3. Now let's crop and mat the photo. The white and dark blue papers that you see opened in the screenshot above will be used to mat the photo. The white paper will be on the bottom with the dark blue paper just under the photo.
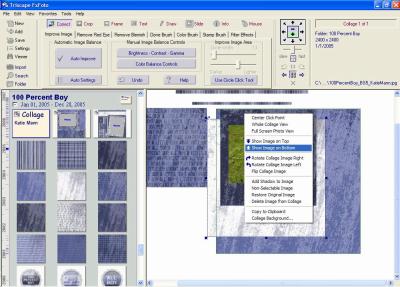
a. Layer the papers - Let's get all the papers in the correct layered order. You can do this after cropping too but I find it is easier to do it before cropping. Start by placing the white paper on the bottom by right clicking on it and choosing Show Image on Bottom. Now right click on the dark blue paper and choose Show Image on Top so it will be on top of the white paper. Right click on the photo and choose Show Image on Top and it will be on top of both papers.
b. Enlarge the papers - Click on the dark blue paper in the right pane to select it, then move your cursor over one of the corners until the diagonal arrow appears. Now click and drag to make the paper larger than the photo. Now do the same with the white paper, making it larger than the dark blue paper. The photo will be on top. It does not matter how big or small the papers are now since you will be able to make them larger or smaller after cropping.
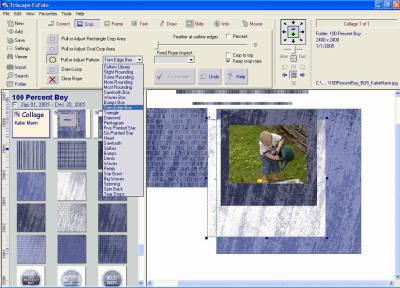
c. Select a Crop Shape - Click on Crop. In the tool box (shown below) click on the Pull or Adjust Pattern button. From the drop menu, choose Torn Edge Box.
d. Crop the papers - click on the dark blue paper to select it. Click and drag the cursor to pull a box that is just a bit bigger than the photo. Note with the Torn Edge Box, the crop line varies as you pull it. Adjust the box by holding your cursor over the center of the blue crop line until an arrow appears, then click and drag to move that side in or out.
Click on Crop to cut the paper. Repeat with the white paper, making the box a bit bigger than the dark blue paper. In the screenshot below, the white paper is in the process of being cropped.

e. Move papers to background and adjust as needed to get the right size.
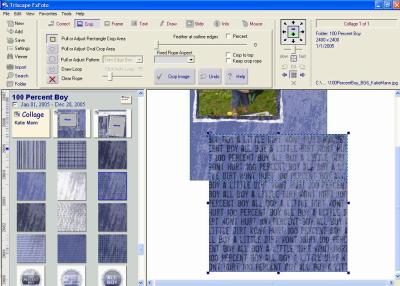
4. Crop the patterned paper (medium blue with writing on it) using a rectangular shape. Click on Crop and click on the Pull or Adjust Rectangular Crop Area and then click and drag the cursor to pull a rectangle. It helps to have the patterned paper as large as the background but moved off to the side slightly so it is easy to see where to crop. Once it is cropped, position the patterned paper on the background.
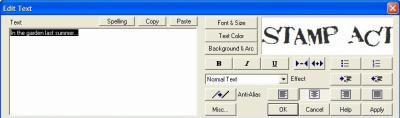
5. Text - Add journaling or text by clicking on Text in the upper tool box. Click on New Text Object and this will open a tool bar (see below) where you can type your text. Select a font, size and color and type in your journaling or title. Use spell check to make sure there aren't any errors. The font used here is Stamp Act.
You can make the text box bigger or smaller using the buttons with the inward arrows (smaller) or outward arrows (bigger). Then click OK and the tool box will disappear. Now grab and move the text box to position it. Make sure the text box does not go over the edge of the background. To edit the text, first click on the Text tab. Now click on the text in your layout to select it and then click on Edit the Selected Existing Text Object.
6. Add elements by clicking on them in the 100 Percent Boy folder in the left pane. Click on the plaid ribbon twice to open two of them. Click on two bottle tops and a cloth tag and whatever else you would like on the layout. Now click on them in the right main pane to resize, move and rotate them.
To arrange the elements as shown in the layout -
a. Bottom ribbon - Right click on one ribbon and choose Show Image on Top. Move it over the edge of the patterned paper and pull out horizontally until the ribbon edge matches the background edge.
b. Vertical ribbon - Right click on the second ribbon and choose Rotate Image Right to make the ribbon vertical. Right click again on it and choose Show Image on Top. Now click on Crop and the Pull or Adjust a Rectangle to crop the ribbon so it meets the horizontal ribbon.
c. Bottle caps - Make them bigger or smaller as you desire and place them in position. You may rotate too by moving cursor over the top left corner until an clockwise arrow appears, then click and drag to rotate. Use right click and Show Image on Top if needed.
d. Cloth tag - resize and rotate. To layer the ribbon, bottle cap and tag, begin with the bottom most layer. So right click on the vertical ribbon and choose Show Image on Top. Right click on the tag and choose Show Image on Top. Move it to cover where the horizontal and vertical ribbon meet. Finally, right click on bottle cap, choose Show Image on Top and then move the cap over the tag.
7. Add shadows to papers and elements by first clicking on the object to be shadowed to select it. Now click on Info along the top tool box. Click on Image Placement and Shadow. Now click on the Add Shadow box. Using the sliders, choose shadow height, darkness and feather as well as color. Then click on Apply.

The same sized shadow may be applied to multiple elements once it is set. After the first shadow is applied, simply right click on the object to be shadowed and choose Apply Shadow.
8. Save your layout. You may save your layout as a collage file, a jpeg (or other file format) or both. Saving the collage file means you can go back and re-edit your layout. Saving the JPEG means that the layout cannot be edited however this is the file format needed for uploading and printing. Saving both as a collage and a jpeg is recommended.
a. Save as a Collage - Click on Save in the upper left corner. Choose Save Collage Wizard. Choose the second option which is Save as New Collage Thumbnail in Left Pane Folder. Choose the folder you want to save it into and type a name for the collage. If you want to save it so you can see a thumbnail of the collage, then check the Show Thumbnail (not name) box as shown below.
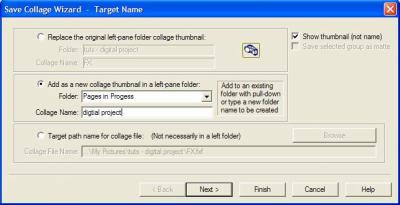
If you would rather see just the name rather than a thumbnail, leave this box unchecked. Click Next and choose Multi-photo Scrapbook page. Click Finish and you have saved the collage file.
b. Save as a JPEG - Click on Save in the upper left corner and choose Save Image As (see box below).

Now click on the Entire Collage button and click Next. The next box will look similar to the one you can see in step 8a. Choose Add as a New Picture in Left pane Folder and click on Finish.
9.Installing a Kit (optional)
You may install any kit into your FxFoto. Installing a zipped kit without unzipping it is the easiest way. Click on the Folder button and then choose Folder Order & Set Up. Click on the Install Zipped Kit button. Now locate the zipped kit and click Open. Use the name of the kit as it appears or create your own name and click OK.
A nice layout in less than 10 steps. Have fun doing your own!
Credits: tutorial written by Susan White; kit is 100 Percent Boy by Katie Mann; font is Stamp Act; photo by Jeanne Doyle
Related links:
FxFoto- Tour Features
FxFoto Tutorials
Using Templates in FxFoto


2 comments:
Thanks so much Julie! It was nice working with you and I just love your blog. Lots of great stuff to do.
I'm so happy to see DH here!!!
Merci Julie!
Post a Comment