How to Achieve Artistic Effects with Your Everyday Photos

Today we continue our focus on Photography, and what to do with everyday photos once they are uploaded to your computer!
Installing and Using Filters in Adobe Photoshop CS2
by Sue Kristoff, Creative Team Member
by Sue Kristoff, Creative Team Member
Featuring Free Software from optikVerve Labs
While the first step in creating stunning photos is in your camera, the second step is in your post processing. One way to improve your photos, or to create artistic effects with your photos is to use filters. Photoshop does include some built in filtering, but there are several third-party filtering suites that can be used to perform a variety of effects.
One set of filters that I use is {the free program} Virtual Photographer by optikVerve Labs. Virtual Photographer is a Photoshop plug-in that adds filtering schemes to the Filter menu. These filters cover both color and black and white schemes. The Virtual Photographer filters are actually complex combinations of several Photoshop functions, and together they allow you to quickly and easily transform your photos. Virtual Photographer is a free application, and can be downloaded from the optikVerve website. In addition, this plug-in is compatible with Photoshop Elements, Paint Shop Pro and other image editing software.
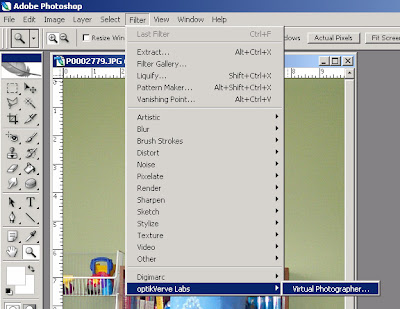
After downloading and extracting the installation file for Virtual Photographer, copy the entire directory into the Filters subdirectory of your Plug-Ins directory for Photoshop CS2. (Note: Installation location will vary depending on your specific software. See the optikVerve website for additional installation details.) The next time you open Photoshop, the Virtual Photographer filters will be available in the Filters menu. (See Figure 1.)

When you open the Virtual Photographer plug-in, you have the option to preview and apply 50 different preset filters, or you can play around with the different settings manually. (See Figure 2.)

The following figures show the effects of several different preset filters.
Figure 3: Raw photo (no filters applied)

Figure 4: Newspaper (B/W)

Figure 5: Photocopy (Color)

Figure 6: Less Tungsten (Color)

Figure 7: Character (B/W)

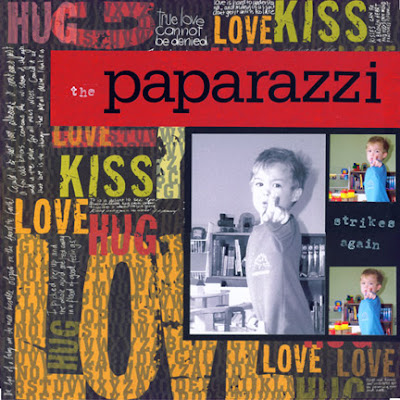
Figure 8: "Paparazzi" Focal photo created with "Newspaper" filter from Virtual Photographer by optikVerve Labs.

Other materials:
Patterned paper: 7Gypsies
Cardstock: Bazzill Basics
Letter stickers: American Crafts
Letter stamps: EK Success
White Ink: Colorbox
If you enjoyed this tutorial, please leave a comment for our designers. You will also enjoy our newsletter!


2 comments:
Thanks so much for the link & tutorial. Can't wait to play with my photos.
I've had this program installed on my computer for a long time, and never knew what to do with it LOL Well, now I know where to begin. Thanks so much =)Hugs
Post a Comment