Custom Photoshop Brush Tutorial So Easy You Will Be in Awe
Special Announcement:
Everyday Digital Scrapbooking is currently featured on Disc Talk Radio.
Dishin' the Digi Coast to Coast
It's free, just register to listen.
Each week, Shanah Gordon and deann McDaniel will take you on a guided tour through the amazing world of digi, spotlighting fun and fabulous finds for all your digital needs...yep, needs! Come along! Don't miss a thing - new shows air each Tuesday.
Read our tutorial and then check out Disc Talk Radio.
Photoshop Brush Tutorial by
Susan Rodriguez, Creative Team Member
How to turn a photo into a PhotoShop brush
This is going to be so easy you will be in awe.
First select a few photos you would like to turn into a brush. My suggestion would be to select photos with mostly a white background. If you do not have any of those available I would suggest deleting as much of the background as possible and filling it in with a white background. See Example below.
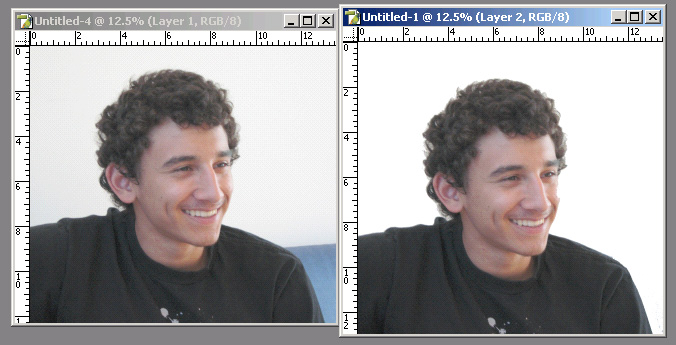
Once you have cleaned up your image make sure you have flattened your image. Click on Layer > Flatten Image. Next you will need to desaturate your image. Click on Image > Adjustments > Desaturate. The image will turn into a black and white image. Now you will need to adjust the brightness/contrast to remove as much grey as possible from the image.
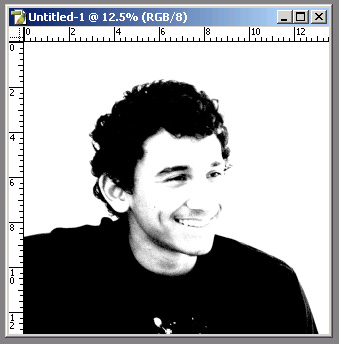
I adjusted my image to +57 brightness and +81 contrast. It really depends on your image on how much you will need to adjust the brightness/contrast.
Now you’re ready to create your brush. Click on Edit > Define Brush Preset. A default name will appear, give your brush a name.

If you want to create a whole set of your own brushes you may want to delete the other brushes already in the set. To do that, open up your brush preset picker, right click on the brushes you wish to delete and click on delete. You will be able to retrieve your brushes again once you load that set of brushes. Once you have deleted all the other brushes continue on with the same process to create more brushes.
Once you have created all the brushes you want in the set click on the brush preset picker (see example below). Click on the brushes menu button, scroll down to save brushes and give your brushes a name.

Imagine all the fun you will have with your own photo Brushes. Enjoy and happy creating.

If you liked this tutorial please let us know by leaving a comment. You would also enjoy signing up for our newsletter!
Categories:
Adobe Photoshop
Advanced
Artistic Photo
Brush - Brushes
Create Your Own Elements
Creative Team Member
CS2
Custom
Photo Editing
Photoshop Elements
PS7


12 comments:
A photo brush....NEVER thought of that...so COOl!!!!! Thank you for sharing that and thank you for the shout out!!!!
And hearty congrats again on your new column...woo hoo....that is the COOLEST!!!!
Shanah
I can't wait to try this!!!
I love this blog!!! I think I might actually be able to do some stuff digitally...thanks everybody for the inspiration!
This is really cool. Always new Bucket (Susan) was multi-talented...just didn't know she was digi-talented as well.
BUCKET You have rocked my world! You make it all sound so easy - Off to sign up for the newsletter now!
can't wait to try it! thanks for the idea!
Loved this JA! I'm going to try this out for WAT tomorrow!
great tutorial - thanks for helping digital scrappers!
i LOVE this!!! on my first try got it RIGHT, thats the first time i could do the tutorial correct the first time!! lol! love love LOVE these photo brushes, NOW i know how those designers do it!!! thank you SO much!!!
very cool!! and such an easy read too, great instructor!
Oh my GOSH!! This is to stinking cool, Holy Mackarolie!! THANKS SO MUCH!! I am just totally jazzed right now!
Absolutely love this idea! Thanks
Post a Comment