How to to Use the Embed Action In Photoshop Elements for Digi Scrapbooking
How to to Use the Embed Action In Photoshop Elements for Digi Scrapbooking
by Julie Ann Shahin
by Julie Ann Shahin
This is a tutorial to show you another option for drop shadowing on elements such as buttons, eyelets, and other things that "attach" to a page. I use the "Embed Action (Style)" from Scrapgirls. This tutorial assumes that you have followed the instructions provided from Scrapgirls on how to install the tool in your styles palette.
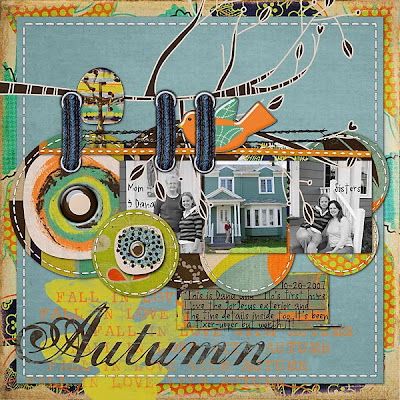
Here is the layout that I am using this tool on. I want to shadow the denim ribbon eyelets.
Step 1. In the Styles & Effects palette on the right, chose Styles, then chose the Embed Action. Make sure the layer you want to use the tool on is selected. In this case, I am using the tool on the left denim ribbon with eyelets.
Step 2. Go to Layer --> Layer Style --> Scale Effects. You can see I adjusted the scale to 30
(Click on image to enlarge)
 You can compare the Embed style with the regular drop shadow which I used on the right denim ribbon. The left ribbon is a more pronounced shadow, which I prefer in this case.
Note: There are 6 different types of this tool. I try different ones until I get the look that I desire. I do not have a rule about which type to use with certain embellishments.
********************************************
In the image below, I have applied the tool to all three ribbons.Next, I'm going to use the Embed Tool Style on a staple. This is the staple before.
Now I've clicked on the tool and the style has been applied to the staple. (You can click on the image to enlarge if you wish).
As I did in Step 2 above, I've adjusted the scale of the tool until I get the desired effect.

********************************************
In my last example, I am going to apply the tool to the epoxy button in the middle of this paper circle. First, I want to duplicate this layer. Second, on the top duplicate layer -I applied the tool to the whole circle as the embellishment .png comes with the button in the middle.

********************************************
Next, on the same layer, since I want the style applied only to the button - I erase or cut away the outer circle. You can erase with the eraser tool or you can create a circle with the circle marquee tool around the button. Then, select inverse, then delete that selection.

********************************************
You can see I've applied the tool to both buttons below.

It's one of my favorite and most used tools that I use! Thanks for your support of the EDS Blog.
 Credits: Falling for Fall by Two Sisters Designs at wearestorytellers.com; Daily Birdie Font by Audrey Neal at wearestorytellers.com; All Stitched Up template by Janet Phillips; Embed
Action 1801 by Scrapgirls
Please leave feedback if you would like more new content on the EDS Blog!
Julie Ann Shahin, Founder


12 comments:
Cool tutorial...too bad I don't have PhotoShop!!
Never knew a style/action like that existed :) Very cool!
I welcome every tip to get a new effect on PSE. Thanks for this one, going to try it out =)
This is amazing thankyou, never knew how people got their elements to look so "real", definitely will try this.
Hello Jody,
Thanks for visiting my blog. You have a cool blog. I didn't know PSE can use action! I downloaded a few but they never work. I will come here to learn some tricks from you.
Liz
I am eager to learn to use the great things available to digital scrapbookers. I have dipped my toe into it but I want to design. I am looking for guidance on how to create realistic looking elements.
hi jody
it all started here..
get your freebies :)
ur blog is so interesting and i gonna add up to my blog buddies..
thanks for dropping by :)
fliffy
http://allthingsvisual.biz/ready-to-party/
Thanx for the tuto!!
Cool effect! Will definitely try to incorporate this in my next layout.
Cheers!
Thanks for the tips, I am going to have to check out that action now :)
Very cool!
Work from home India
Thanks for this one,
electric fence charger
fence posts
horse fence
fence chargers
Post a Comment