Friday, June 08, 2007

Now You Can Get Your Kids to Do Their Chores and Have Fun Too


Help Your Child Create


Their Own Customized Chore Chart

Tutorial by Julie Ann Shahin, Founder


1. To start, go to DLTK's Custom Chore Chart Generator with your child at your side to help make decisions to personalize the chart to his or her tastes. You can print it in color or in black and white so they can color it in themselves.


2. Choose the theme. You can use your own image or one of the themes which include cartoon characters, animals, holidays, or seasons. Click "Next Step"

If you choose your own image to upload, you will be given the prompt to upload in a few steps. For this tutorial, I'm using one of the cartoon characters DLTK offers.


3. Choose Black and White if your child wishes to color in the calendar themselves. Choose color if you wish the chart to print in full color.


4. If you are using your own image, this is the step where you can now upload the image. Otherwise, as you see here - I am given several different options for a Dora The Explorer theme. Pick one and click Next.


5. Ask your child what he/she would like the title of the chore chart to be. Type the name in the box and then select font style, size, and color. Click Next.


6. Create columns for your chore chart. Usually the columns would be the days of the week. Or type the column titles in, with a "comma" between them. Let your child pick the font, size, and color.


7. Create the rows for the chore chart. Enter in the box the names of the child's weekly chores. Allow the child to pick the font, size, and color. Click Finished.

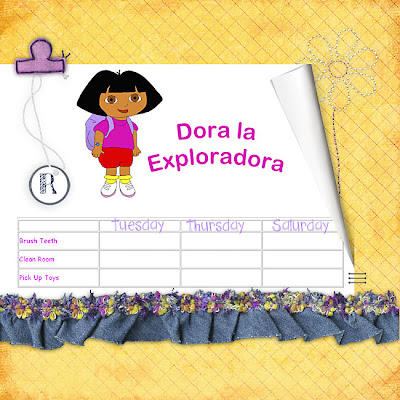
8. Here is your chore chart. Click Print if you would like to print it now. Or follow my instructions in the next step to create a digital layout to print.


9. Instead of printing it, I clicked on the "prt scr" button (print screen). Then I opened up Photoshop Elements. Go to File-->New-->Image from Clipboard. I cropped the image to remove the internet framing. Then I dragged the image onto my digital background paper. Embellish as you wish.


TIP: After printing out your completely embellished image, have it laminated so you can wipe it clean every week.
Please leave feedback for Julie as we work hard everyday to bring you free tutorials.

Related Tutorials: Paper Fold Tutorial


Credits:
Background Paper: Jessica Bolt
Trim: Denim Flowers Ribbon by Amy Martin
Tab : Natalie Braxton
Tag & String: unknown?
Stitching: Sarah Batdorf
Paper Fold: Christine Smith
Staples: Kim Hill
Font: SP Coffee Break, Sketchy
Chore Chart: http://www.dltk-cards.com/chart/


Thursday, June 07, 2007

See How Easily You Can Outfit Your Little Pirate

Shutterfly.com


Arrrrr.....It's Time to Party Me-Hearties!

Pirate Hats to Make and Decorate

by Sue Kristoff, Creative Team Member


Here is a super fun and easy activity for you and your kids. For each hat, you'll need one full sheet of newspaper, some adhesive, and a sheet of pirate hat accessories.


First, download the sheet of pirate hat accessories HERE. Once you have unzipped and opened the file, you can customize the accessories with your colors of choice. Use the paint bucket tool to fill in the feather, or select an item and replace the color. Print out the sheet, and cut out the accessories.

To make the hat, fold the sheet of newspaper in half, and turn it so the fold is at the top. Fold down the top corners to the center and tape the corners down. Turn up the bottom edge on both sides to create the hat brim. Add your accessories to your hat and voila......you're a well accessorized pirate! Or choose a star or crown to become a member of the Royal Navy, sailing the seven seas battling the forces of evil.

I created all of the accessories using built-in shapes in Photoshop PS2, with the exception of the skull and crossbones, which I created from scratch.

This would be great for any day or a great party activity! Please leave Sue feedback as we work hard to bring you free tutorials every weekday! Thanks.

Support This Site


Wednesday, June 06, 2007

See How Easily You Can Make a Hybrid Toy Camera


Shutterfly.com


Checkbox Camera

Kid-Friendly Tutorial by

Angela Spangler, Creative Team Member

Angela Spangler

Cora and I made a quick camera out of a checkbox.

Materials:

Paper to cover the front part of the checkbox
Markers
Foil
Buttons
Paper or foam sheet to make a lens


Instructions:

1. Cover the checkbox with paper. You can print out digital papers and use them for this project.

2. Cut two rectangles out of foil. One is for the flash, and the other is for the viewfinder. Attach them to the front of the camera whereever you like.

3. Attach a button to the top of the camera for the shutter.

4. Cut a piece of foam into a circle for the lens.

5. Let the child decorate until their heart's content.

*Camera craft idea found at about.com*


Please leave feedback for Angela! We work hard to bring you free tutorials! :) Thanks.

Tuesday, June 05, 2007

Father's Day Gift Ideas to Make With Your Kids


Portable Family Album: Hybrid Scrapbooking

Tutorial for You and the Kids

Featuring FxFoto Software by Miss May:

Susan White

Creative Team Guest Member


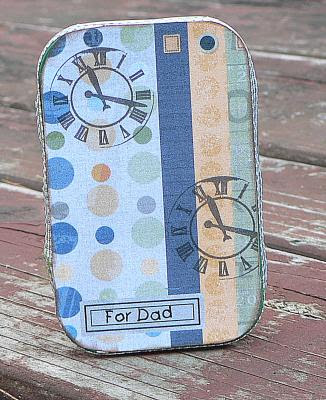
Here’s a great way to carry photos of your family with your when you travel. It would make a great gift for Father’s Day, especially for a Dad who travels a lot. And kids can help make it too. Depending on their age, they can help you choose the papers, elements or they may be able to do the whole thing themselves.


Here’s what you will need:

Altoids Tin, empty and clean
Digital kit – Trainspotting by Rikki Donovan
1/4 in ribbon, one 12 inch piece
Scissors and sharp craft knife
Cardstock for printing, 67 lb
Adhesive
Photos
Ink pad


1. First make the top and bottom which will cover the top and bottom of the tin. These will be made digitally, printed out and adhered to the tin. The directions are written for the software I use (FxFoto) but you can modify them for your own software.

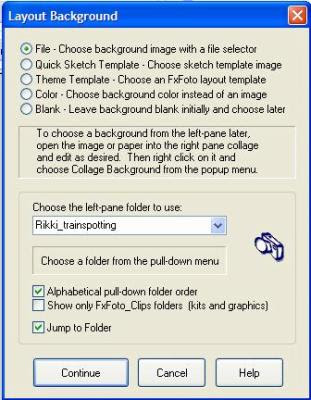
Begin by clicking on the New button and choosing Card. The size for both the top and bottom are the same. Click on Custom Page Size and enter 3.9 inches for height and 2.5 inches for width and click Continue. Here’s what you will see:


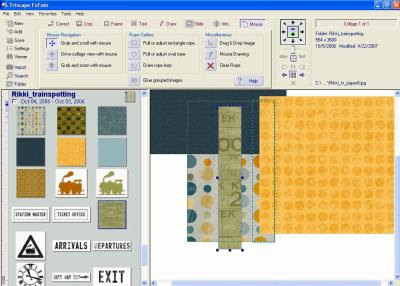
As you see above, check the File box and then choose the folder where you have the Trainspotting kit. Click on Continue and that kit folder will appear. Just choose a background paper and click Open. Now you are all set to add papers and elements as below:


2. Add papers and elements to your layout by clicking on them in the left folder. Move, resize and rotate using the blue grab boxes. Keep elements away from the edges a bit since they may get trimmed off later.

To crop several pieces of paper the same size like the strips of paper, use the Keep Crop Rope feature. First, click on the rectangular shape and pull the box to the desired shape. Now click on the Keep Crop Rope button which is marked below with the red arrow.


The Keep Crop Rope feature means that you can use the same crop rope to cut several papers to they will be exactly the same size. Now cut the paper by clicking on the Crop button. Then the move the paper, click on the Mouse tab and move the cut paper out of the way. Move another paper under the crop rope and go back to the Crop tab and cut that paper. Keep repeating until you have three strips of paper. Here you can see one paper cut and another being moved into position.


When you are done, clear the rope by clicking on the Clear Rope button.

3. Add Text by opening the Text tab and choosing New Text Object. Choose a font – in the example First Grader was used. Don’t forget to spell check! Click on OK and then move text over the title box,

4. Save as a jpeg (Save > Save Image As) and as a collage (Save > Save Collage Wizard). The jpeg is useful for printing and the collage lets you go back and re-edit your layout. Now print out the cover on 67 lb white cardstock. Click on Save and then Print.
At the dialog box below, check the Limit Print Size and type in 3.9 in height and 2.5 in width. Then continue to follow directions.


Support This Site


5. Create the back too. Here I used the same background and changed some elements. Print out back.


6. Cut out front and back by first cutting the rectangular shape. Lay the tin on top of the paper and using the craft knife carefully trim away any excess paper and round the corners. Adhere to top and bottom of tin.

7. Adhere ribbon to the edge of top lid. You may leave the bottom section white or cover it with paper ½ inches wide by 12 inches long. In the example, digital paper from the kit was printed out and used.

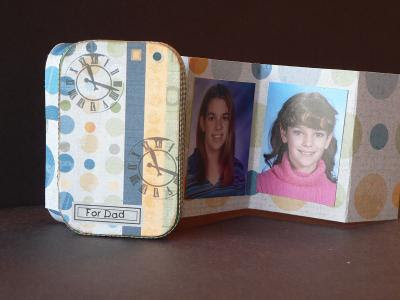
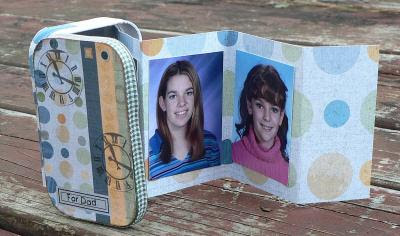
8. To make the accordion album, cut cardstock 3 ¼ inch wide by 11 inches long. Fold it into 2 1/8 inch panels . Cut photos 1 ¾ inches wide by 2 ½ inches high. Adhere first panel to the bottom of tin. Adhere photos on to the rest of the segments.

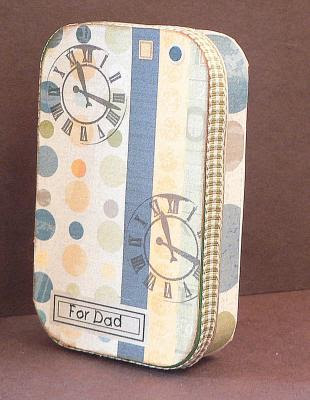
Here’s my Portable Family Album:


Please leave feedback for Susan! Thanks~!

Monday, June 04, 2007

Projects You Can Create with Children!


Polly Put the Kettle On…

Have a Tea Party with Cute Paper Tea Cups!

Hybrid Tutorial by Beth Price,

Creative Team Member

Beth Price
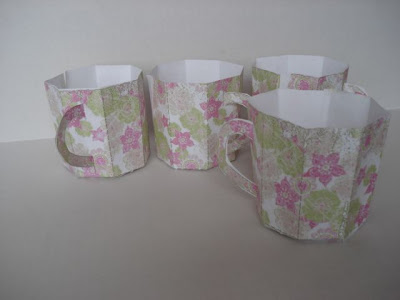
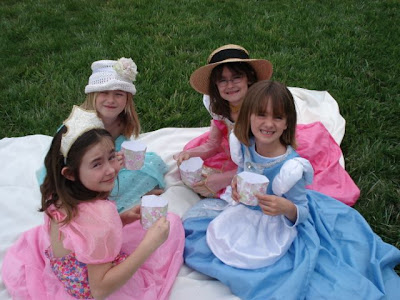
For a fun girl party, make your own paper cups for a girly tea party outside!
Here I tell you how I made this template, and how you can create these cups in a palette of your own choosing.

I found this template online for a cute cup you can print on 8.5” x 11” paper.

Creating the Tea Cup Template
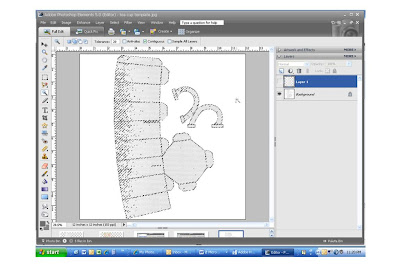
I scanned the template with my scanner, loaded the .jpg file into PSE5, then used the magic wand to select the pattern. I used a Tolerance of 20, and checked contiguous. No anti-alias, No sample all layers. The area should have blinking dotted lines (marching ants) surrounding the template, but not the background.

(Click on image to enlarge if you wish)
Paper Tea Cups by Beth Price For Everyday Digital Scrapbooking blog 1


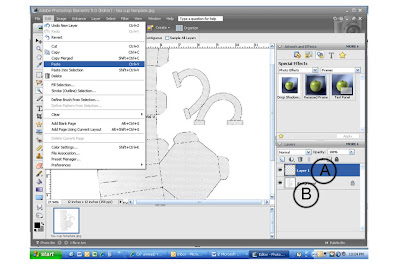
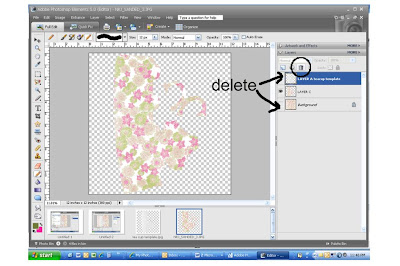
I copy and pasted the pattern into a new layer (A) and deleted the background layer (B) so that I now have a portable template ready to impose on any digital paper.

(Click on image to enlarge if you wish)
Paper Tea Cups by Beth Price For Everyday Digital Scrapbooking blog 2


Putting the Template onto Paper

You can print this template directly onto the back of patterned paper. Then cut out the cup pattern and assemble.

But if you have digital paper you want to use, save ink and only fill the portion you need inside the pattern.
You do that this way –

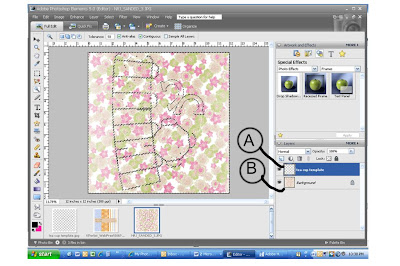
Open both your cup template file (A) and the paper you want to use (B)
Drag the template over the top of the paper and select it with the magic wand.

(Click on image to enlarge if you wish)
Paper Tea Cups by Beth Price For Everyday Digital Scrapbooking blog 3


Support This Site


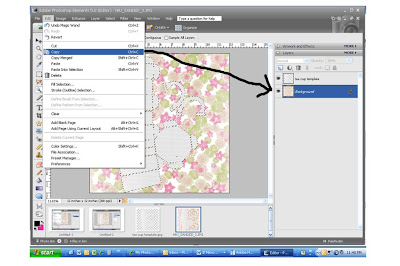
Switch to the pattern paper layer (B)

(Click on image to enlarge if you wish)
Paper Tea Cups by Beth Price For Everyday Digital Scrapbooking blog 4


Select “copy”, open a new layer and paste into the new layer. (C)
Delete the paper layer and the template layer.

(Click on image to enlarge if you wish)
Paper Tea Cups by Beth Price For Everyday Digital Scrapbooking blog 5


You should have a new pattern filled with your digital paper.

To see the fold lines better, I enhanced them this way:
I selected the new pattern
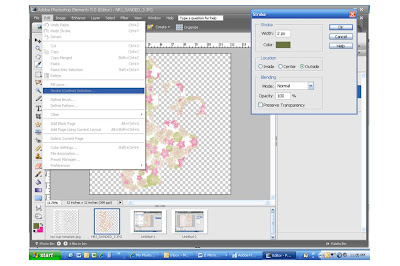
Go to Edit>Stroke (outline) Selection

(Click on image to enlarge if you wish)
Paper Tea Cups by Beth Price For Everyday Digital Scrapbooking blog 6


I chose a color that blends with the pattern, and line size of 2 pixels

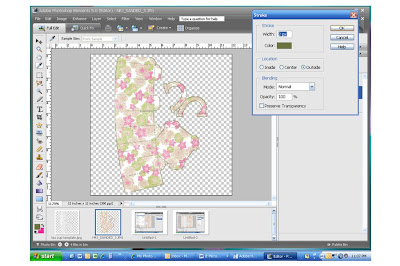
When you hit OK, the lines will appear.
Paper Tea Cups by Beth Price For Everyday Digital Scrapbooking blog 7

Now you’ve got your cups ready to assemble, and girls love a party! These make great party favors or just a fun play date.
Free Teacup Template Download


Please leave Beth feedback as we work hard to bring you free tutorials!