Friday, October 05, 2007

Two Tutorials in One - Find Out How to Use Martha Stewart Stickers


Last Day of EDS Birthday Celebration 2007

Thank you so much to everyone who helped us have a wicked cool week as we celebrate turning one years old at EDS. Remember you have until midnight Pacific time tonight to get your answers in for our trivia contest. Right now we only have a handful of responses so your odds of winning are superb! Continue to this post to enter the RAK contest!
Our newsletter will be sent on Sunday morning (October 7th) where we get to show our appreciation to all EDS Fans with our first ever FREE digital/hybrid kit with over 100 pieces~!
Sign up for our newsletter if you haven't yet in the sidebar of this blog.
Thanks again!
Now for the last birthday-themed tutorial:

Combining Martha Stewart Printable Clipart

with Julie Ann's Bubblewrap Brush

Digital Scrapbooking Tutorial
Did you know you can open Adobe PDF documents in Photoshop Elements to use when scrapbooking? It's too easy so I'll show you how to use clipart stickers from MarthaStewart.com along with tips for using the Bubblewrap Brush I created just for you - which will be in Sunday's FREE kit in the EDS Newsletter.

Instructions for Using PDF Clipart:
1. Go to Martha Stewart's website, click on crafts, and you'll see these stickers. Click on the sticker, then click on download.

2. When the sticker opens in PDF format, click on the button that saves it to your desktop.


3. Open Photoshop Elements Editor. Open the MarthaStewart PDF document you just downloaded. Click on the image icon. I changed the resolution to 300. Click OK. It will open in your PSE Editor workspace.

4. If you wish to print it now with a white background, you may do so now. I'm going to use just a few of these stickers in a digital layout, so I chose not to print at this time.


5. To select just a few stickers to use on my layout, I use the rectagular marquee tool to draw a box around the top six stickers in the upper right corner. (If you are not familar with the marquee tool, Go to Photoshop Elements Help. Type in the search box "rectangular marquee" and read "To Use the Rectangular and Elliptical Marquee Tools").

Once the box is drawn around the stickers you want, click ctrl-c to copy.


6. Next I have opened Amy Duquette's scallopped paper that you will get in Sunday's Free Kit from the Newsletter. Note that this paper is 8x8.

Click ctrl-v to paste the stickers onto the background.
Create a new layer just above the background.
Use the rectangular marquee tool to draw a box around the stickers, but stay on your new layer. Fill that box with the color white.

Continue to create your layout.


Instructions to Use the Bubblewrap Brush from the EDS Free Kit:
1. If you are unfamiliar with how to install and use brushes, please refer to these past tutorials:

How to Load Brushes
Using Brushes

Tip:
I repeat the brush in the same place more than one time so that the color becomes opaque.

To make it look more like real paint, I'll use a filter. Go to Layer Styles, then to Glass Button. I click on Translucent Button.


2. Then I adjust this layer style by going to Layer -->Layer Style--> Scale Effects.

I set the scale to 8. You may play around and adjust it according to your own personal tastes. Alot of great effects come about just by taking the time to play around with the styles, effects and filters. Have fun! Go wild!

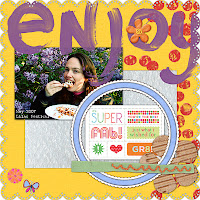
Here is my finished layout using Martha's clipart and my bubblewrap brush.
(click on image to enlarge)
If you enjoyed our birthday week celebration, please let us know! We look forward to your comments. :)

Layout credits:
Background and circle frame: Amy Duquette for EDS Blog
Bubblewrap brush, bubblewrap, felt ribbon: Julie Ann Shahin for EDS Blog
Dough flower and cardboard flower: Sara Amerie for EDS Blog
Butterfly sticker: Julie Kelley for EDS Blog
Stitched flower: Sarah B. Meyer for EDS Blog
Not included in kit: Enjoy brush by Rhonna Farrer 2peas; Stickers by MarthaStewart.com


Mention this ad and get free May Arts Ribbon with your first order at The Shaker Box!

Thursday, October 04, 2007

Hints to Our Free RAK's Contest

WIN FREE RAK's!

Our Creative Team is offering the following

to the winner of our birthday trivia

challenge:

  • Traditional goodies from Michele Ciola
  • Coupon for a free digital kit from Sarah B. Meyer's store
  • Magistical Memories Recent Release Chipboard Goodies from Susan Rodriguez
  • Free digital kit from Di Hickman's store
  • Autographed premiere issue of Scrapbook Dimensions Magazine from Julie Ann Shahin


Join us on our 4th day of our Birthday Bash as we celebrate turning ONE!
Answer the following questions and send your answers to thedigitalproject@gmail.com between Wednesday, October 3rd and Friday, October 5th midnight pacific time.

1. Which EDS Creative Team Member is an engineer? (HINT: see sidebar and click on Creative Team Names for info about them)

2. Which Creative Team Members were introduced to scrapbooking through Creative Memories? (HINT: see sidebar and click on Creative Team Names for info about them)

3. What was the title of our very first tutorial?
(Hint: Have you checked our archives in the sidebar?)

4. How many "Sketches and Templates" tutorials do we have? (Hint: Check out the sidebar under "Labels")

5. Which tutorial is your favorite? (Link please)

All correct answers will be entered into a drawing for free RAK's from the Creative Team
and the winner will be announced in our newsletter on October 7th.
Send your answers via email to thedigitalproject@gmail.com


*******

For those EDS Party Go-ers who like to mingle!

Here's a chance to mingle with our very own Maggie Lamarre and win a RAK at her blog.


How to Make a Delightful Hybrid Birthday Card with a Sketch


Making a Hybrid Birthday Card

Scrapbook Tutorial

by Di Hickman, Creative Team Member

For my birthday card I decided to use a digital template I made previously. You can find the template information here: http://dihickman.blogspot.com/2007/09/card-sketch-sept-4.html

I created the card digital using the EDS birthday kit and added a "Happy Birthday" sentiment


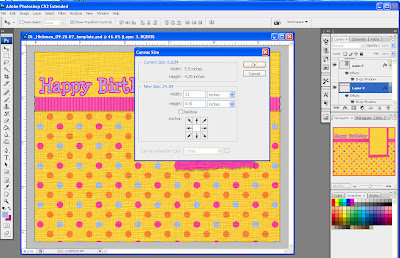
I could just print out as is but I like a little texture to my cards so I decided that I would print the vertical elements separately. To do this I changed the canvas size : image>canvas size and change the width to 11" and height to 8.5" high.

As I was printing onto a letter size sheet I decided to print 2 cards so I duplicated the base, and vertical elements. And laid the vertical elements separately. I then set my printer to borderless printing and printed out onto cardstock.


Once printed I trimmed out the peices and adhered the fronts to card bases. For the first card I trimmed out the pieces and tore the edges then assembled the card adding a flower and brad


supplies: Papers & ribbon: EDS birthday kit; flower: Bazzill; brad: MM

For the next card I decided to leave off the panels and go with a ghost flower and button, layering them onto the card, simple yet effective!


supplies: Papers & ribbon: EDS birthday kit; flower: Heidi Swapp;

So next time you go making cards, think about hybrid!


Mention this ad and get free May Arts Ribbon with your first order at The Shaker Box!
Wednesday, October 03, 2007

Day 3 Of Our Birthday Bash - Win Free RAKs!!!

Layout created using the Free EDS Blog Birthday Kit Coming
To YOU on October 7th in Our Newsletter!
Credits:
Template, Papers, Button: Maggie Lamarre for EDS Blog
Yellow Paper: Sara Amerie for EDS Blog
Bubble-wrap brush: Julie Ann Shahin for EDS Blog
Not included in kit: Beauty Marks by Two Sisters; Fonts: Pea Katie Shea and Palsu; Flip Tape by Tracy Ann; Date Stamp by Amber Clegg Scrap Artist


***
WIN FREE RAK's!

Join us on our 3rd day of our Birthday Bash as we celebrate turning ONE!
Answer the following questions and send your answers to
thedigitalproject@gmail.com between Wednesday, October 3rd and Friday, October 5th midnight pacific time.

1. Which EDS Creative Team Member is an engineer?
2. Which Creative Team Members were introduced to scrapbooking through Creative Memories?
3. What was the title of our very first tutorial?
4. How many "Sketches and Templates" tutorials do we have?
5. Which tutorial is your favorite? (Link please)

All correct answers will be entered into a drawing for free RAK's from the Creative Team
and the winner will be announced in our newsletter on October 7th.
Send your answers via email to thedigitalproject@gmail.com


How to Use our Free Kit to Create a Birthday Thank You Card


Birthday Thank You Card Tutorial

Featuring the October 7th Free Kit from EDS Creative Team

How-to by Sarah B. Meyer


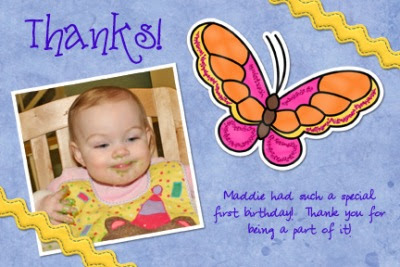
Anytime you receive a birthday gift you can't forget to say thanks! Make an extra special thank you card using a picture of the recipient enjoying the gift or just having a great time!

I've used the EDS Birthday kit and made this a 4x6 page for easy printing and mailing 300ppi for printing or resize to 72ppi for emailing.

These screenshots are from Photoshop CS3.

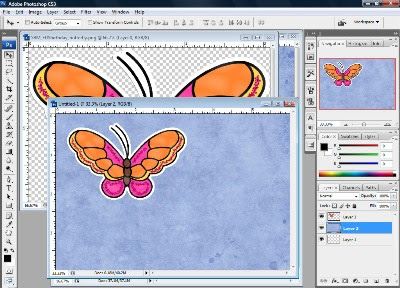
1. Open a 300ppi canvas that is 4 inches tall and 6 inches wide. Pull in all the materials you want to use on to your canvas. I've used my own butterfly sticker and Sara Amarie's light blue paper.


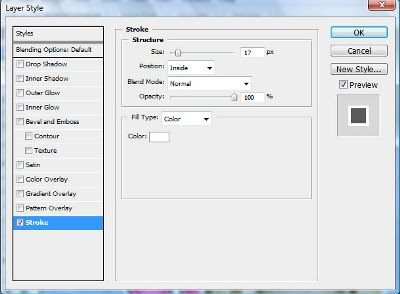
2. Bring in your photo and resize/crop as desired. I added a 17px white inner stroke to the photo as shown in the screenshot below. I also added a slight drop shadow to the photo.


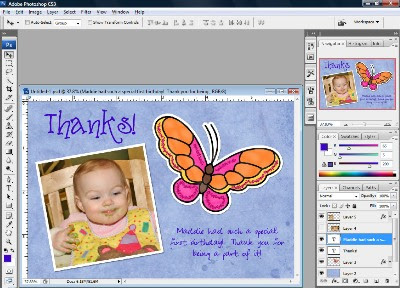
3. Rotate with Free Trasform (Ctrl+T) and move into desired position.

4. With the Type tool (T) add a title and your message. I used Pea Stacy and Pea Shirley for the fonts.


5. My page still needed a little accessorizing, so I brought in some stitched rickrack by Amy Duquette (Digi-Mac Designs), placed it at the corners and added a slight drop shadow.

6. That's it! You can print it yourself of with your favorite photo processor, or reduce the Image Size (Alt+Ctrl+I) and save it as a jpg to email!


Mention this ad and get free May Arts Ribbon with your first order at The Shaker Box!

Tuesday, October 02, 2007

Testing 1,2,3 - Did you get an EDS newsletter today?


Hi to all our EDS Friends!
If you did not receive a newsletter from us today, and would like to get the newsletter that comes out on Sunday, October 7 with the FREE DIGITAL KIT - then I need you to follow these instructions:

1. Check your spam folder for the EDS Newsletter
2. If it is not in your spam folder, then sign up in the sidebar

Thanks!
EDS Team

Day 2 Of Birthday Bash

Free Kit Available At The End of the Week in Our Newsletter

EDS Birthday Blog Party Day 2

Thank you to the following EDS Friends who left a link to their blog.
Please take a moment to check out their blogs, mingle like good party guests, and leave a friendly hello!

colleen
kelli
yezenia
cindy
juls
brooke
aimeslee
bucket
cpbunch
maggie
di
beth
julie k

Join us all week as we celebrate our first ever birthday. Add to our party by linking your blog in our comments section.

The 50th person this week to add a link to their hybrid or digital tutorial will receive an extra special RAK.
Please add your link in our comments section. At the end of the week one of these persons will be awarded the title of Guest CT member for the EDS Blog for November, December and January!

Be sure to party and mingle with all those linking our blogs.
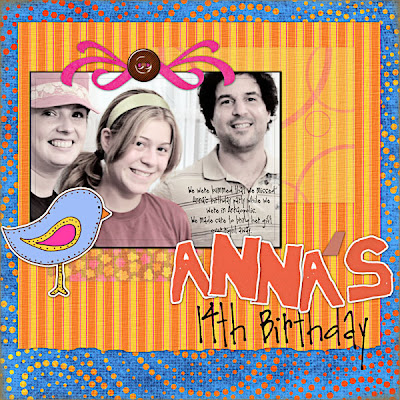
My niece just turned 14 in September.
Layout created with the EDS Blog Birthday Kit - free to all newsletter subscribers.
Newsletter will be sent on October 7th.
Credits: Template: Michele Ciola for EDS Blog
Blue paper, bird sticker: Julie Kelley for EDS Blog
Other papers: Di Hickman for EDS Blog
Button: Maggie Lamarre for EDS Blog
Alphabet: Julie Ann Shahin for EDS Blog
Font not included in kit: AMC Chatty available at Scrapgirls


Now we will share a new birthday-themed tutorial for all our party guests!
************


Digital Scrapbooking Tutorial by Maggie Lamarre, Creative Team Member
Using the EDS Blog Birthday Kit

Hi Everyone:
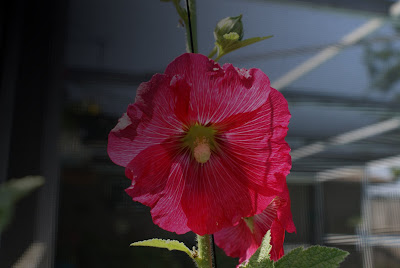
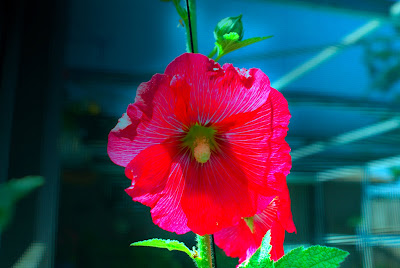
I have been trying to figure out what every single options in PS does and have discovered some great tricks.

Today I will go over vector mask and match color mode and what they do, and how you can use them to improve your pictures.

  • Vector mask are great for defining images and it is sharper than using layer mask.
  • Match Color is used to match colors between several layers. I mainly use it to tweak the colours in my image precisely to a colour I have in mind. It is also great for correcting colour cast or to add luminance to a picture.

Let’s begin
  • Open an image in my case I wanted to mask my pool screen enclosure and have the flower really pop only in certain areas and have a greater depth of field.


1.make a copy of the image, then select image, mode turn the picture into grayscale.
2.convert the image back into RGB.

3. paste the other copy onto the layer so now you should have a grayscale layer
and colour layer.

3.Now on the colour layer selected we are going to choose Vector Mask under
Layer select reveal all.
4.Now you should see the mask on the layer.
5.Select the gradient tool from the tool menu and select transparent or black depending on how much you want to mask, and apply.

Here’s where the fun really begins


6.on the layer with the mask, select image adjustment and select match color.

7.Now if the image has an unnatural colour cast you can click on the neutralize and adjust to your liking.

8.We are going to play with the colours a bit here, make sure preview is selected.

9.On the slider for color intensity slide to the right to pop to tone it down slide to the left.

10.if too much colour you can adjust the fade which works similar to the fill option in the layer palette.

11.As this point you can adjust the luminance as well and it ok, if you want more pop like I did on this pic I use the burn tool, once satisfied I turned the layers into a smart object and save.


Have fun create your ART,
Maggie Lamarre


Please join our party!!!

Monday, October 01, 2007

It's Party Time! Celebrate EDS Turning One Years Old


Hi all! I'm Julie Ann Shahin and one year ago today I debuted the Everyday Digital Scrapbooking Idea Blog with the help of my fabulous Creative Team. Join us all week as we celebrate our first ever birthday. Add to our party by linking your blog in our comments section.

The 50th person this week to add a link to their hybrid or digital tutorial will receive an extra special RAK.
Please add your link in our comments section. At the end of the week one of these persons will be awarded the title of Guest CT member for the EDS Blog for November, December and January!

Be sure to party and mingle with all those linking our blogs. I'm very excited to share with you a piece of birthday cake made by our own Sarah B. Meyer! All the items in that layout above will be in our big free kit that you will get at the end of this week if you are signed up for the newsletter! (except the stitching).


This kit has been created by Sara Amerie, Amy Duquette, Beth Price, Di Hickman, Julie Ann Shahin, Julie Kelley, Maggie Lamarre, Michele Ciola, Sarah B. Meyer, Sue Kristoff, and Susan Rodgriguez.


Help our blog party run smoothly - it will be most helpful for you to leave a comment on this post, link to your blog, tell us where you live and I will be updating this blog with those links. At the end of the day if you do not see your blog listed, but you have left a post - please email me at thedigitalproject@gmail.com.


So back to our party! I'm so glad you could join us. Take a look around and then join us for cake!


After you've mingled a bit....let us show you the first of our birthday-themed tutorials we are sharing this week!


Party Bag Toppers by Susan Rodriguez, Creative Team Member

For this tutorial I will be creating Party Bag Toppers. This would save you a lot of time if you had lots of little ones or older ones coming over for the big day.

Create an image that will fit on your party baggie. I am creating mine at a 4 x 8 resolution at 300. When creating your baggie topper make sure you make a mental note of where your crease will go. If you are creating an image both on the front and back of your baggie topper, your front image should be create anywhere between the 4.25 & 8 inch marks. The back of your baggie will be created anywhere between the 0 and 3.75 inch mark. I am leaving a .5 inch allowance for the fold.


Have fun with creating the front.

Remember for the back of the tag you will have to create your image upside down. I rotated my canvas at 180 to make this easier. Click on Image – Rotate Canvas – 180.


I had a lot of fun creating this party bag topper. Here is my completed image.


Print image on heavy card stock or glue on to heavy cardstock and staple on to baggie. I think your guest will get a kick out of this. Plus imagine all the time you will save!!


Please visit the blogs of our Creative Team:

Amy Duquette
Beth Price
Di Hickman
Julie Ann Shahin
Julie Kelley
Maggie Lamarre
Michele Ciola
Sarah B. Meyer
Sue Kristoff
Susan Rodriguez