Friday, January 19, 2007

How to Print 12x12 even if You Don't Have a Wide Format Printer


Photobucket - Video and Image Hosting

Tutorial by Julie Ann Shahin,
Creative Team Member
What do you do when you want to create a 12x12 layout using digital products however you do not have a large format printer? I will show you how to print and use digital paper for use in scrapbooking. You will need white paper that is 12x12. It can be white on both sides or you can print on the white side of printed paper. The paper and overlay I am using was downloaded from Designer Digitals.

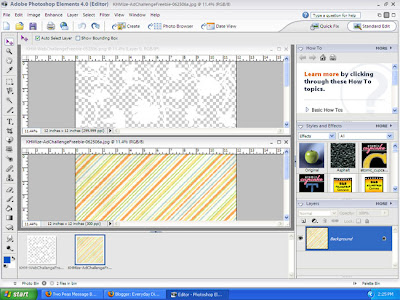
1. Open the paper of your choice from a digital kit. Here I have also opened a digital overlay or transparency. I will drag the overlay onto the striped paper to create a customized look.


Take the actual paper that you will be printing on and crop it to 8.5x12 inches with your trimmer. Bring both this piece and the left over piece that is 3.5x12 inches to your printer.

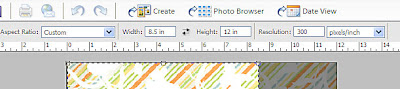
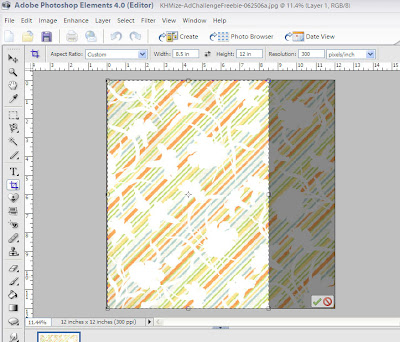
4. Set the crop tool for 8.5 inches x 12 inches, resolution 300. Drag the crop tool from the upper left corner to the bottom. Click on the check mark to crop.


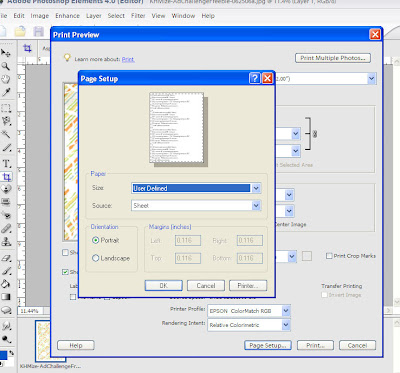
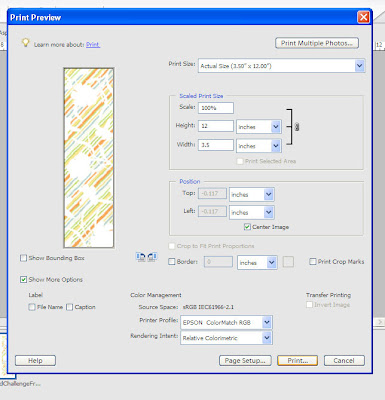
5. Click on File --> Print. In the preview window, click on Page Setup. With the "Size" drop-down menu, choose "User-Defined." Click ok.


6. Click PRINT. If you get a pop-up that says that some clipping will occur, click ok.
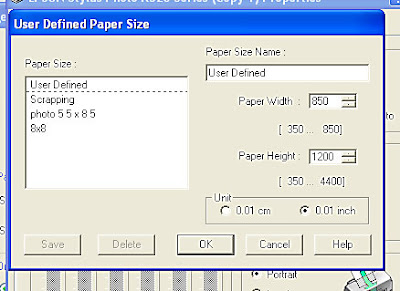
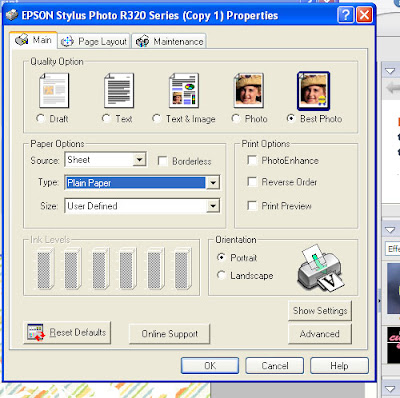
7. Click on Properties in the dialog box. In the Paper Options field, click on the drop-down menu for size and choose here "User-Defined" and you will get a box that alllows you to put in the dimensions. Type 850 for width and 1200 for height. Click OK.


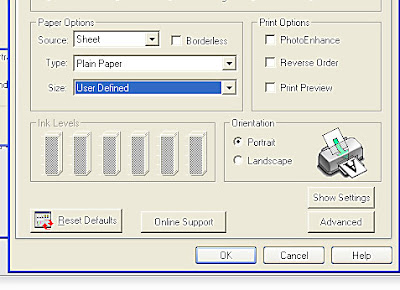
8. Set Quality for Best Photo. Select the Paper Type. My paper is not cardstock so I chose "plain paper." Click ok to print.


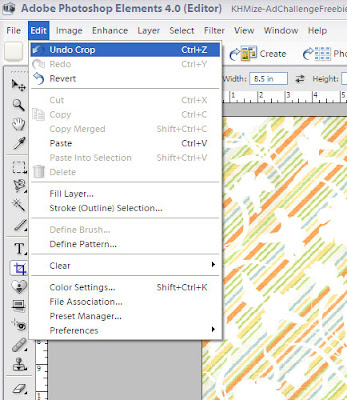
9. After the sheet has printed, go to your document in Photoshop. Go to Edit --> Undo Crop. (ctrl-z)


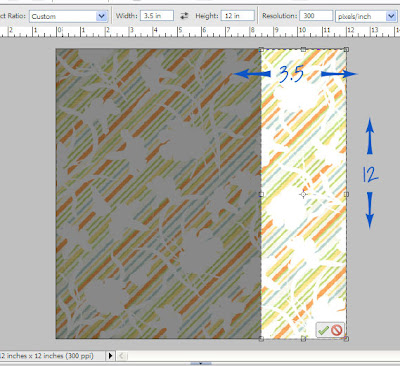
10. Now we will crop for the left-over piece of paper. Set the crop tool at width: 3.5 inches and height: 12 inches, resolution 300 pixels/inch. Click the check mark to crop.


11. Repeat Steps Five and Six.
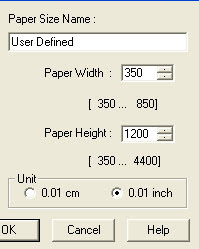
12. Repeat Step Seven except now we will enter 350 and 1200 as the values for the size of the paper.


13. Repeat Step Eight. Now you have your own customized paper to create a hybrid layout, and if you printed on the back of printed paper you now have awesome two-sided paper! Have fun!

Since my printer does not print all the way to the edges, I will just plan my design to have a cardstock base with these new printed papers.

If you like this tutorial, please leave a comment. Enjoy your new digital knowledge!


Thursday, January 18, 2007

How to Print Digital Papers at Home to Create Home Decor


Photobucket - Video and Image Hosting


Introducing our first sponsor: Jill D-Zines!
Your ad could appear here too! Details below.


Layout created with our sponsor's kit
by Julie Ann Shahin
Additional credits: Journaling tag by Jen Wilson Designs; Inked edge by Jan Crowley

Advertising Details
I am looking for a way to compensate the talented ladies on my Everyday Digital Team. Since I do not have a store nor do I design kits, I am looking for advertisers.

Digital Kit Designers: In exchange for a month of free advertising space on the blog, I would ask that you send a full-digital kit worth $15 to each of my team members (total number of 10 which includes a monthly guest member.) You would get triple exposure with space on my blog, the designers could use your kits, and you would have a space in the weekly newsletter for 4 weeks.

If you are not a digital kit designer and would like to consider advertising with us, please contact me for payment details.


Please contact me at thedigitalproject@gmail.com
I will give you the space size at that time.
There is also a cash option if you are unable to compensate with digital kits.

ETA: Your kit is subject to approval by me.

Thank you,
Julie Ann Shahin, Founder/Editor Everyday Digital


Home Decor Tutorial by Maggie Lamarre,
Creative Team Member
The main question I get asked as a Digital Artist is what do you do with your lo's?

I usually save them on disk and turn them into slide shows or incorporate them

into flip album and give as Digital album.
Lately I have been printing my lo into album and home decor.

Here are a few tips to get you going.
First before starting any printing project I strongly recommend following

the mfg guidelines to clean the cartridges.
Sometimes after having the cartridges in the printer for a prolong period of time

they will get clogged. Cleaning the cartridges and self test the printer will insure a happy ending.
I suggest printing 1 test page of your lo in draft mode to proof it before printing the project.
Select the correct paper for the project in the printer window, i.e. cardstock and photo paper. Another important thing is to follow the mfg recommended weight for paper as well. Having the wrong weight will produce paper jams.
Once a month I turn my printer upside down to make sure nothing has fallen into it or there's no little pieces of paper sticking in there.


Supply list used

Paper Antique_Flaminco, Antique_Env, Tag Antique kit@Dragonflaire.com

Charm is by KI memories, ribbon Joann Fabric

Instructions

I measured the candle width and height.

Printed the first paper full width and height

Printed the second 2/3

Printed the accent piece 1/2

I tear the papers then glued

Addhere the ribbon add the tag and ink the edges using Tim Holtz distress Ink Vintage photo.

Added the charm to the tag.
Voila!
Have fun create your ART!

Wednesday, January 17, 2007

How to Use a Digi Kit to Print at Home for a Hybrid Layout

Tutorial by Audrey Lafontaine-Leprêtre aka Prolix,
Janauary Creative Team Guest Member


As I've got PSE4 in french, maybe I haven't got the same technical words than you.

Title : "Flan Parisien" (it's a name of french typical cake)
Type of LO : hybrid


List of supplies :
- Patterned paper : Motifica Clay Motif Cut Off Strip by Basic Grey
- Brads by Doodlebugs
- Adhesives stones (strass) by Make Me! by Kars
- Uniball Signo 0.7 black gel ink pen
- Clairefontaine Paper Touch sky blue plain paper
- Acrylic paint by La Maison à Loisir in Yellow and Orange
- Crackle Accents by Ranger
- Lollipop letters Lollipop Shoppe Cut Off Strip by Basic Grey
- Foam Stamps Jersey by Making Memories
- "Echoes of Asia" digital kit by Jessica Sprague, offered by Creating Keepsakes Magazine (Volume 12 / Issue 1 / January 2007)
- PhotoShopElement 4
- Fiskars punch

How-to :

1- Take 2 pics of your choices, telling a story, and open it into PSE4.
Open the main pic and correct the light and the contrast.
2- Open the digital kit and take the frame. Add it to the pic.
3- Open the journaling block from the kit and add it to the pic on the top, on the right.
4- Take the 3 flowers from the digi kit, reduce their size if necessary and add them under the journaling block.
5- Take a semi-solid paper (I choose the turquoise one) to create a mat, for your 2nd pic. Change its size, in order to adapt it to the 2nd pic.
6- Add the 2° pic on the mat you'd just create, by letting some blue paper appearing around it : the mat is here!!!
7- Open another frame, for adding it to this other pic.
8- Your pic is ready to be printed into a big size (A4 format for me = 21x29,7 cm).

9- Glue a strip of blue paper under the left side of the pic printed. Cut waves, circles or whatever you want to create a funny design!
As you can see, I added some holes with my punch, to create a lace motif!
10- Add the brads in the middle of each digital flowers.
11- Adhere the pic to the patterned paper.
12- Adhere some adhesive strass to your pic (you see I added one on my face, as a bindhi, for an indian touch).
13- Draw some doodles to the pic thanks to the Uniball pen. I wrote the journaling on the piece of cake!
Write the recipe on the journaling block for example.
14- Stamps your title with the foam stamps and acrylic paint. First with orange. After add some dots of yellow acrylic paint inside the letters.
15- Put Crackle Accent inside the letters. Let dry.
16- Adhere stickers alphas under these letters. Put some strass instead of "i" points.

Et voilàààà! C'est fini!!!

Have fun! Be artsy!

;oD

Prolix
{ThE fReNcH tOuCh}
http://prolix.typepad.fr
Audrey Lafontaine-Leprêtre

Tuesday, January 16, 2007

How to Create a Pattern for Hand-Cutting Titles: A Hybrid Scrapbooking Tip

Creating a Pattern for Hand-Cutting a Title Using Adobe Photoshop CS2
by Sue Kristoff - Creative Team Member

One way to create a custom title for your layouts is to hand cut the letters. This allows you to use any size letter, any paper and any font with enough weight to hold up to the cutting process. This tutorial will show you how to quickly and easily create a cutting pattern using Adobe Photoshop CS2. I love to handcut my titles because I can create titles that really mesh well with my layout. I don't have to search for die cuts that match, or limit myself to certain sizes.

The first step is to select a font and create your text. I generally start with a 8.5"x11" canvas at 72 dpi. High resolution is not required for this process. It is important to choose a "thick" font. For this tutorial, I used the font Bambi Bold (available free at http://www.dafont.com). The font needs to have enough heft to maintain its shape while you cut it out. When you are creating your text, it is helpful, but not necessary to create your text in a color other than black to facilitate one of the later steps. (Figure 1)


The second step is to rasterize the type. This coverts the letters from text into shapes, which can then be manipulated in ways that text can't. This is done by Layer>Rasterize>Type.

Step Three is to create a stroked outline around the letters. This is done by Edit>Stroke. For a 72 dpi image I set the stroke at 2 pixels, on the outside of the shapes. For higher resolution canvases, increase the stroke width so it remains visible (I use 4 pixels for a 300 dpi canvas). I also change the color to black, so it is easier to see the stroke outline. (Figure 2)


Once you have your stroke outline, Step Four is to use the Magic Wand tool and select each of the letters while holding down the Shift key, until all of the letters are selected. (Figure 3)


Once they are all selected, hit the Delete key. This will clear the font and leave the stroke outline. While Steps 3 and 4 are not required, it does drastically cut down on the amount of ink or toner required to print your pattern, and if you are using very large, chunky fonts, that could be a lot of ink or toner. (Figure 4)

The final step is to flip the text so it is reversed. This is done by Edit>Transform>Flip Horizontal. This step allows you to print directly onto the back of the paper you will be cutting the letters from. You can also print the pattern onto regular paper and adhere it to whatever material you will be cutting the letters from. (Figure 5)


Layout - "Let them eat cake"
Materials:
Patterned paper, tags: Fancy Pants
Paper for title: Provo Craft
Cardstock: Bazzill, Making Memories
Brad, letter stickers: Making Memories
Ribbon: Lil Davis
Font: Bambi Bold (available free at http://www.dafont.com)

Monday, January 15, 2007

How to Print Photos and Digital Layouts at Home with These Tips

This week's focus here at Everyday Digital is Printing at Home.

Tutorial by Susan Rodriguez, Creative Team Member
Printing your photos at home

One thing you do need to know about is what is the maximum print size allowable for your mega pixel resolution? Below is a small cheat sheet sort of chart you can follow.


If you try printing an image, that is 1152 x 864 or smaller, as an 8 x 10 chances are image will come a bit blurry and not at all clear. Follow your printer’s instructions on printing your photos.

If you want to make sure your pictures last make sure you take some time to investigate your photo paper. Below is a Chart taken from an article by Wilhelm Imaging Research [article link - http://www.wilhelm-research.com/hardcopy/WIR_AftermarketTests2006_05.pdf]


Click on image to enlarge to read.

Take the time to read your printers instruction manual and especially take the time to investigate your photo paper. While we are all looking for economical ways to print our photos, we also want our photos to last.


Resources:
Printing Article by Scrapjazz
Scrapgirls University: Printing Your Digital Layouts